Intro
Vulnerability triage is the process of evaluating and prioritizing security vulnerabilities. This involves assessing each vulnerability’s severity, potential impact, and exploitability. Phoenix allows security teams to tackle the most pressing issues first and allocate resources effectively with contextualised prioritisation.
The difference between a Vulnerability and a Finding:
At Phoenix Security, we define a specific vulnerability using both a CVE and a CWE using a mapping system to uniquely group findings together. A finding specifies the location of the vulnerability, meaning there can be many findings within a vulnerability, as the same CVE/CWE can be found across multiple assets/locations. This approach to grouping findings under a single CVE/CWE enables patches to be applied across all locations simultaneously. A vulnerability can be searched by
Save commonly used filter combinations to make searching even faster. For advanced filtering there is an option to “Show Excluded options” which act as a BUT NOT condition.
1. Analysis of Teams dashboard
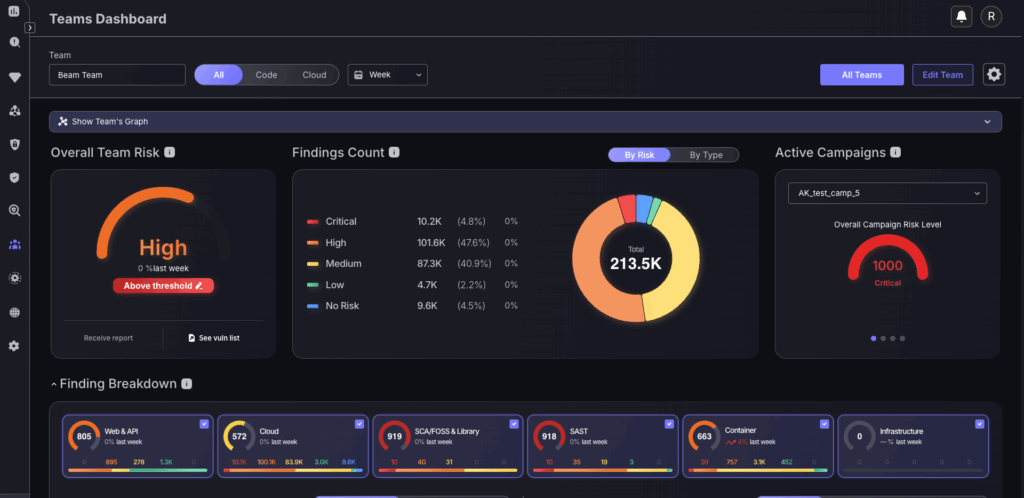
As a security or engineering team member, the triage process begins with your team’s dashboard, a real-time view of what matters most. Metrics don’t just report risk; they frame where to act. From unresolved criticals to SLA breaches, the dashboard surfaces the data points that demand attention. It’s your operational starting line. Your responsibility is to turn that visibility into action. That means understanding the dashboard metrics, prioritising the right vulnerabilities, triaging efficiently, and ensuring issues are ticketed and moving toward resolution. Control isn’t about seeing everything—it’s about knowing what to act on, and doing it with precision. The ultimate measure of success? Executives who know your team has control, because the metrics prove it.
Navigation
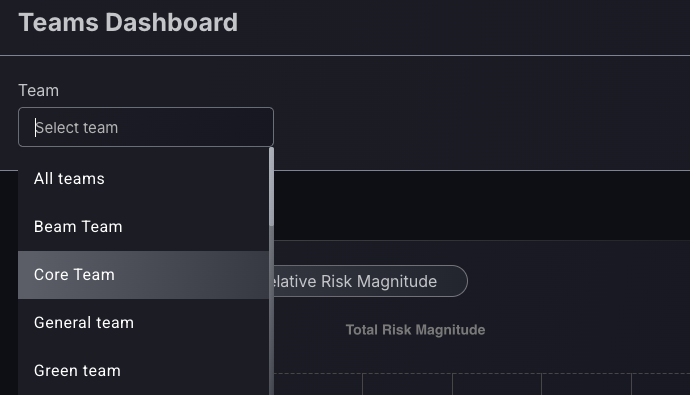
Select your team from the Team drop-down to get to your team’s dashboard.
Basic use cases for effective triaging:
1. Triaging criticals
The most effective way to reduce your teams risk level and hence resolve the most pressing vulnerabilities is to triage the most critical vulnerabilities.
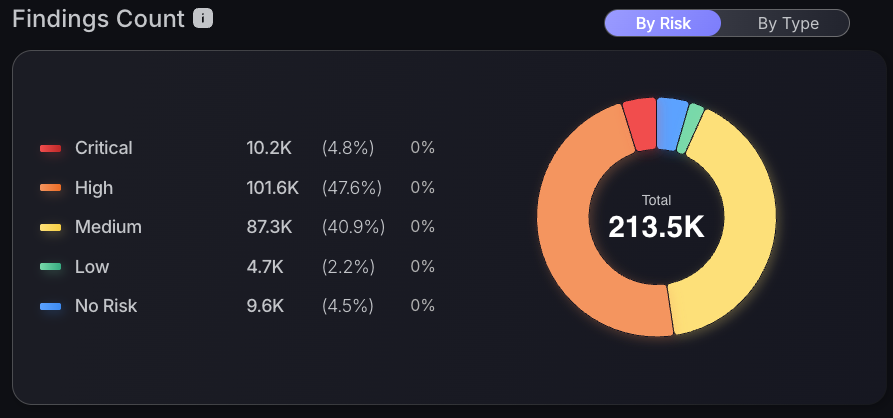
To do this, use the Findings Count chart, which has interactive features to shortcut you to the vulnerabilities page with adequate filters. Click on any severity level, but to have the biggest impact on the team, click on the criticals to shortcut you to the findings page with the critical risk level and team name filter applied.
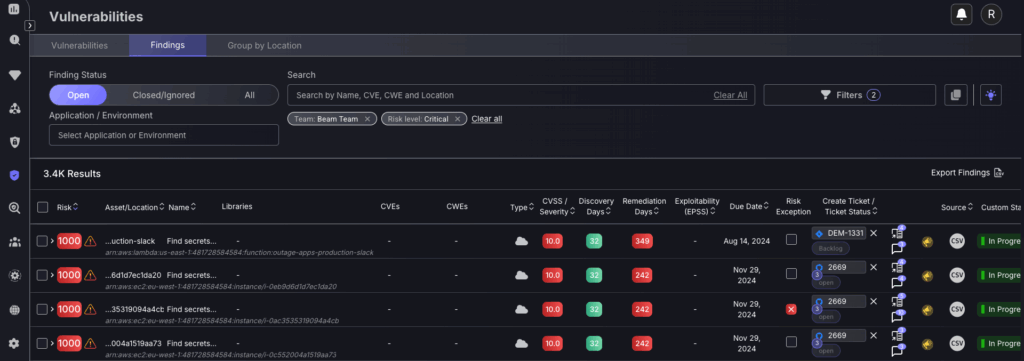
The vulnerabilities page will display a contextualised table of the most urgent critical vulnerabilities at the top for triaging. Follow the steps from 2. Analysis of findings to continue with the triaging process.
2. Critical assets
Use the Top 10 vulnerable Assets table to effectively triage the most critical assets that need to be addressed, ensuring there is equal prioritisation across the entirety of your vulnerabilities and not just one specific area. It is also advised to use the scope toggle at the top of the screen to toggle between Code and Cloud assets. Click on any asset to shortcut to the vulnerabilities page, with the recommended asset to fix being at the top of the table.

The vulnerabilities page will display a contextualised table of the most urgent critical vulnerabilities at the top for triaging. Follow the steps from 2. Analysis of findings to continue with the triaging process.
Advanced use cases for triaging
1. Correlation type filtering
Using the correlation type filter allows you to triage findings based on if they are from the source or are deployed. Filtering findings this way enables you to view the more critical, fixable findings within source, without the noise of having container findings. Recommended configuration for source findings prioritisation:
Use the Correlation type: Source along with your team or application/deployment filters.


This enables you to prioritise the source findings without the unwanted noise of duplicate container findings that are less critical. For example, the two container findings below are libraries appearing in container, which shouldn’t be prioritised.
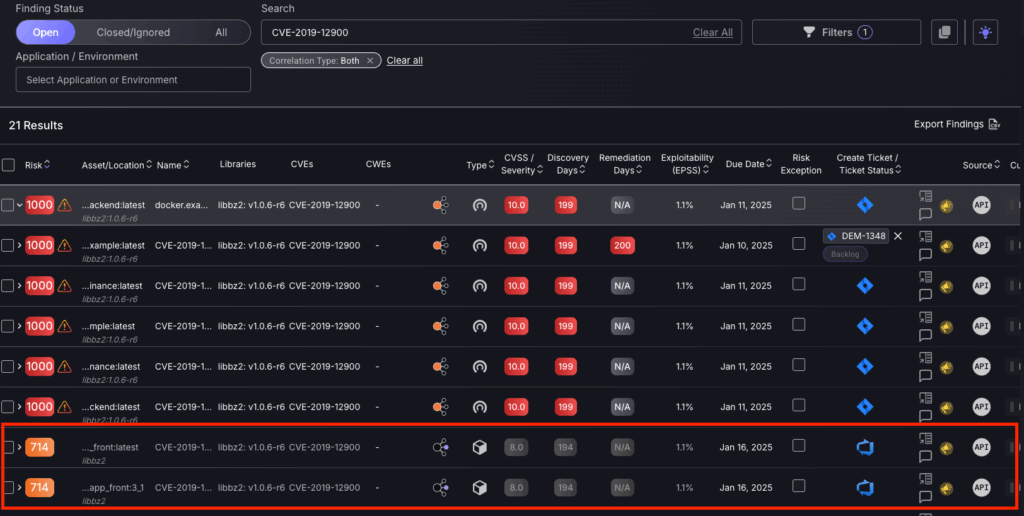
Another and more effective way to ignore container findings is to use the BUT NOT filter for Correlation Type: Deployed. This ensures unwanted container findings aren’t prioritised, as well as displaying all other findings other than source. This BUT NOT filtering option should be used when source code findings aren’t the highest priority, but deployed container findings should be ignored.


2. Threat intelligence filtering
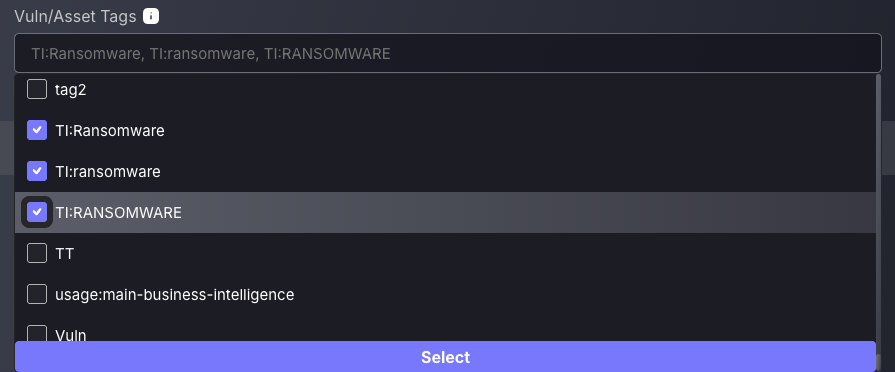
One of the most critical threats is ransomware. Phoenix uses threat intel to automatically assign tags to the findings identified as vulnerable to ransomware attacks. To leverage this tagging system, use the filter by vulnerability/asset tags feature to view the most critical findings by ransomware attack likelihood.
3. Exploitability filtering
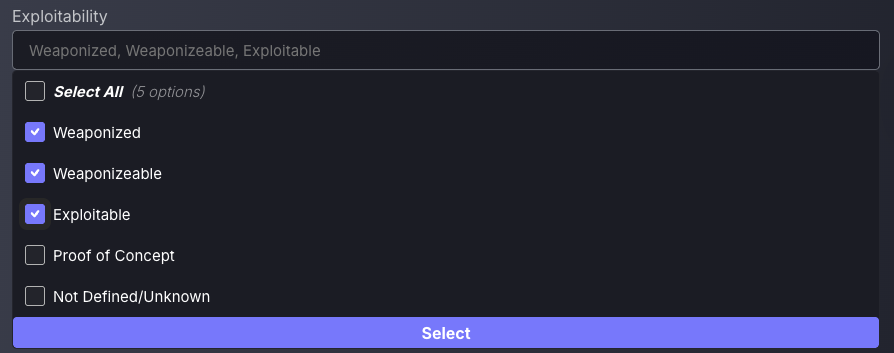
To effectively prioritise the most dangerous vulnerabilities, use the Exploitability filter to focus on findings with the greatest potential for real-world impact. Phoenix categorises vulnerabilities based on threat intelligence into levels such as Weaponized, Exploitable, and Weaponizeable, helping you quickly identify those already being used in active attacks or those with publicly available exploits. This allows you to triage based not just on severity, but on actual exploit likelihood.
4. Externally facing
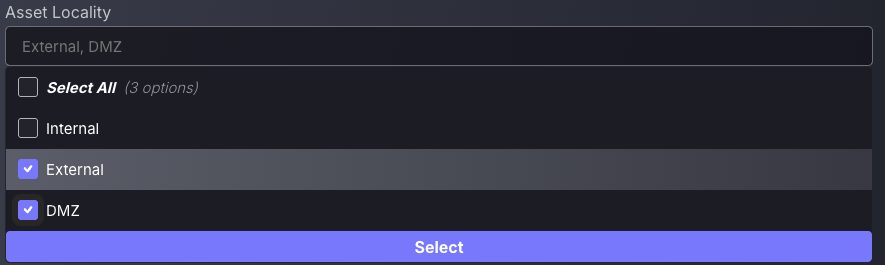
The Asset Locality filter allows security teams to triage vulnerabilities based on where the affected assets are located: Internal, External, or in the DMZ. This is especially useful for prioritisation, as vulnerabilities on externally exposed or DMZ-facing systems typically carry higher risk due to increased attack surface. By filtering findings to focus on these zones, security users can more effectively allocate remediation efforts to the areas most likely to be targeted first.
Ensure you save these filters for future use and streamlined access to the most critical findings to prioritise.
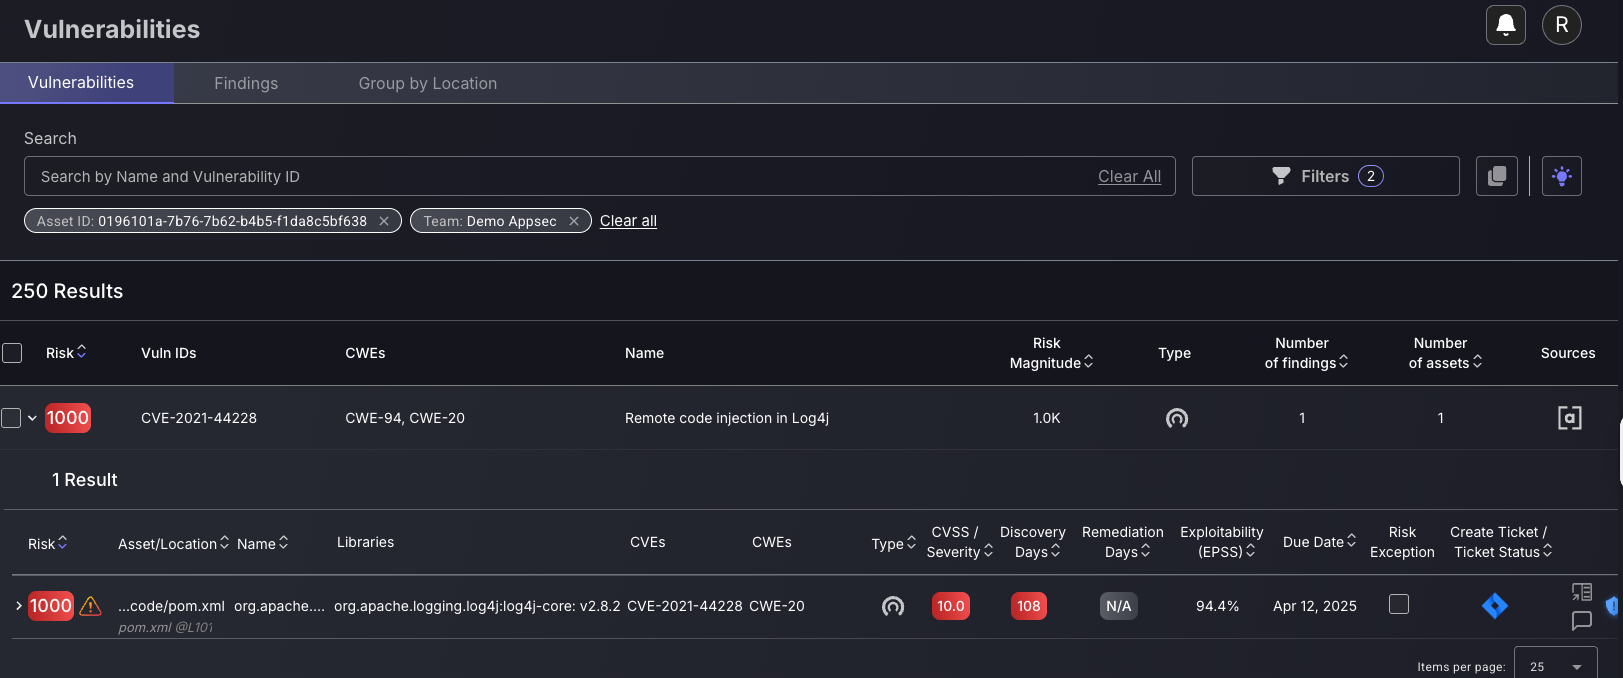
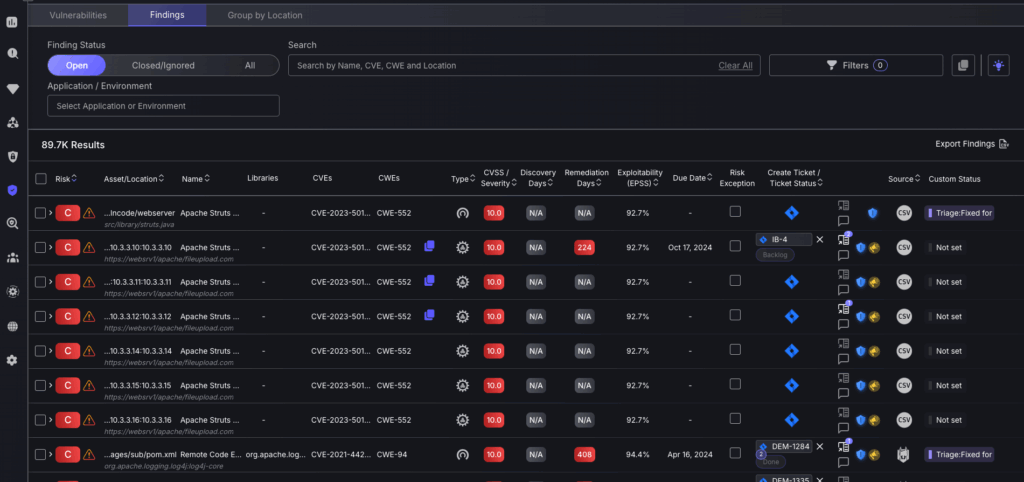
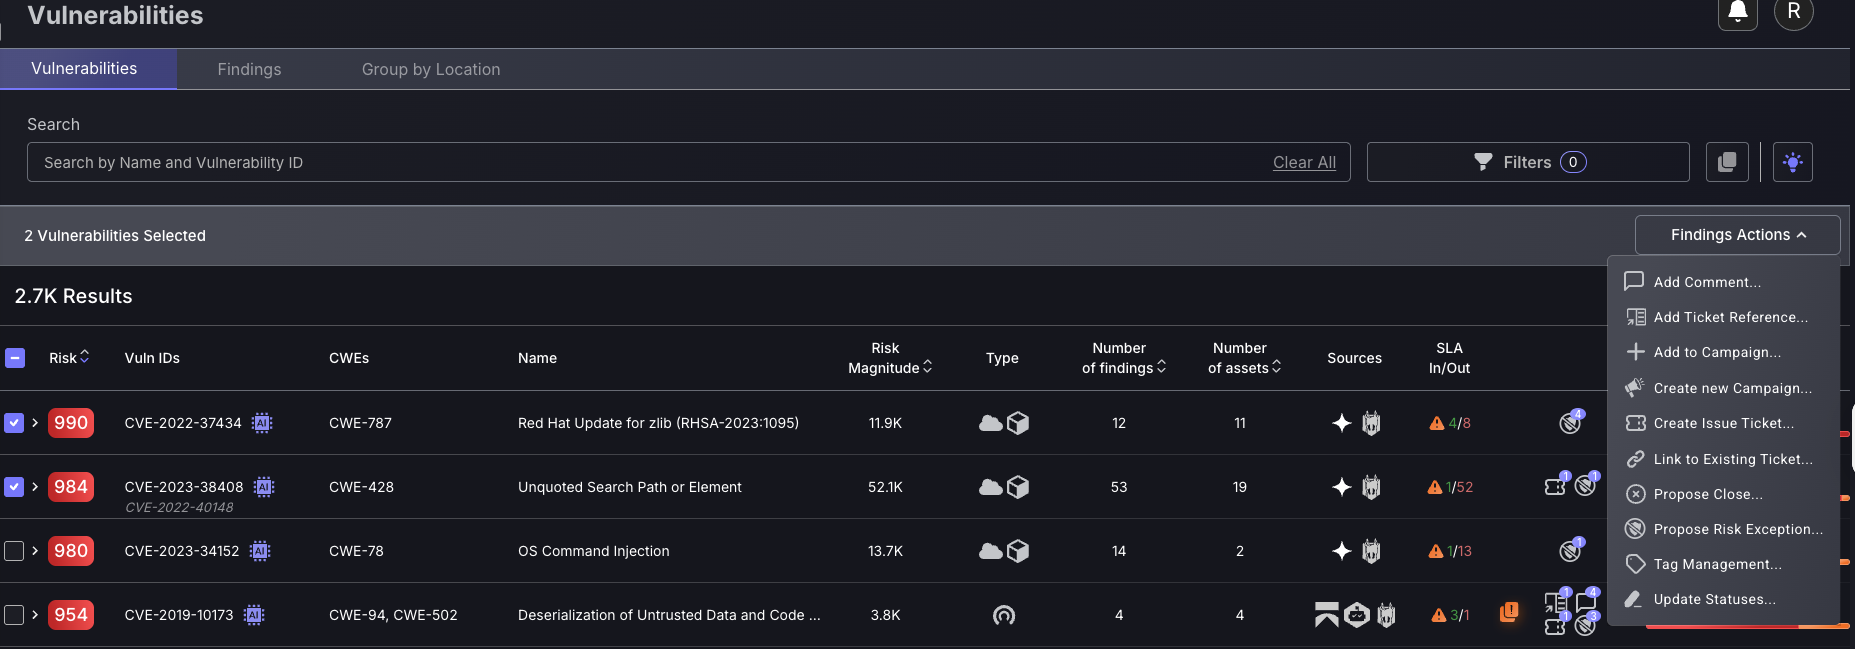
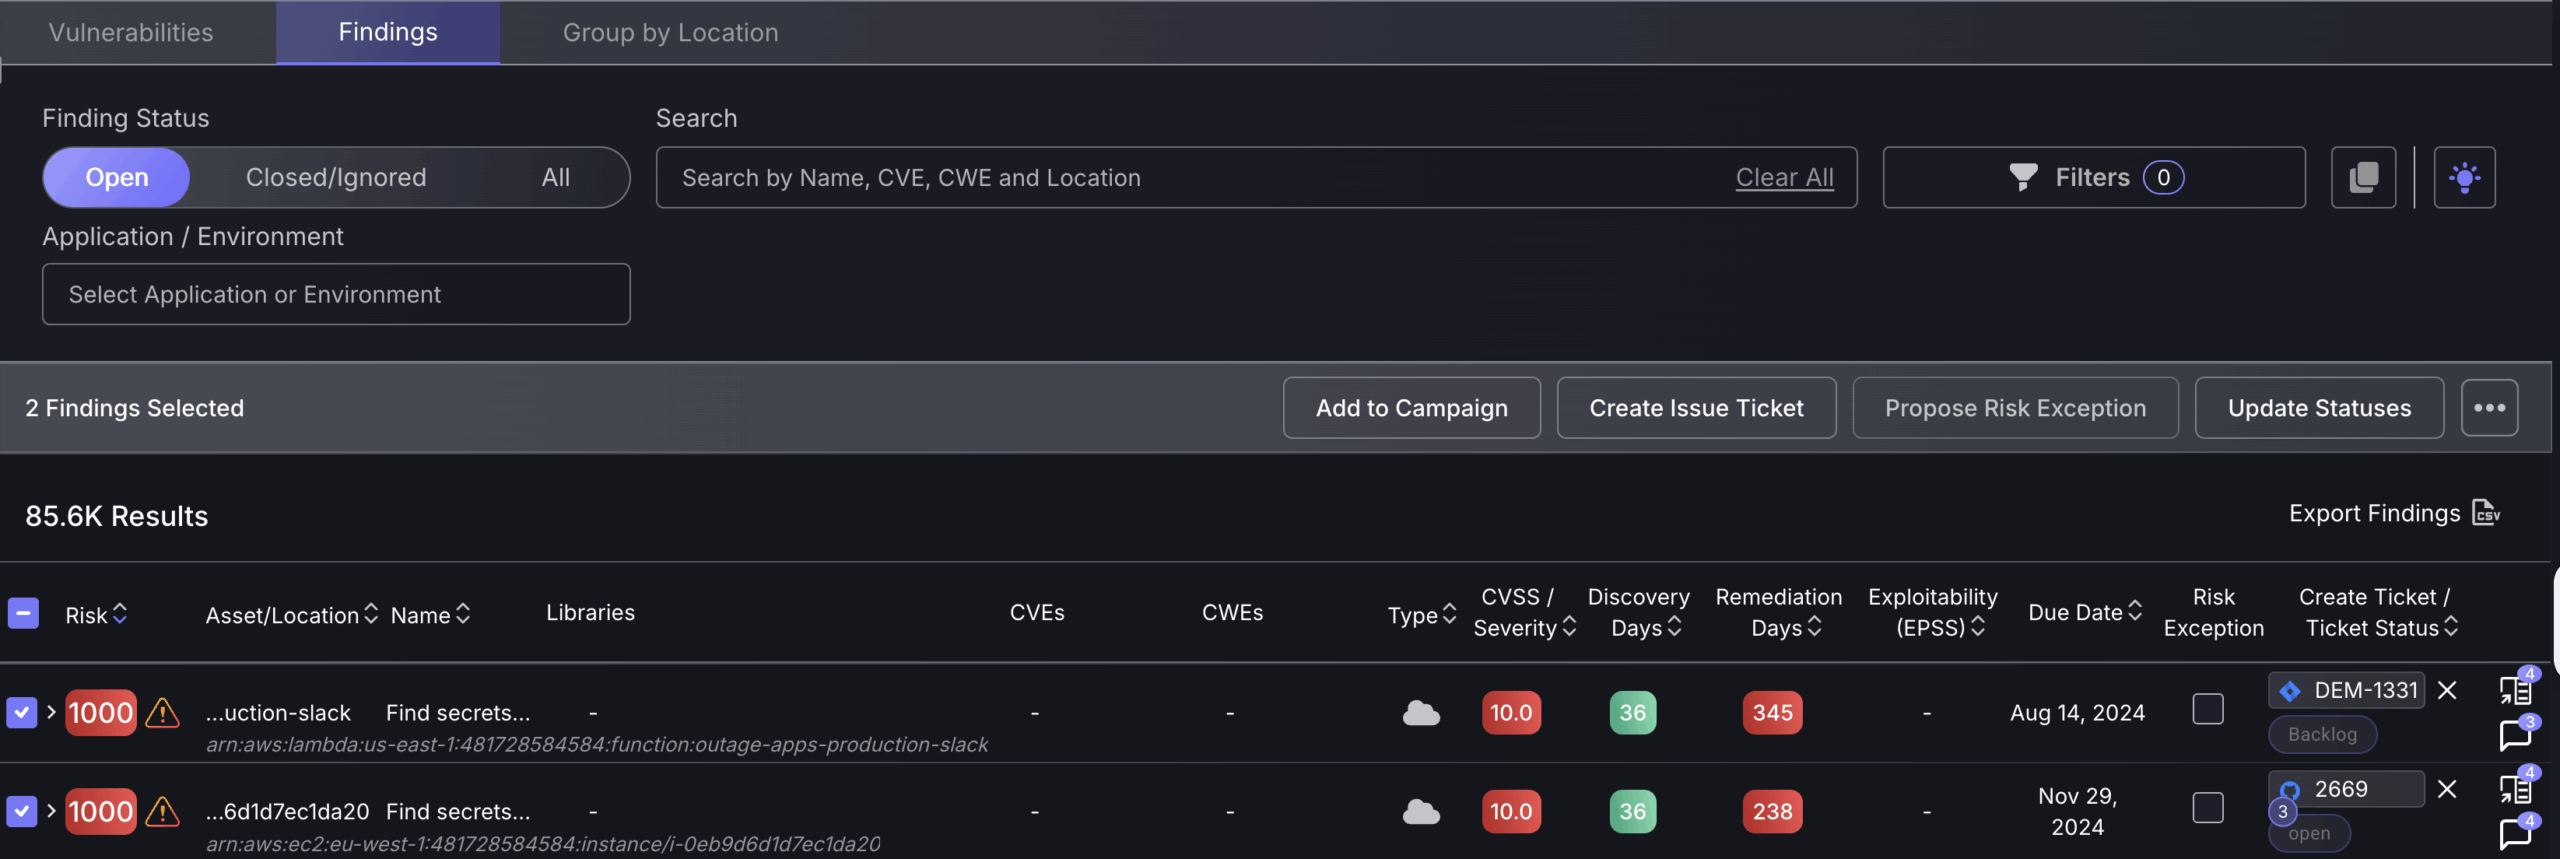
2. Analysis of findings
The Vulnerabilities page serves as a contextualised view of findings, offering detailed insights into factors such as potential impact on specific assets and likelihood of exploitation. Rather than providing a general overview, this screen is designed to help users tailor their vulnerability management workflow, using powerful filtering and sorting capabilities to focus on what matters most. For more details on the vulnerabilities page features, refer to this guide.
Findings are ordered by severity, with the highest at the top of the table, ensuring that the highest priority findings are dealt with before any others.
Threat Intel
Click on a vulnerability finding to view a detailed breakdown of contextualised threat intel, including a description of what makes this finding exploitable and remediation efforts to be taken.
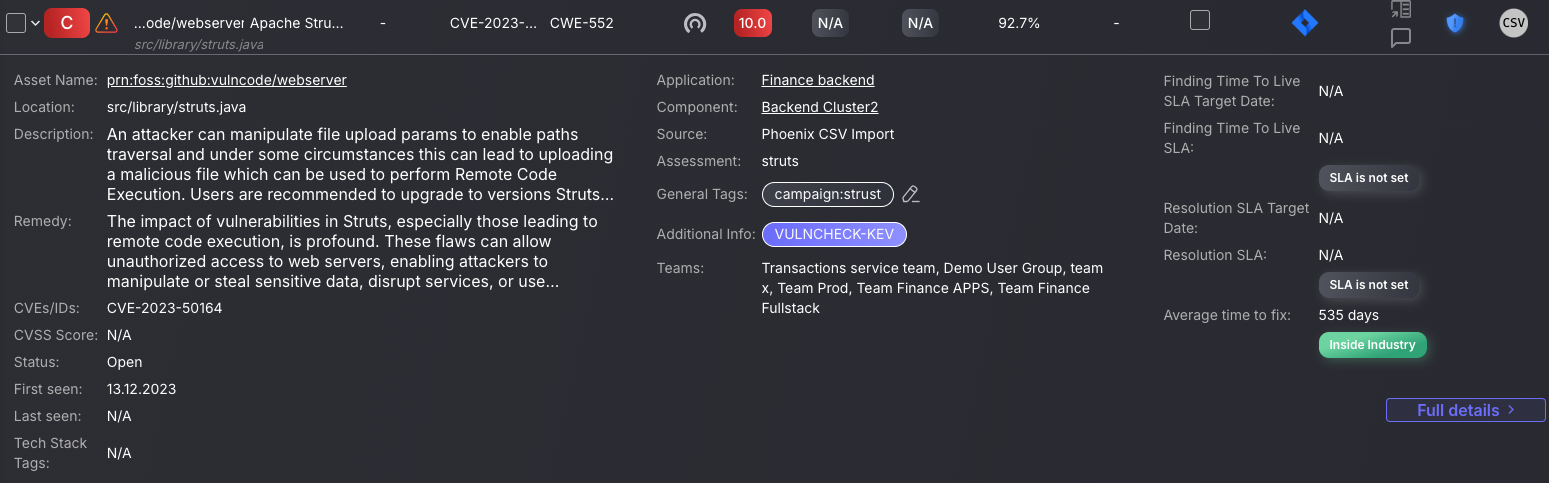
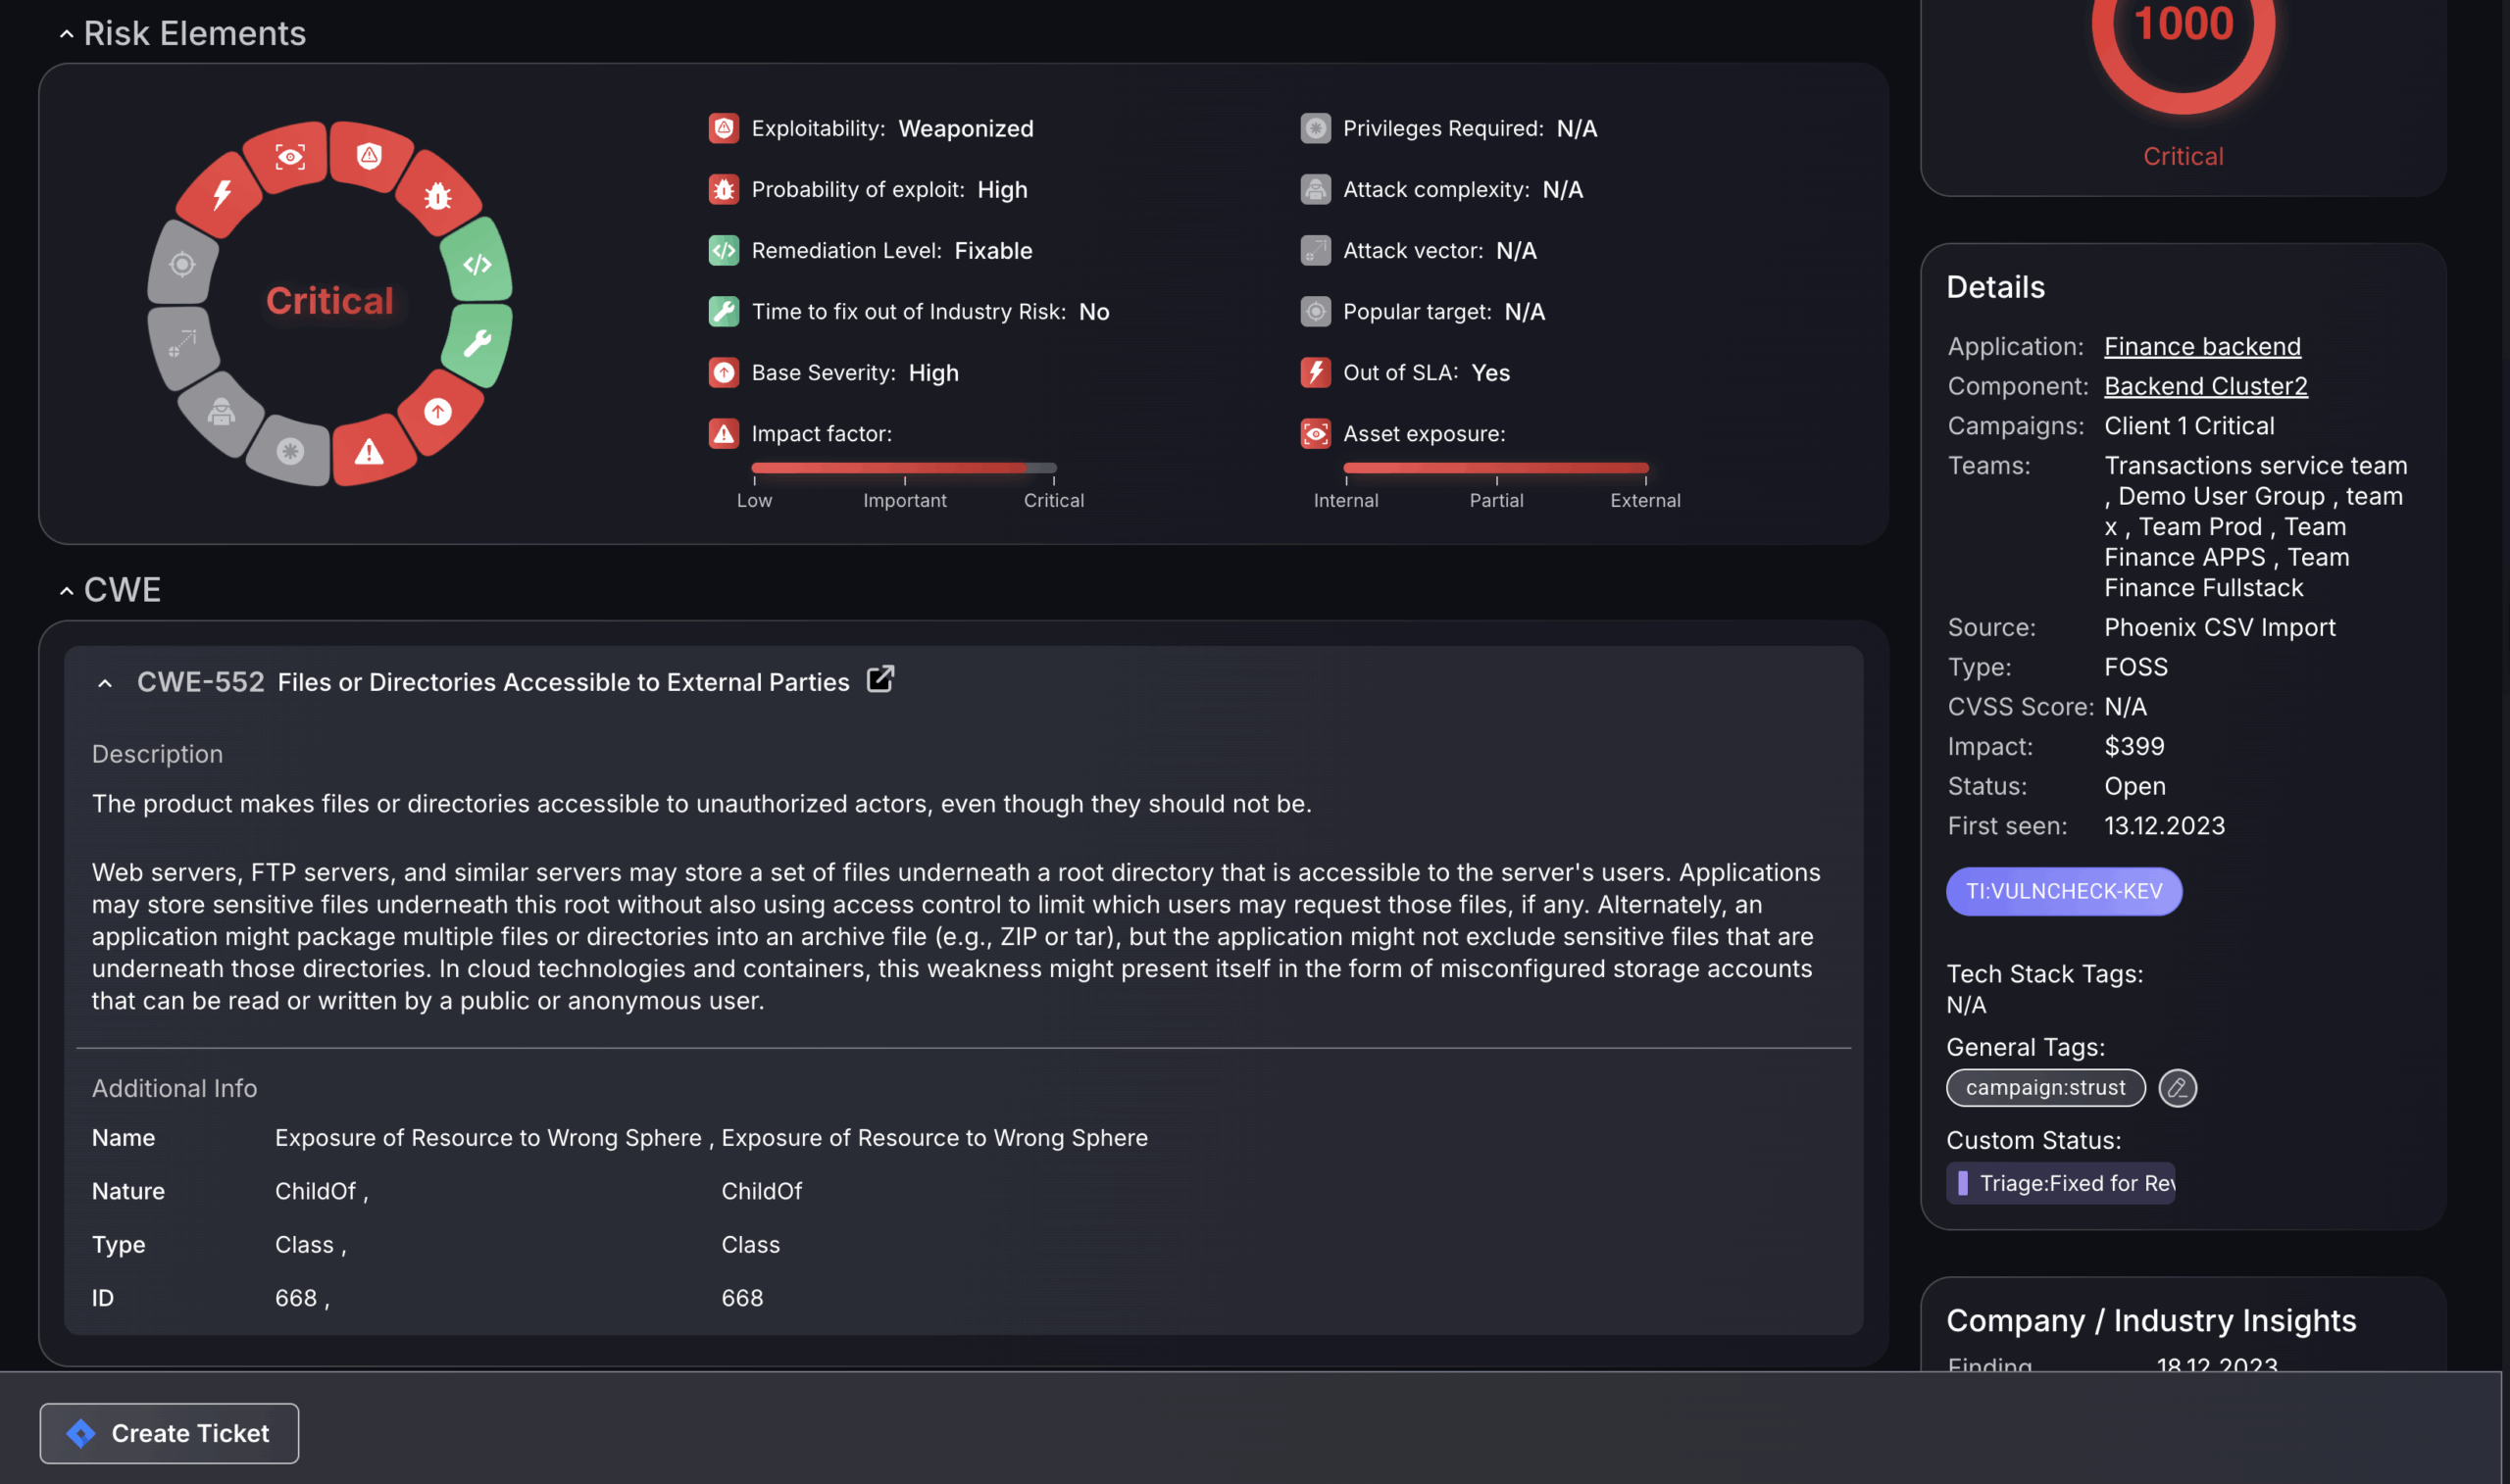
Alongside detailed analysis of the vulnerability finding there are also visual tools if you click “Full details”.
The Risk Elements diagram quickly tells a user the urgency, type, and fixability of the vulnerability. If, for instance, the Base Severity is high and the Remediation level is Fixable, then a team member may want to implement a fix.
The CWE Breakdown section, below this, provides a standardised description of the type of weakness associated with the vulnerability, helping teams understand the general nature of the issue. For example, in the case of CWE-552, it explains how files or directories may be unintentionally accessible to unauthorised users, often due to misconfiguration or missing access controls. This information is useful during triage to give additional context for which remediation steps can be taken to implement the fix.
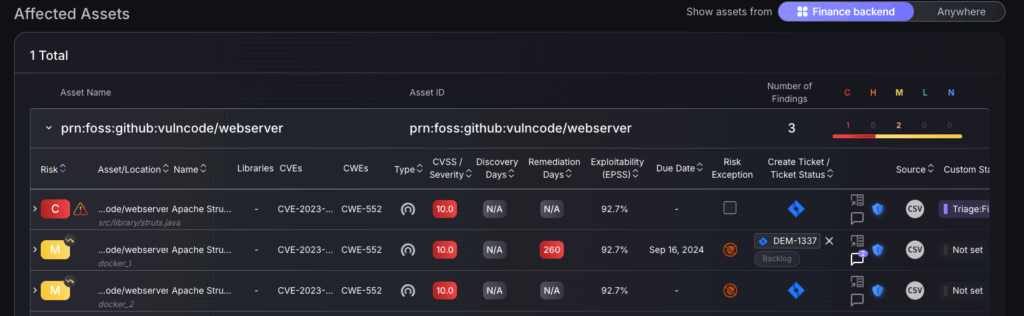
To get a detailed view of the locality of the finding select the Affected Assets and Applications tile in the top right of the full details page.

The Affected Assets section displays all the assets affected by the finding, including all the findings within that given asset. There is a filter in the top right to show assets only from that Environment/Application, or to select “Anywhere” which will show a list of assets with that same finding.
3. Taking action
The next step after analysing the findings is to use the Phoenix platform to mitigate risk by using ticketing integrations, campaigns, proposing risk exceptions and assigning tags.
Standard procedure – creating tickets
Standard procedure once you have analysed findings is to create tickets using the multi-selection feature of similar findings, e.g. the same CVE score and location. Follow these steps to create new tickets:
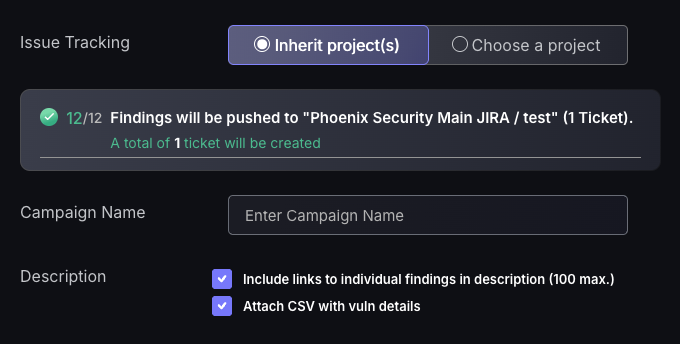
- The default setting is to inherit the issue tracking project, which will mean the tickets created will inherit the issue tracking projects of the applications/environments the findings are within. If the findings selected are within different applications/Environments with different issue tracking projects, then they will automatically be created within their allocated issue tracking projects. The other option is to manually choose a project, which is not recommended as it may complicate remediation efforts to have vulnerabilities from one application/environment spread across multiple projects.
- Enter a Campaign name to assign the ticket to(not required).
- Select a finding to set as the description for the ticket. The ticket name will automatically be set to the CVE of the finding selected as well as the remedy for the finding will be set within the ticket. Tickets should be made for very similar findings, meaning whichever finding you select for the ticket name, description, and remedy should be applicable to all findings created within that ticket.
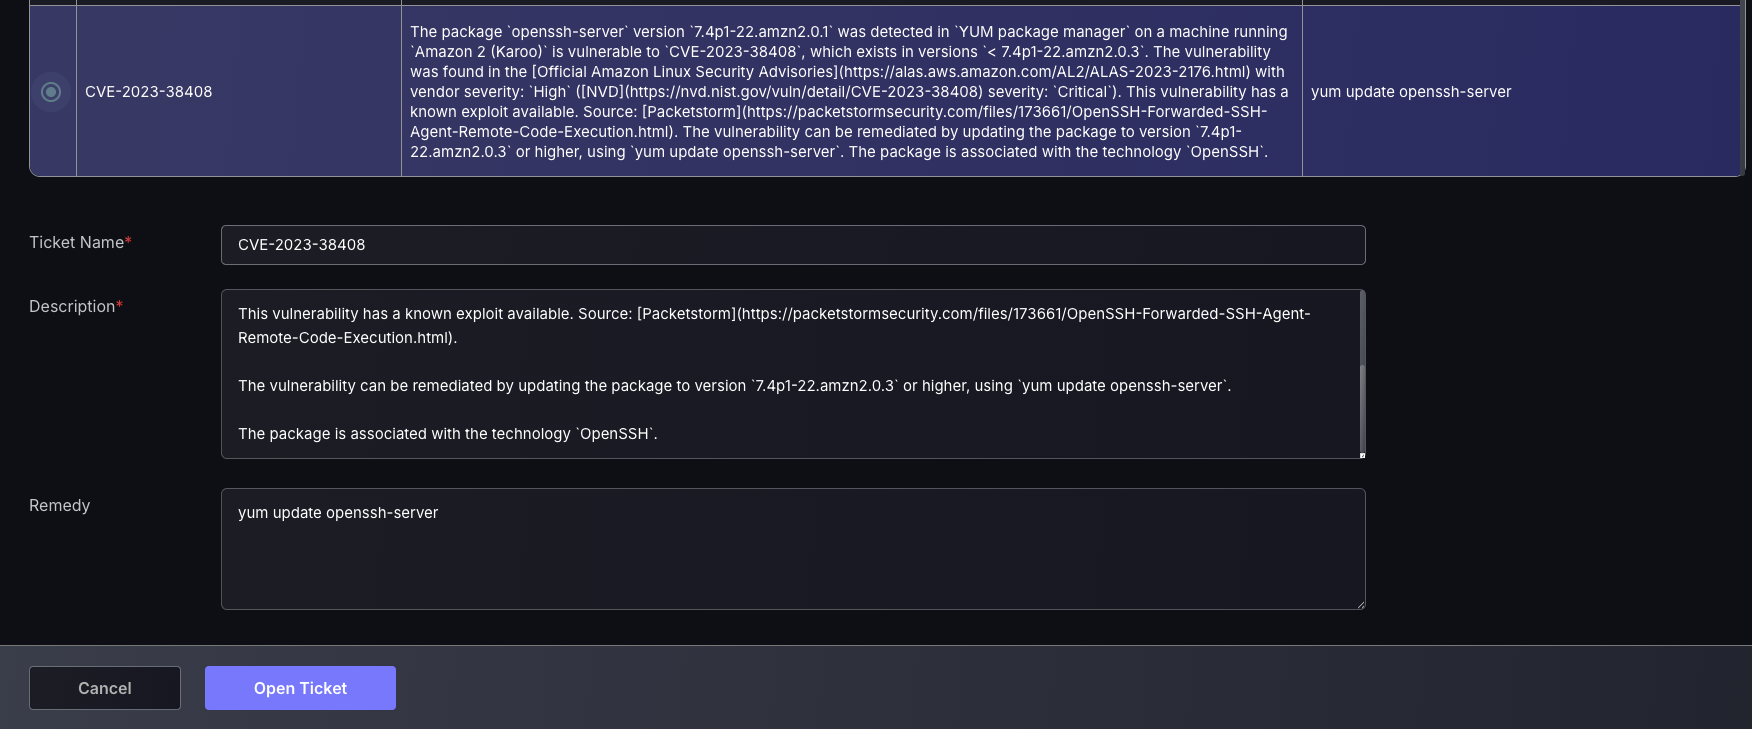
- Edit the Ticket name, Description and Remedy to have the appropriate information for teammates to have the relevant information on what needs to be fixed and how.
Link to existing ticket
This feature provides flexibility by allowing newly discovered vulnerabilities—when deemed similar to existing ones—to be linked to already created issue tickets. This helps consolidate remediation efforts and avoids duplication of work. Before linking a ticket, ensure that the issue tracking account or project has not been modified on the issue tracking provider’s side. Phoenix validates all details—including the issue tracking account, project name, and ticket ID—against the original information recorded when the ticket was first created. Any mismatch may prevent the ticket from being linked successfully.
- Enter the Issue tracking account of the existing ticket.
- Enter the issue tracking project of the existing ticket.
- Enter the Issue ticket ID found on the Issue tracking provider’s platform(not Phoenix).
- Press Confirm.

Once a ticket is created, it is automatically pushed to the integrated ticketing platform, where it can be tracked alongside workflow automation and remediation timeline features built into the integration.
Alternative procedure – creating exceptions
After analysis of findings, you may deem that a particular finding or series of findings should either: have a lower risk level than displayed, a higher risk level, a nullified risk level or be removed completely from the platform.
Exception Type: False Positive
Use Case:
The platform has flagged a vulnerability (e.g., CVE-2022-37432), but after a thorough review, the team confirms that it is not a valid security risk in your environment.
Examples include:
- The vulnerable component is installed but never used in the application runtime.
- The vulnerable code path is inaccessible or unreachable in the deployed context.
- The scanner generated a false match due to metadata or outdated signatures.
In this case, you would set the finding as a False Positive, which:
- Sets the risk score to 0, effectively removing it from application, environment, and global risk metrics while still maintaining visibility.
- Keeps the finding visible on the system for auditability and future review.
- Prevents it from triggering pipeline gates or skewing dashboard metrics.
⚠️ Important: False positives should be applied carefully—mislabeling a real vulnerability can result in hidden exposure.
Exception Type: Risk Mitigation
Use Case:
Your team acknowledges the vulnerability exists, but:
- The EC2 instance is isolated from external traffic via strict security groups.
- An update (
yum update zlib) is scheduled to be rolled out next sprint and the overall risk level needs to be met to comply with an SLA.
You apply a Risk Mitigation with:
- Expiry date aligned with the upcoming patch schedule.
- Mitigation level set to “Medium” (e.g., reducing risk score by 60%).
This signals that the risk is under control, while enabling other teams to prioritize more urgent vulnerabilities.
Exception Type: Risk Recasting
Use Case:
Phoenix typically ingests and analyses exploitability, location, and asset context automatically. However, in some cases, external scanner tools may fail to update or fetch new data, causing a finding’s risk score to appear outdated or understated.
Use Risk Recasting when:
- A scanner no longer reports updated exploitability data, leaving the finding in a default or low-risk state.
- The asset’s context has changed significantly (e.g., it was internal but is now internet-facing), but that change isn’t reflected in the source data.
- A target appears to be inactive in the scanner, where the finding is known to be found, but your internal threat intelligence or pentesting results confirm it is still present and more severe than shown.
Risk Recasting allows you to:
- Manually elevate the risk score to reflect the true criticality (e.g., set to 800).
- Ensure the finding is prioritized correctly by security and engineering teams.
- Assign ownership and set an expiry date in case the data sync issue resolves or the scanner recovers.
This is especially useful when asset metadata or exploitability signals are missing, inaccurate, or delayed.
Exception Type: Risk Acceptance
Use Case:
A pipeline or API gate is blocking deployment because this finding is among multiple flagged as “Critical”, and policy only allows 3.
After review, the team determines:
- This finding is low-impact in current context.
- Other issues are higher priority or harder to mitigate immediately.
A Risk Acceptance is created to:
- Temporarily exclude this finding from enforcement gates.
- Let the deployment continue without marking the vulnerability as resolved.
- Assign accountability with an expiry date and responsible team.
Recommended only if the risk is well-understood and does not jeopardise production stability or security.
There are two ways of creating an exception:
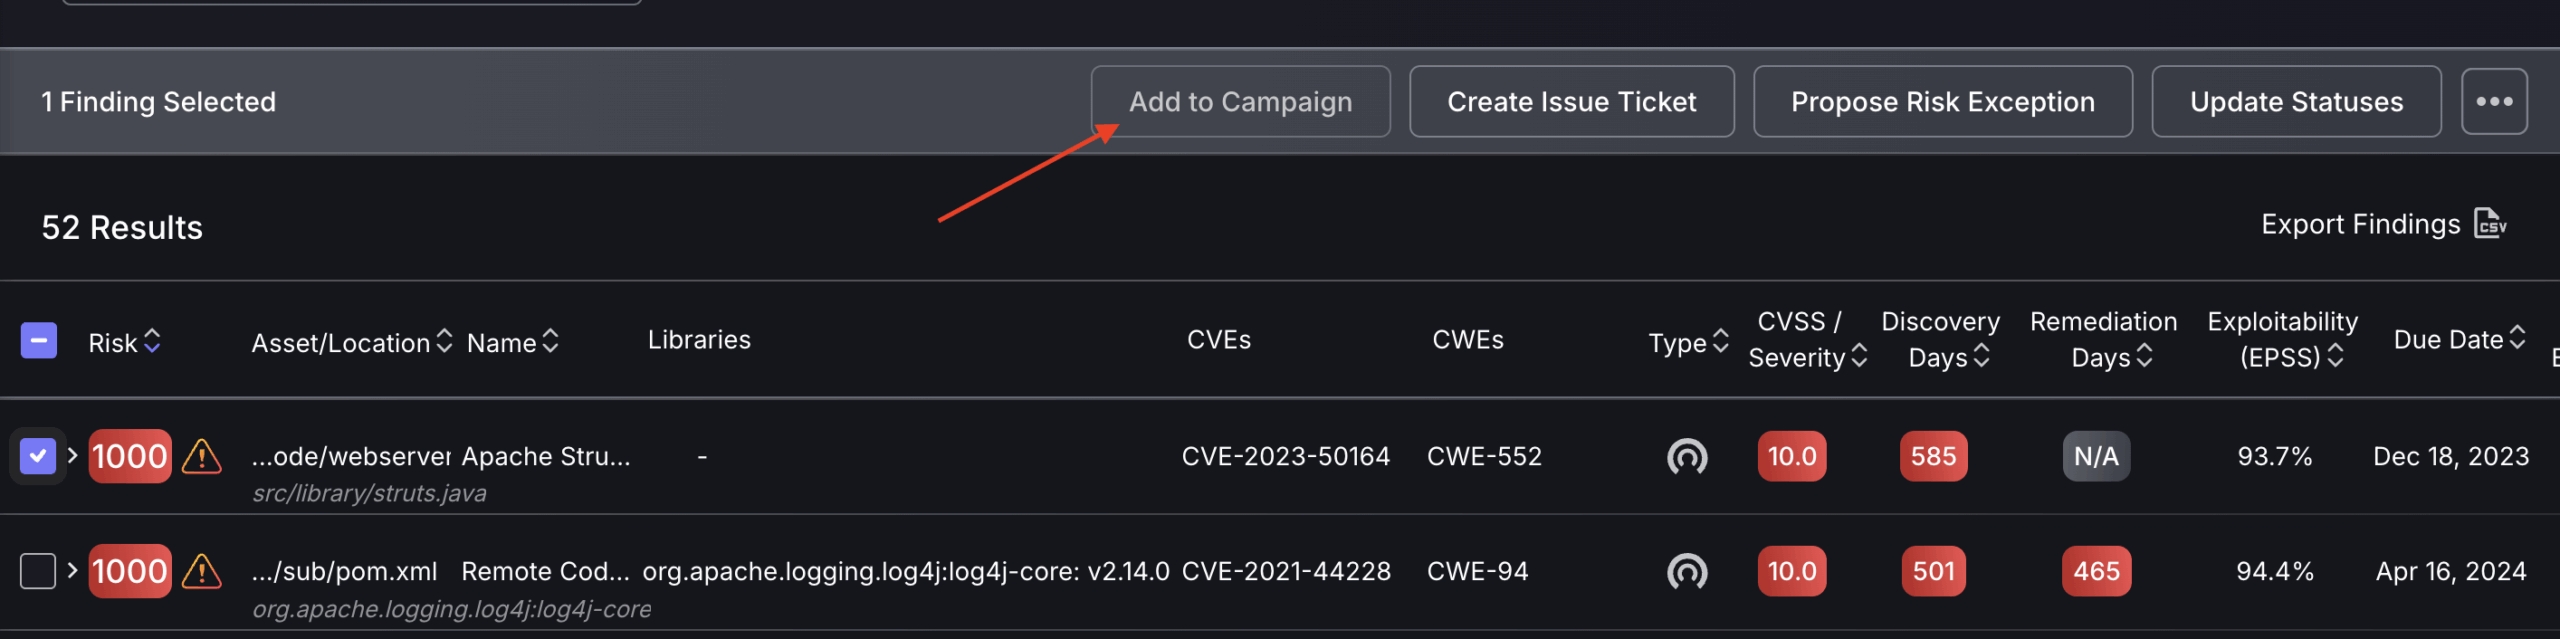
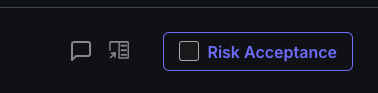
a. For a single finding, use the risk exception box, indicated by the red arrow in the image below.

b. Select multiple findings or a single finding, then select “Propose risk Exception”.
Both options will open the same Exception tab, where the exception type can be selected and details filled in.
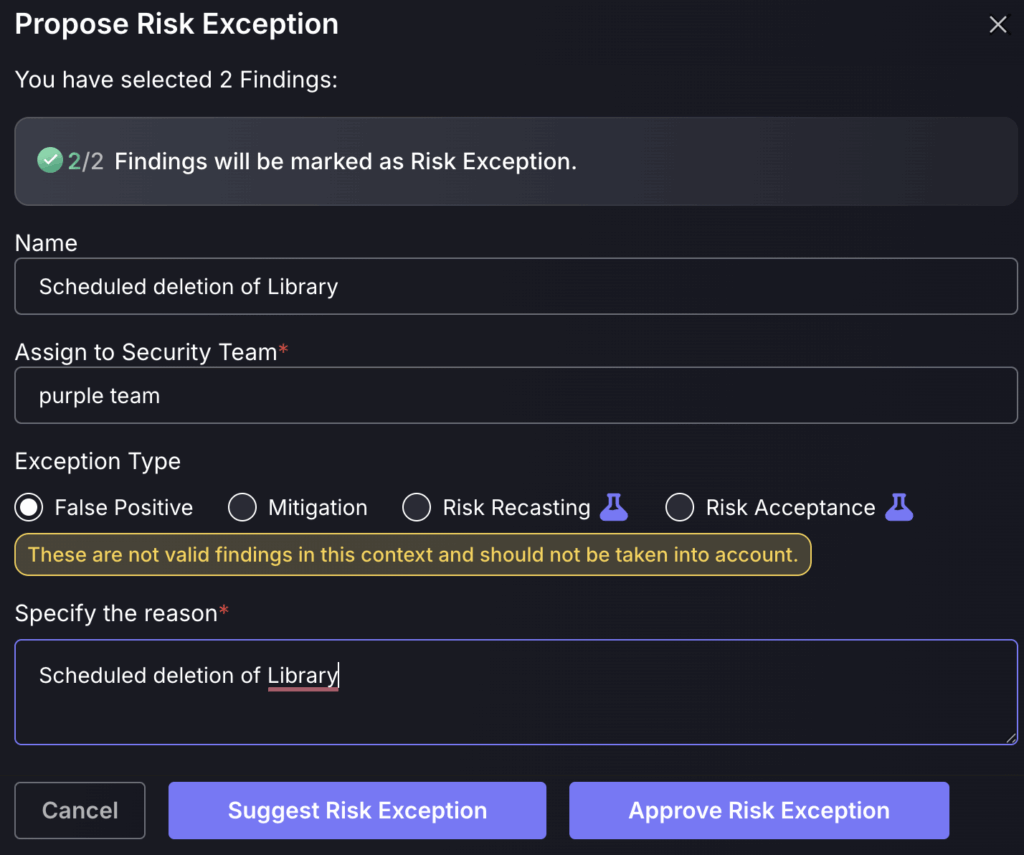
By selecting “Suggest Risk Exception”, it will add the exception to the Exception request queue for a Security Champion or administrator to approve. “Approving Risk Exception” will skip the queue for review and add it immediately.
4. Maintain visibility
After creating a ticket or exception, it’s important to leverage the platform’s visibility and auditing features to track changes effectively, ensuring transparency and alignment with best practices in vulnerability management.
Custom status’
The custom status feature allows users to define and apply their own workflow labels to findings, giving teams greater flexibility in tracking remediation efforts, prioritisation, and internal review processes.
These statuses don’t impact the risk score directly, but they provide valuable context and visibility into the state of each finding. These should be used throughout the triaging process to inform other users of your decisions and triaging efforts.
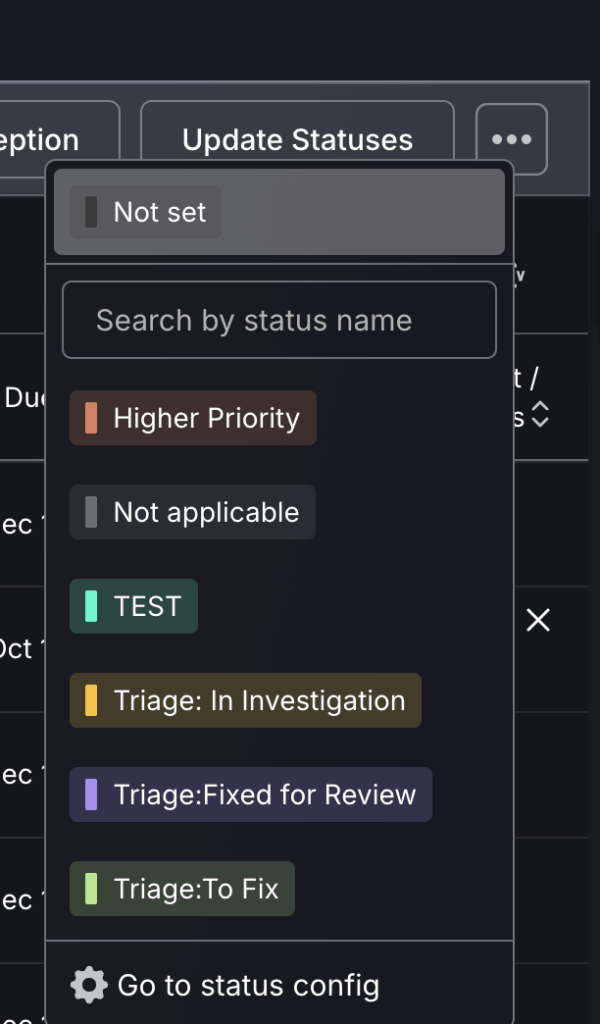
Suggested Custom Statuses & Their Use Cases:
- “Higher Priority” – Use to flag critical vulnerabilities that require attention beyond what the default scoring reflects (.eg, business-sensitive systems, regulatory exposure).
- “Triage: In Investigation” – To indicate that a finding is currently being reviewed or validated by security or engineering teams before action is taken.
- “Triage: Fixed for Review” – Helps teams track fixes that have been implemented but are pending verification, re-scanning, or QA sign-off.
- “Triage: To Fix” – Signals that a finding is confirmed and prioritised for remediation.
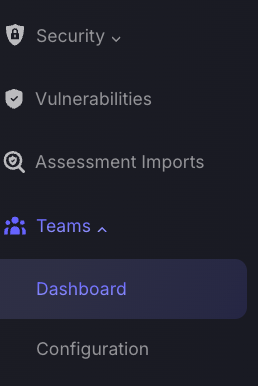
To configure Custom status’ go to Organisation Settings->Configuration.
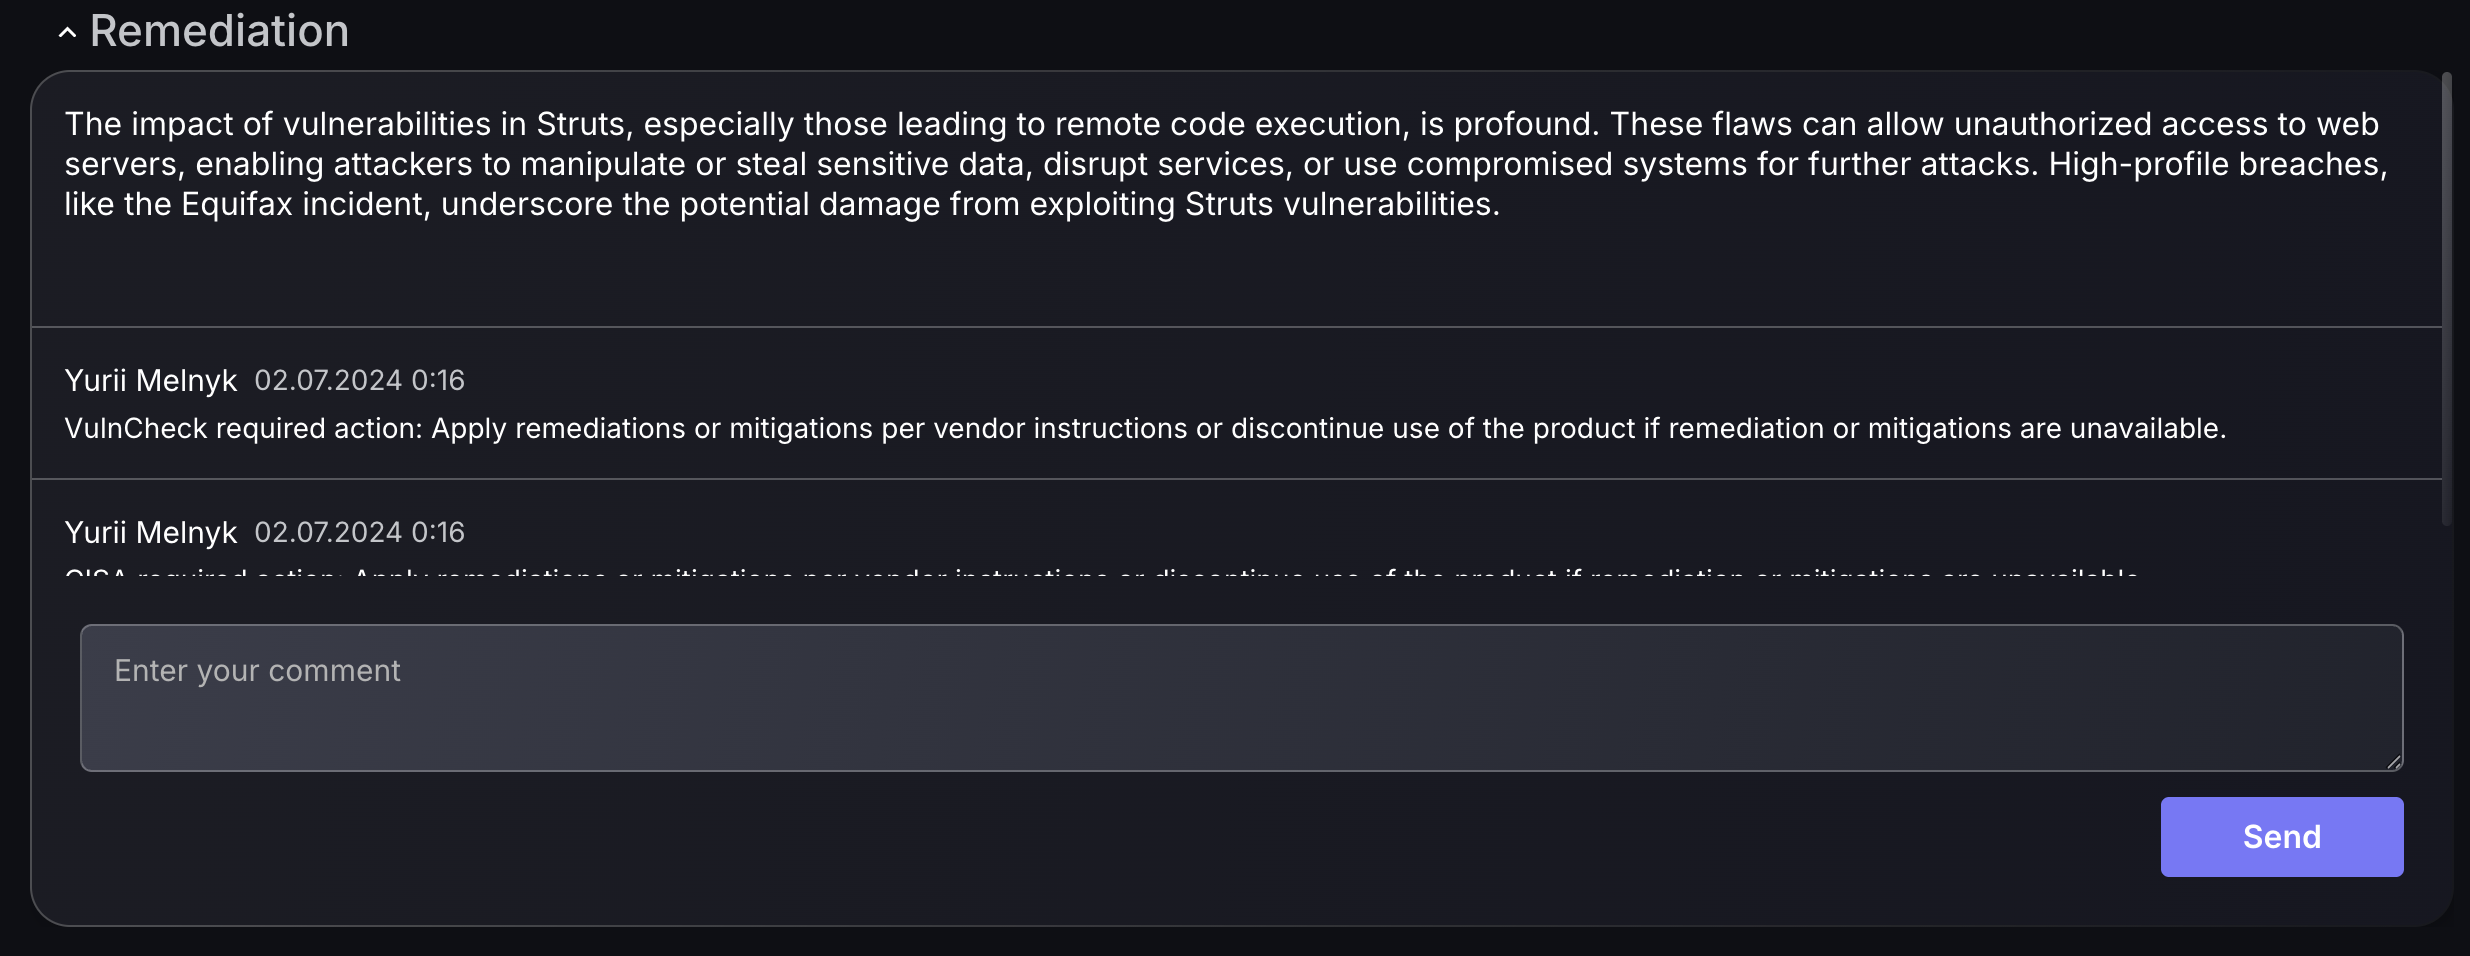
Commenting
In the top right-hand corner, there is an option to make comments to coordinate with users appropriately. Comments made will appear in the remediation section of the “Full details” page and should be used as a secondary form of communication between security teams, as most coordination of findings should be done via integrated ticketing platforms. NOTE: commenting gives security teams complete customisation of their vulnerability management process but should not be their primary source of communication/organisation.
Remediation comments:
Within the findings “full details” section, you can coordinate with security teams on which remediation steps can be taken by adding comments. The recommended remedy is displayed at the top to give users a basis to work from.
Campaigns
Now that a ticket has been created, it’s recommended to add the associated findings to a Campaign. This enables internal tracking within the platform, rather than relying solely on external ticketing integrations, which may vary across teams or tools and often operate in disconnected workflows. Campaigns provide a unified way to track remediation progress, monitor risk reduction over time, and maintain visibility across multiple workstreams. They offer additional granularity beyond dashboards, helping teams quantify fixes, align efforts across teams, and support consistent vulnerability management. Refer to our Campaigns Management guide for more details.