1. Introduction
The Vulnerability page is central to the Phoenix Security platform. It provides you with a comprehensive list of vulnerability information across your organisation. It also lets you add comments and tags to each vulnerability, create incident tickets via ticketing integrations such as Jira, and create various exceptions.
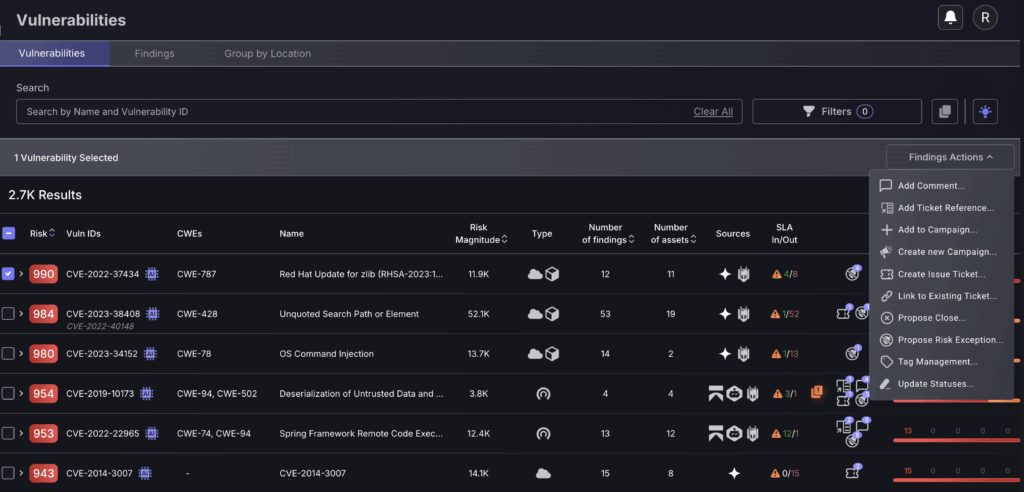
A single vulnerability may generate multiple findings, which can be associated with different assets, locations, or software libraries. However, these findings are all tied together by a common CVE identifier. By grouping them under one vulnerability, based on classification and remediation similarities, Phoenix ensures that related issues are tracked collectively. This approach streamlines ticket creation by consolidating findings that share a common resolution path, reducing duplication and improving remediation efficiency.
If you don’t want to look at Findings grouped by CVE, then you can see them grouped by location on the right-hand side of the page at the top.

By default, ten vulnerabilities are displayed on the list per page. But it can be set to 5, 25, or 50 per page.
2. Parts of the Vulnerability Page
The Vulnerability Page consists of the following:
a. Vulnerability Search and Filter
The list is searchable by CVE (Common Vulnerabilities and Exposures) Name, Location, and CWE and can be used in tandem with other filtering capabilities listed below.

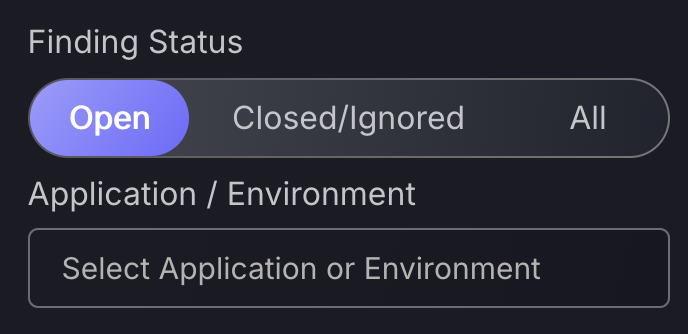
The “Finding Status” gives you quick access to open vulnerabilities/Findings, but also closed vulnerabilities matching your filtering conditions. This enables you to look for similar closed vulnerabilities, allowing you to view remediations for fixed tickets which may be applicable to the similar open vulnerabilities that need fixing.
Also get quick access to the “Application/Environment” filter to filter by a specific application or environment in tandem with other filtering options.
b. Filter
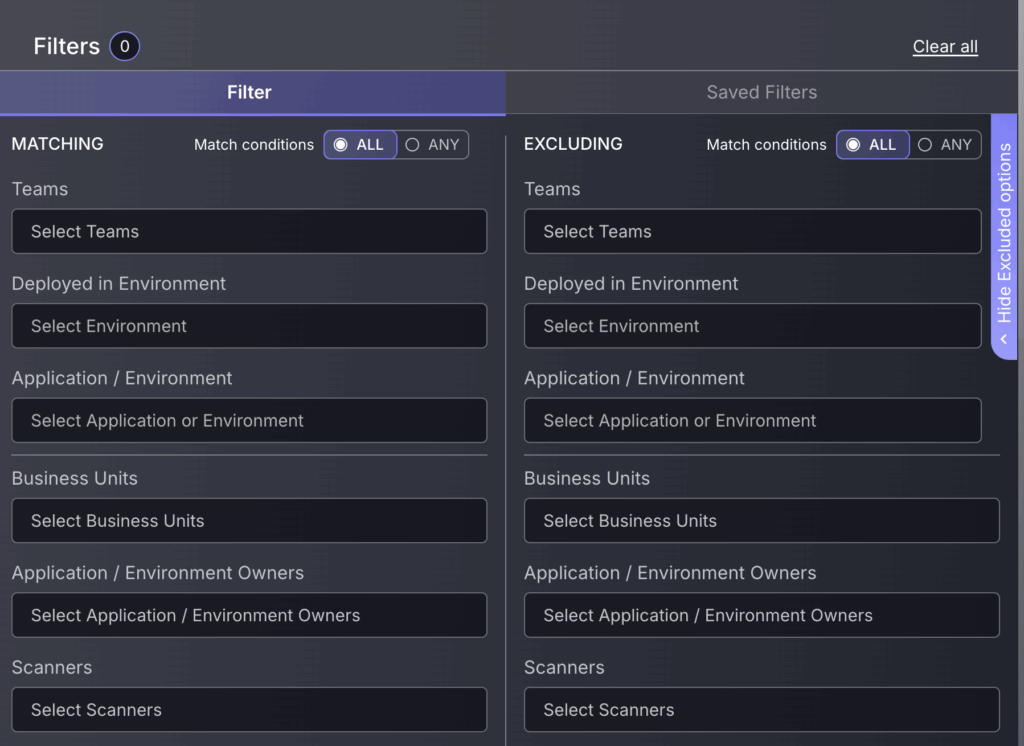
The filter function allows users to refine vulnerability data by selecting specific criteria, allowing targeted analysis and efficient management of vulnerabilities.
By pressing the blue tab on the right side of the screen, you will reveal an alternate filtering menu to exclude specific categories. This includes the option to add exclusion filters for findings that match Any condition, as well as All conditions. The “All” feature acts as an AND, excluding a finding only if all exclusion filters have been met. The “Any” feature, on the other hand, acts as an OR, excluding a finding if at least one of the conditions is matched. This option to select for “ALL” or “ANY” is also available for the main filtering tab.
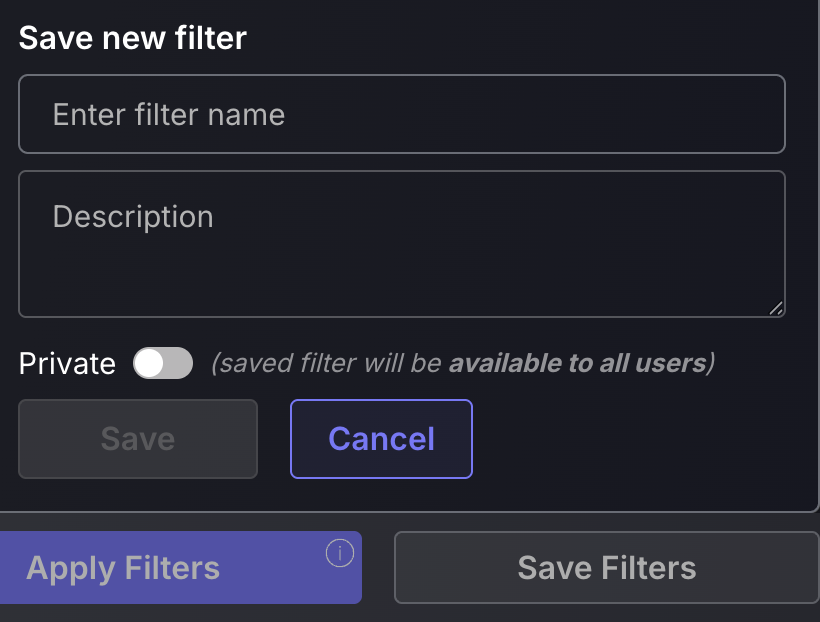
Filters can also be saved to enable streamlined, quick access to your organisation’s prioritised vulnerability types. To save a filter follow these steps:
- Select your filtering options and scroll down tot he bottom to select “Save Filters”.
- Enter the name and a description for the filter in the pop-up tab.
- Select if you would like it to be Private or Public(default is Private). The public filter will make the filter available to everyone in your organisation.
- Press save in the pop-up tab.
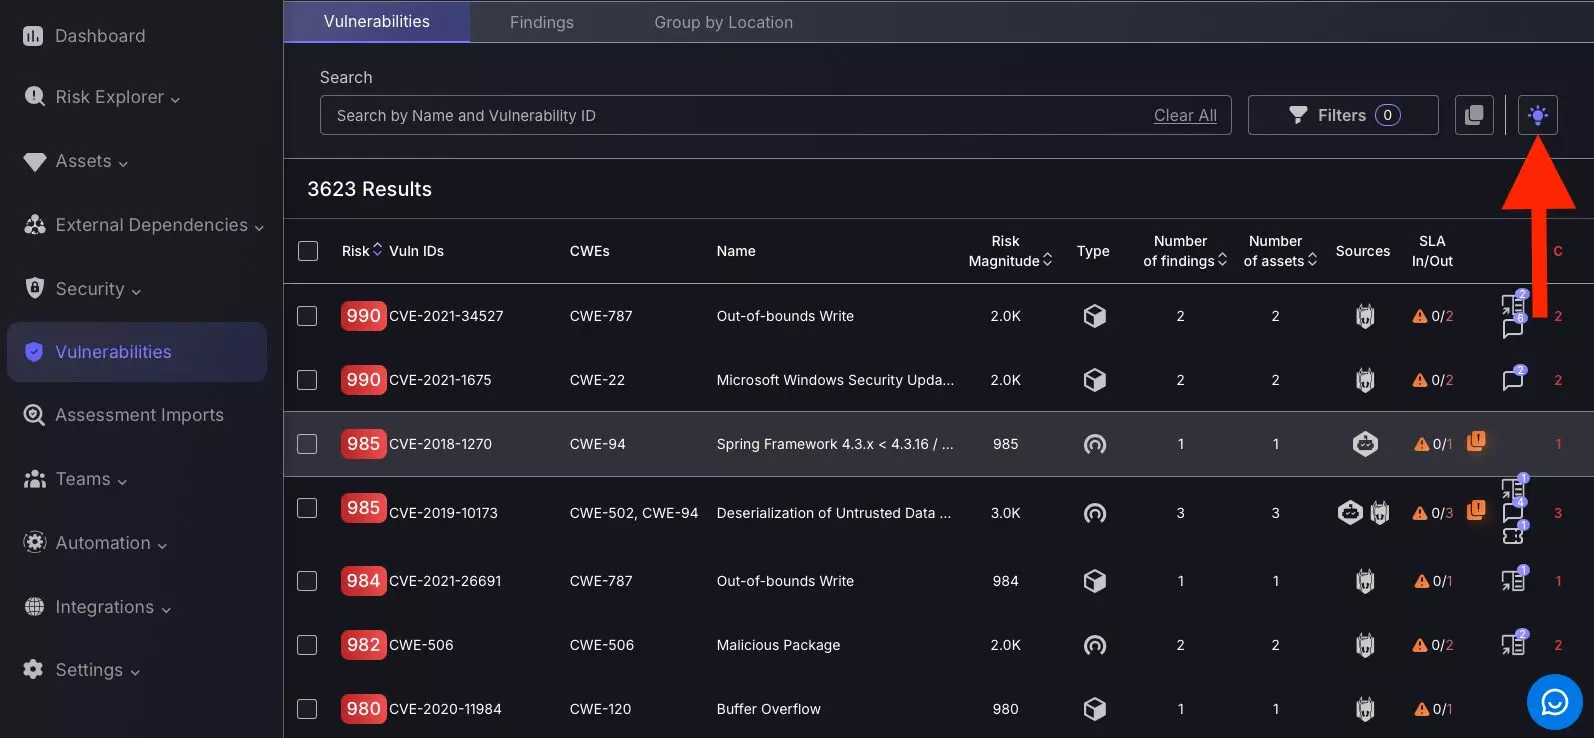
c. Insight Intelligence
Use this as a tool to get quick insight into the most pressing issues to be fixed. Located on the top right-hand corner of the page by the lightbulb icon.
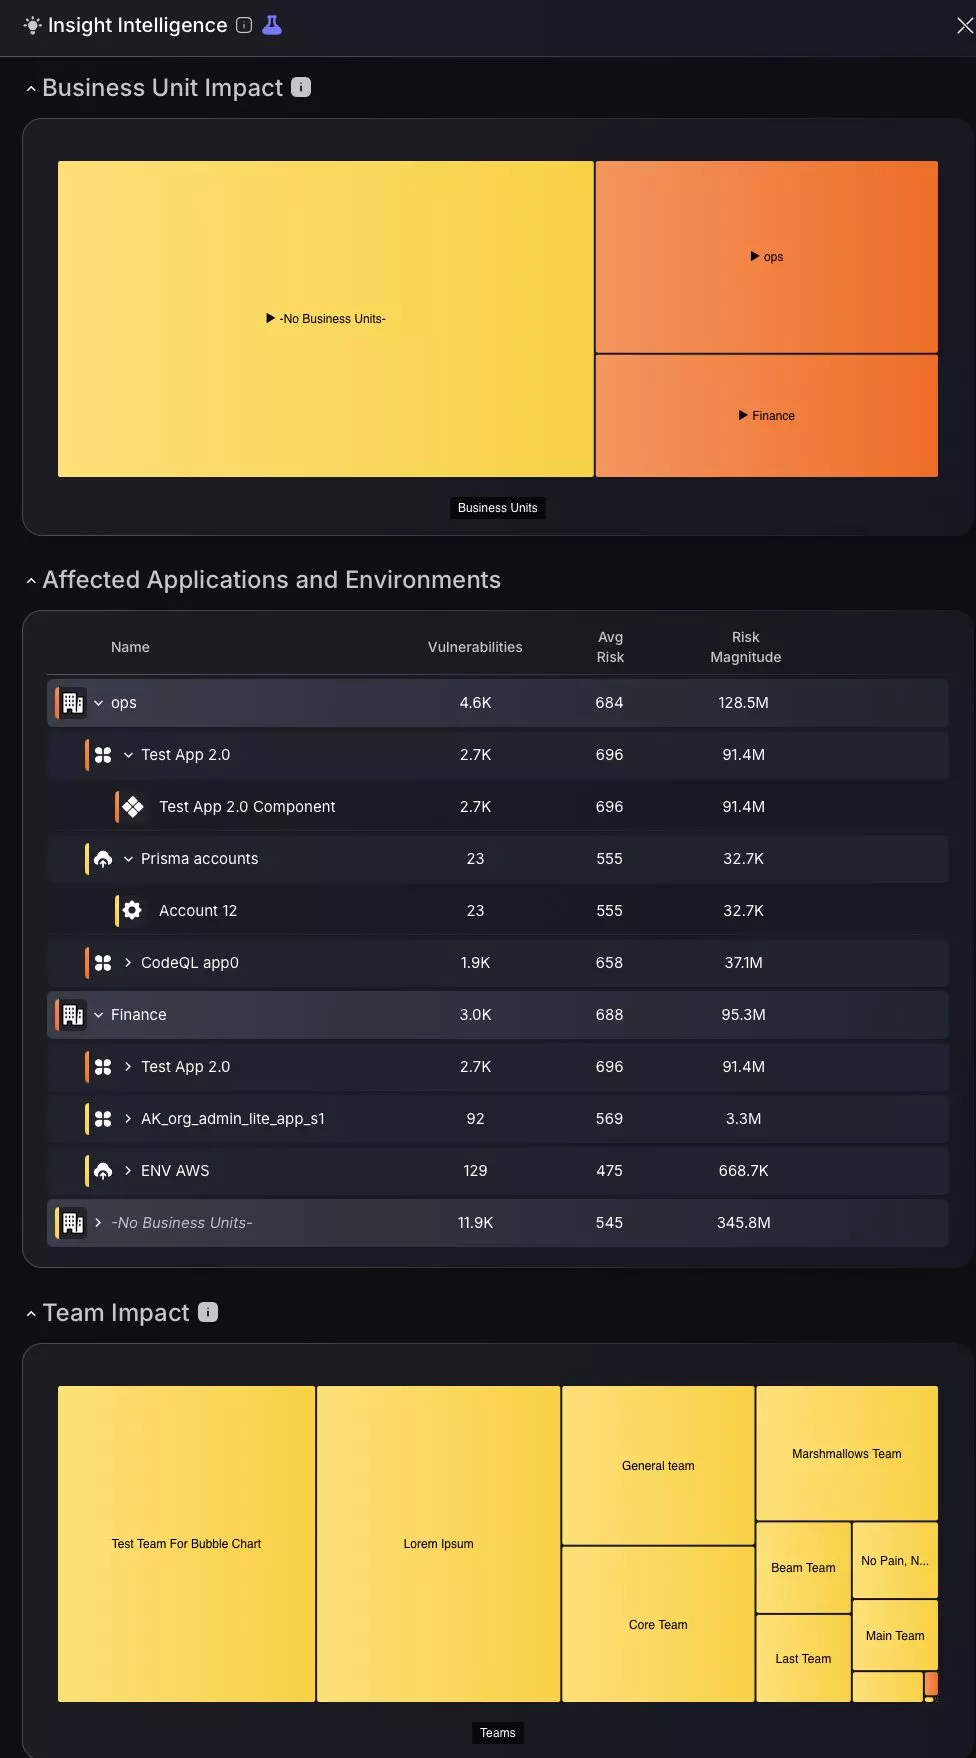
New Impact and Risk Explorer side panel: We’ve made assessing impact easier than ever before. The new Insight Intelligence panel allows you to reveal the blast radius of specific findings, vulnerabilities and assets. This is the side panel that opens on the Findings, Vulnerabilities and Assets pages when you click the new “bulb” icon on the top-right to open a series of heatmaps and an impact breakdown table.
Explore areas affected using the business impact tab to visualise how vulnerabilities are distributed across different business units and empower yourself to take action faster. Peel back layers of vulnerability on the heatmap by clicking on different business units to reveal apps and environments affected; click further and pinpoint specific components affected using risk score metrics.
For a more comparative visualisation of applications and risk profiling, the Affected applications and environments table is the place to look. This expandable data table with nested groupings accommodates contextual risk exposure analysis using risk metrics columns such as: Vulnerabilities (scale), Average Risk score, Risk Magnitude score. For ease of navigation there are even shortcuts accessible by clicking the icons on the right of each application or environment entry. For example, by clicking on the diamond icon a shortcut will be executed to take you to the asset page with this business unit pre-filtered.
Assessing team impact is essential to maintain a stable security posture, which is why we have included a team impact heatmap to visualize team security posture and assess associated risk metrics.
d. View Findings
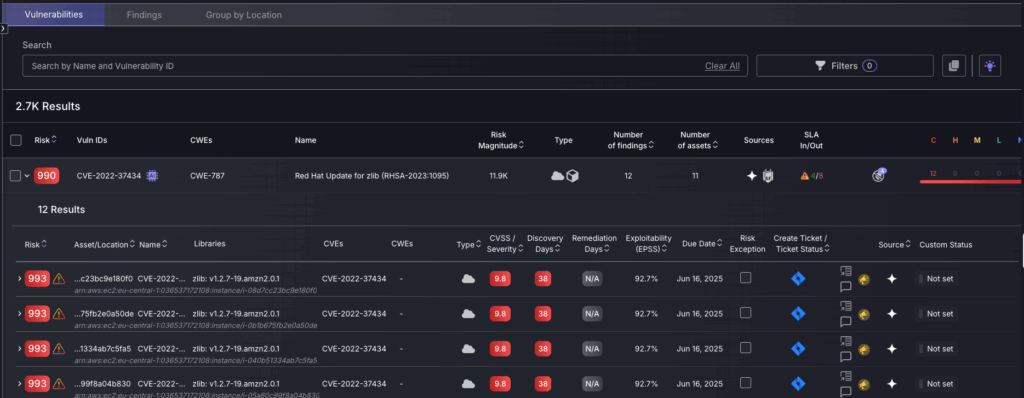
Click on a vulnerability from the list to view findings.
From here vulnerability findings can be viewed, including each findings risk score, ID, name, risk magnitude, type, number of findings, affected assets, sources, and SLA status. Below, individual findings are listed with detailed information such as asset location, CVSS severity, days open, exploitability, and ticket status, facilitating comprehensive vulnerability management.
e. Vulnerability Details

To view detailed information about a specific vulnerability, click on the three-dot menu next to the vulnerability entry. Select “Details” from the dropdown menu. This action will provide in-depth insights into the vulnerability, including its context, associated assets, severity, and remediation status.
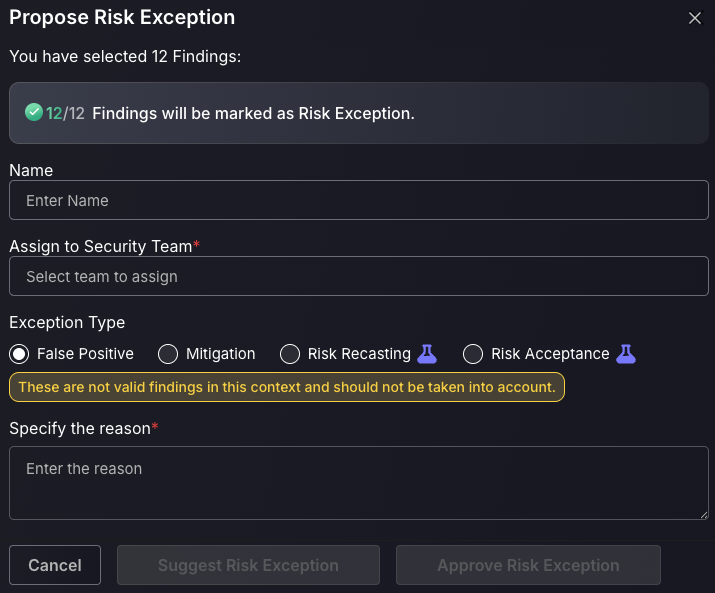
f. Risk exception
The Risk Exception box lets users mark vulnerabilities as exceptions.

There are four types of risk exceptions:
False positive:
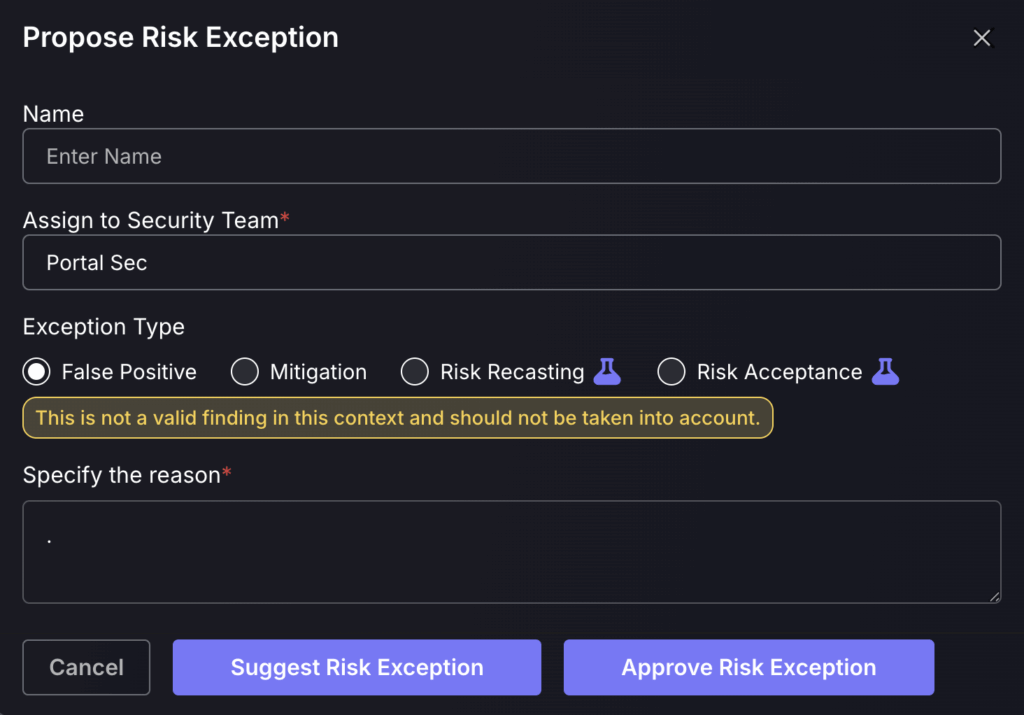
Setting an asset/vulnerability/finding as a false positive will mark it as no longer a threat, setting the risk score to 0, and will mean it no longer contributes to the global risk score/risk score of the application/environment it is within. False positives can be viewed from the risk exceptions page within security and be reviewed by security users. Risk Exception article. It is advised to test this rule as you don’t want to accidentally set a large number of findings as false positives as this could accidentally hide a lot of exploitable Vulnerabilities..
By selecting “Suggest Risk Exception”, it will add the exception to the Exception request queue for a Security Champion or administrator to approve. “Approving Risk Exception” will skip the queue for review and add it immediately.
Mitigation:
Risk mitigation is to be set for vulnerabilities which aren’t as severe as they are made out to be. Risk mitigation can also be set for vulnerabilities which are about to be changed, due to an update for example, and an expiry date can be set for when risk mitigation ends/the update is implemented. This will ensure that the vulnerability won’t exist as a focal point for the given time frame, allowing prioritisation of more important vulnerabilities.
- Enter the name for the new risk mitigation.
- Assign the risk mitigation to a responsible Team
- Select a expiry date for when the asset is no longer flagged as risk mitigation or select no expiry date by ticking the box next to this.
- The risk mitigation percentage can be set as Low, medium, high or custom and reduces the risk score for that asset/vulnerability as a percentage e.g setting it as high will reduce the risk score by 100% to 0. While setting the risk mitigation percentage as low will reduce the risk score by 30%. This enables vulnerabilities known not to be as severe as made out to be deprioritized enabling engineering teams to focus on what matters most.
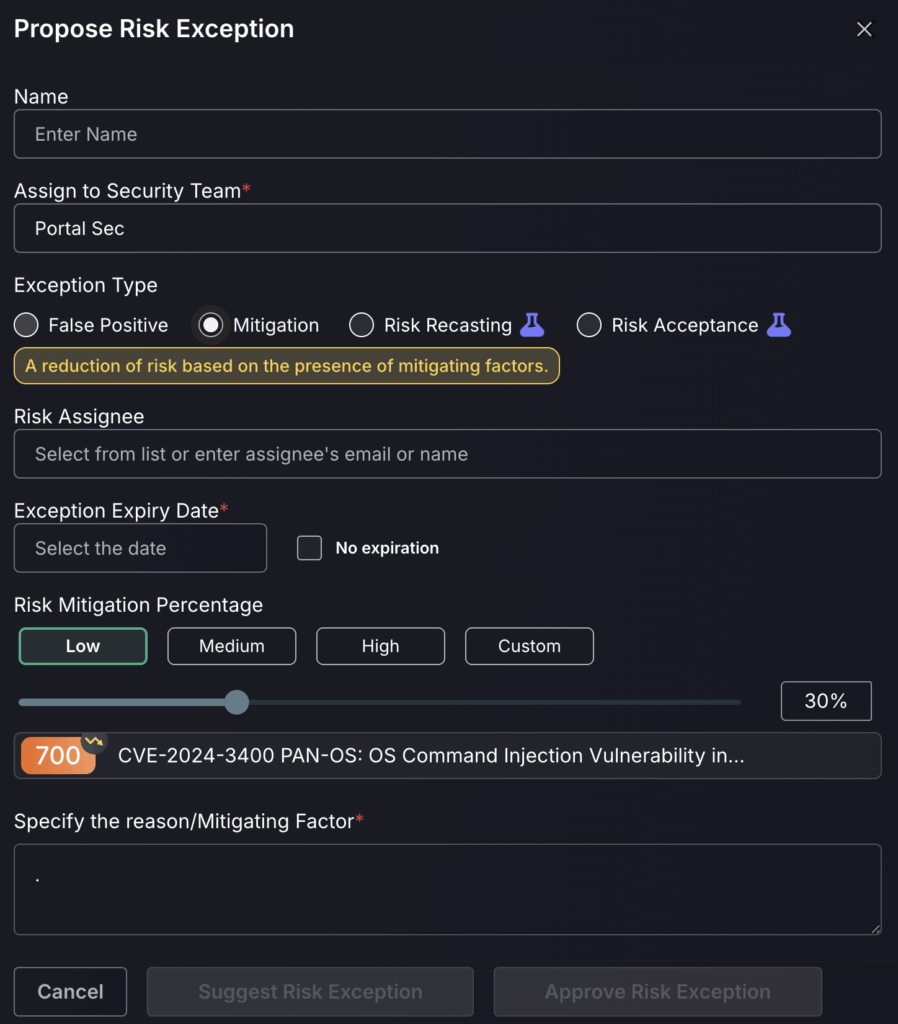
By selecting “Suggest Risk Exception”, it will add the exception to the Exception request queue for a Security Champion or administrator to approve. “Approving Risk Exception” will skip the queue for review and add it immediately.
Risk Recasting:
Risk recasting is to be set for vulnerabilities which are more severe as they are made out to be. Risk recasting can also be set for vulnerabilities which are about to be changed, due to an update for example, and an expiry date can be set for when risk recasting ends/the update is implemented.
- Enter the name for the new risk recasting.
- Assign the risk recast to a responsible Team
- Select an expiry date for when the asset is no longer flagged as a risk recast or select no expiry date by ticking the box next to this.
- The risk recast percentage can be custom set and increases the risk score for that asset/vulnerability as a percentage, e.g setting it as high will increase the risk score. This enables vulnerabilities known to be more severe as made out to be upscaled, enabling engineering teams to focus on what matters most. We recommend you set the score to the recommended value, which is 800.
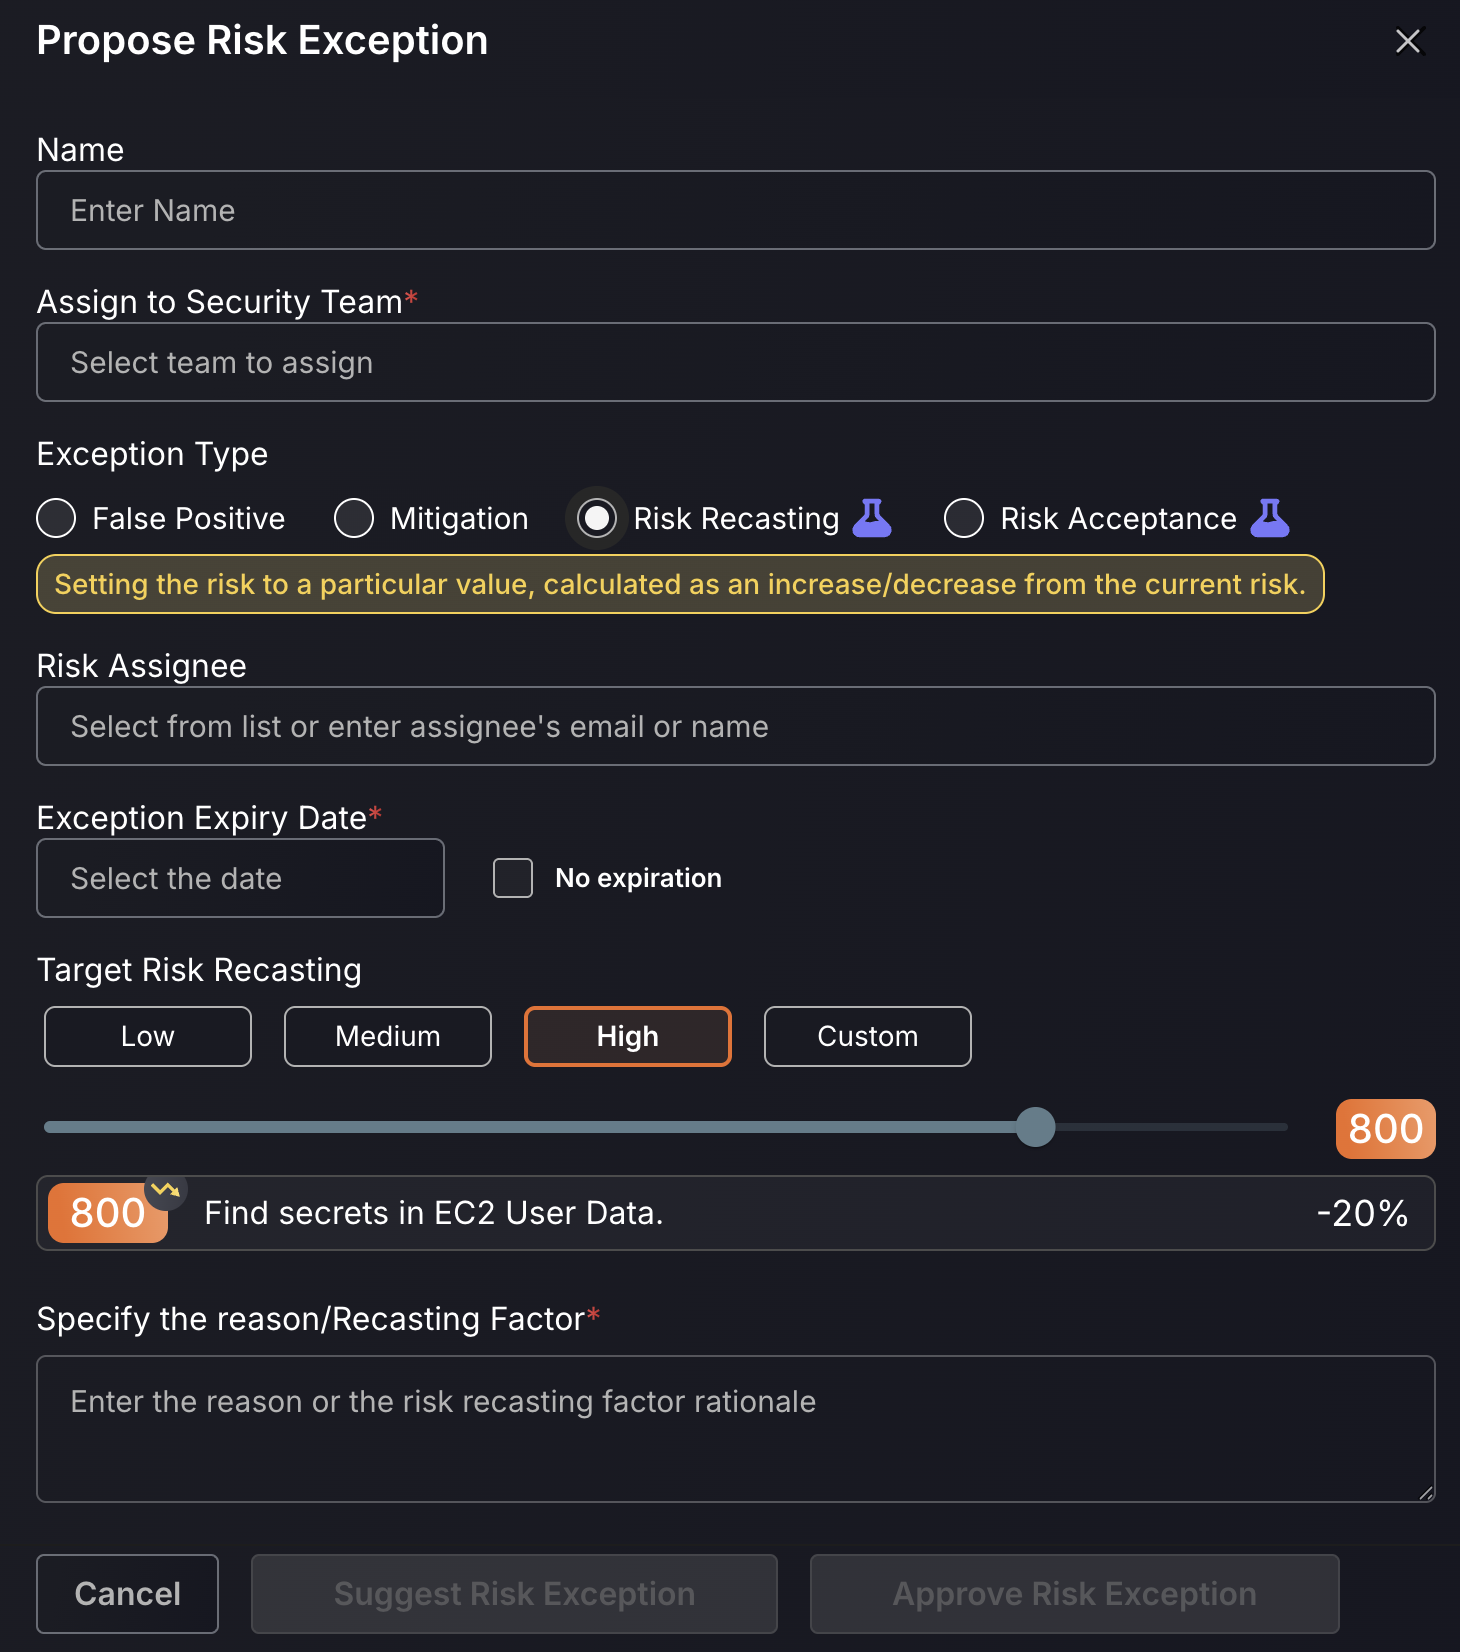
By selecting “Suggest Risk Exception”, it will add the exception to the Exception request queue for a Security Champion or administrator to approve. “Approving Risk Exception” will skip the queue for review and add it immediately.
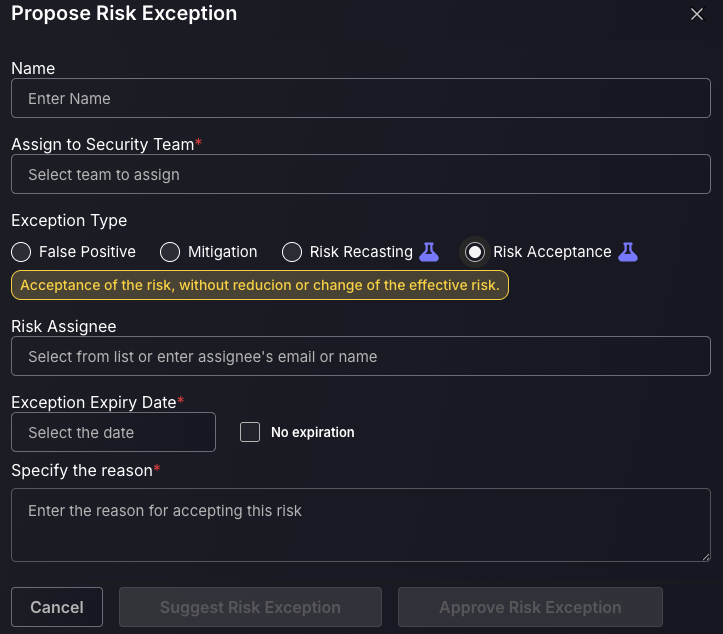
Risk Acceptance:
A risk acceptance should be created when a user encounters a failing API gate due to a specific finding, and needs that finding to be excluded in order to proceed with the deployment to production. For example, the API gate may require there to be no more than 3 critical findings and is failing because there are 4. This API gate would be blocking deployment to production due to policy enforcement, so one of these criticals could be marked as a “Risk Acceptance” to ensure the API gate passes. This is not recommended for criticals, but more so for lower risk levels, where ignoring a finding will not put you at risk. Follow these steps to add a Risk Acceptance:
- Enter the name for the new Risk Acceptance.
- Assign the risk Acceptance to a responsible Team.
- Add a Risk Assignee to be responsible for the acceptance.
- Select an expiry date for when the asset is no longer flagged as a risk recast or select no expiry date by ticking the box next to this.
3. Vulnerability Details Page
Click on a vulnerability to view Findings then click on the three dots of a given finding to view finding details.
a. Overview
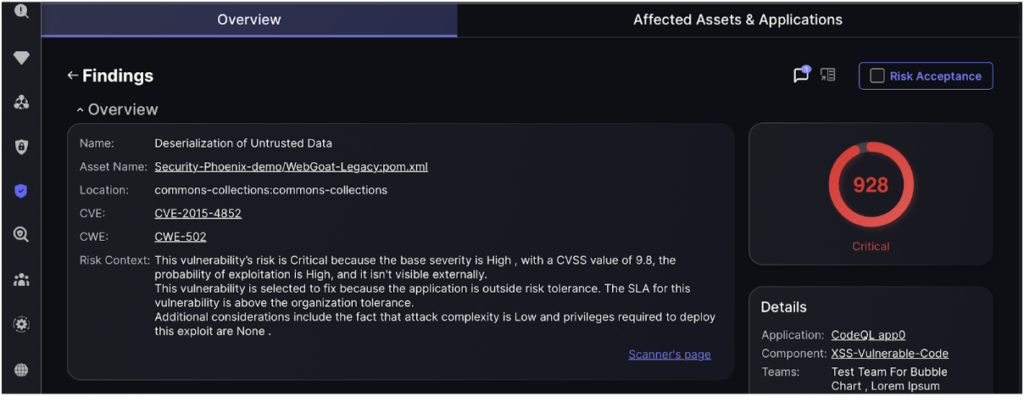
The “Overview” tab provides detailed information about the selected vulnerability, including its name, asset, location, CVE/CWE identifiers, and risk context. It highlights the severity (CVSS score), probability of exploitation, visibility, and rationale for remediation. The right panel displays the critical risk score and specific details about the affected application and component.
- CVSS Score – CVSS refers to the Common Vulnerability Scoring System which is used to assess the severity of the vulnerability.
| CVSS Score | Qualitative Rating |
| 0.1 to 3.9 | Low |
| 4.0 to 6.9 | Medium |
| 7.0 to 8.9 | High |
| 9.0 to 10.0 | Critical |
- CWE – CWE refers to Common Weakness Enumeration of the vulnerability which is an alphanumeric identifier used to classify different hardware of software weakness types. You may refer to this external page for a list of weaknesses, or click here to use the weakness search tool.
- Scanner Type – indicates the type of scanner used to identify the vulnerability/
- Specific Details – provides the full details of the vulnerability including but not limited to:
- Category
- Fisma
- Kingdom
- Line Number
- Source
- Nearest Fixed Version
b. Details
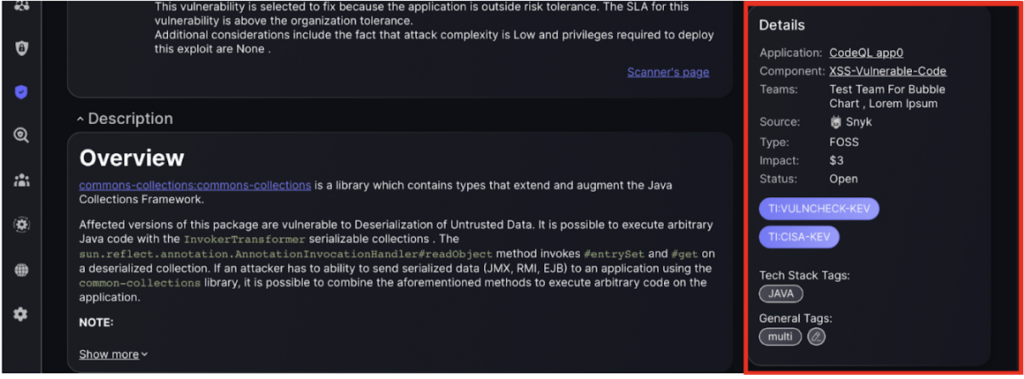
The section provides brief details about the vulnerability, including the affected Application and Component, responsible Team, and Source of the report. It also shows the Type, Impact, and Status. Tags for the tech stack and relevant threat intelligence are also listed.
This section explains gives an in depth description of the relevant vulnerability. Describing the historical context, and how attackers can exploit flaws to execute arbitrary code. The details section underscores the importance of rectifying the issue to prevent such exploits.
e. Remediation

The “Remediation” section outlines the necessary steps to resolve the identified vulnerability by suggesting a specific version upgrade of the affected software component. Additionally, it provides a list of references, including blogs, official documentation, and security databases, to offer further context and guidance for implementing the fix and understanding the broader implications of the vulnerability.
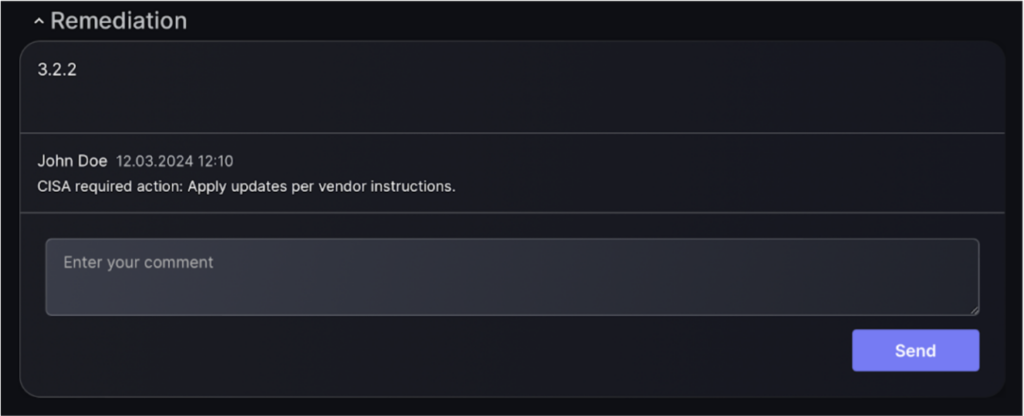
Add comments and updates to let other people and teams know what the latest updates on remediation are.
f. Specifics
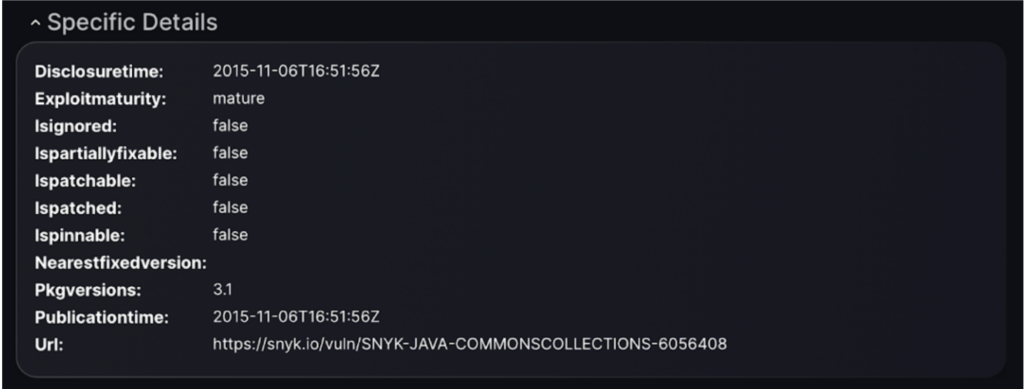
The “Specific Details” section provides technical metadata about the vulnerability, including its disclosure time, the maturity of its exploit, and whether the vulnerability is ignored, partially fixable, or patched. It also lists the affected package version, the publication time, and a URL for more information. This section helps users understand the status and history of the vulnerability, as well as where to find additional details.
g. Risk Elements
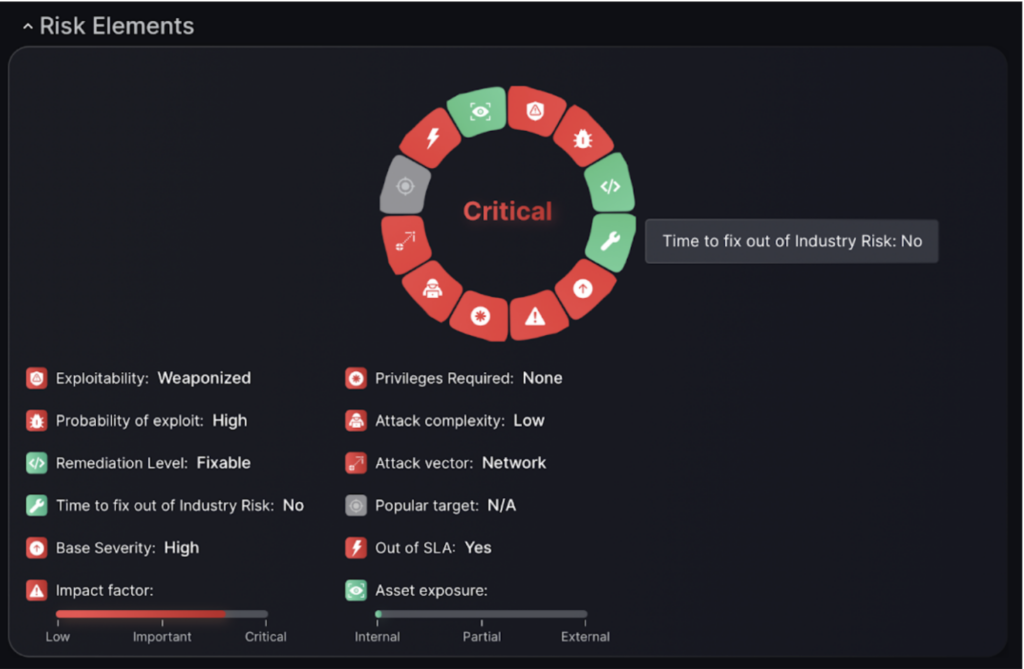
The “Risk Elements” section visually summarizes the criticality and factors influencing the vulnerability. It highlights key aspects such as exploitability, probability of exploit, and the fact that remediation is possible. The chart also notes that no privileges are required, the attack complexity is low, and the attack vector is network-based. Additionally, it indicates that the vulnerability is out of SLA. This section provides a quick overview of why the vulnerability is considered critical.
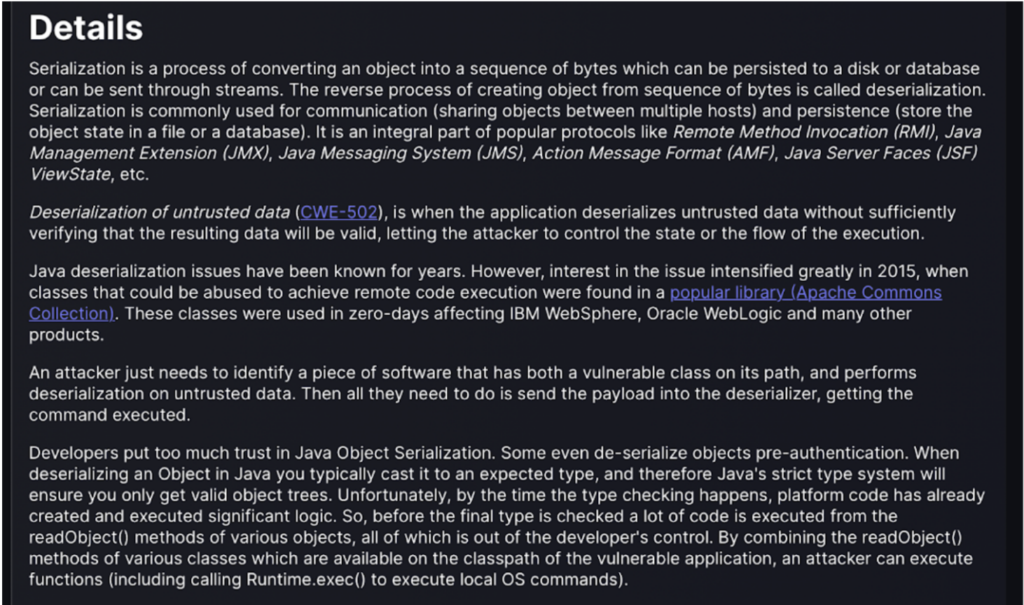
h. CWE Details
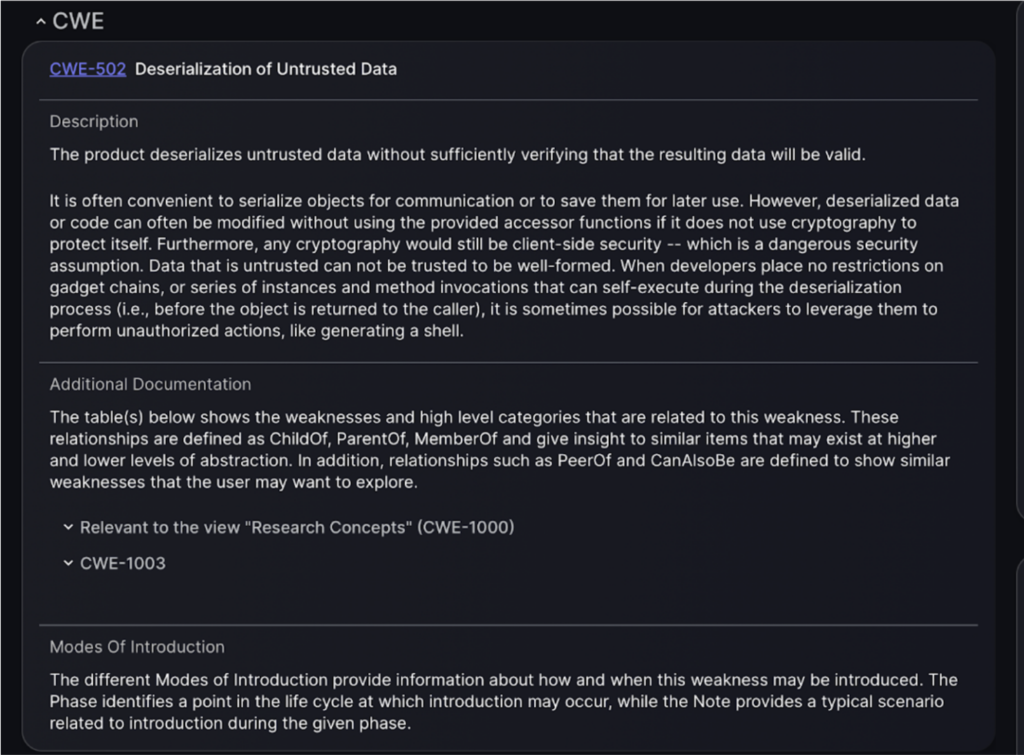
The “CWE” section provides detailed information about the relevant CWE. In this instance it describes how untrusted data can be deserialized without proper validation. Additional documentation explains related weaknesses and high-level categories. This section also covers various modes of introduction, detailing how and when the weakness may be introduced during the software lifecycle.
4. Findings Actions
Now that you understand the basics of vulnerability management and the different features available for vulnerability analysis, this guide will introduce you to some of the triaging actions to be taken.

To take action on a vulnerability tick the grey box on the right of your chosen vulnerability then navigate to the “Findings Actions” tab to select one of the following actions:
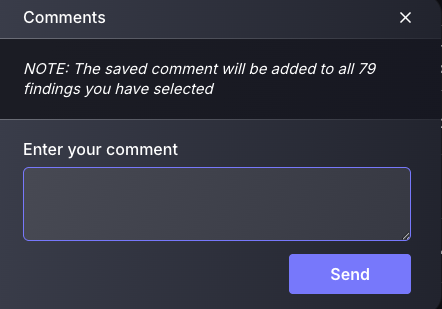
a. Add Comment
Adding comments should be used within your triaging process to keep a permanent record for all users. For example, administrators may want to comment on a specific date by which the vulnerability needs to be fixed. Comments should not be used as an informal way to achieve what the Phoenix platform is already capable of, e.g. adding a comment to a finding to advise mitigation, as this should be done by proposing a risk exception.
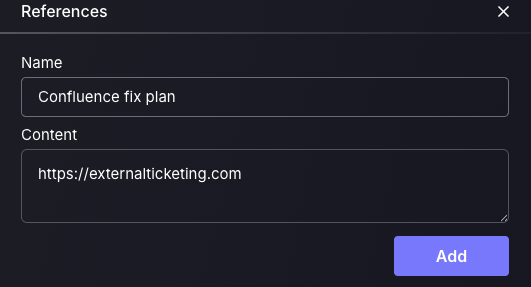
b. Add ticket reference
Ticket references are to be used when a ticket has been created using non-Phoenix-supported ticketing platforms, and a reference can be made to give a link to this ticket. This is not a recommended action to be done, as ticket management using disconnected tools leads to confusion and overcomplication.
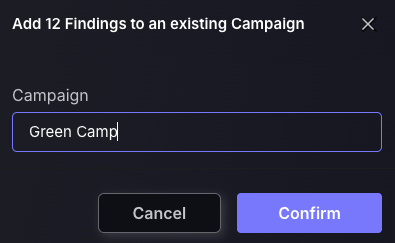
c. Add To Campaign
Campaigns are created by administrators to provide a centralised way of tracking vulnerability management progress. Specific vulnerabilities can be assigned to a campaign, allowing teams to monitor remediation efforts, leave comments, and manage associated tickets—all from a unified campaign dashboard.
This approach fosters cross-team collaboration by consolidating efforts within a single campaign. It also enables better scheduling and coordination of vulnerability fixes, compared to managing them separately across isolated teams, which can often be harder to track and align. For more information on Campaigns, refer to this article.
d. Create Issue Ticket
- The default setting is to inherit the issue tracking project, which will mean the tickets created will inherit the issue tracking projects of the applications/environments the findings are within. If the findings selected are within different applications/Environments with different issue tracking projects, then they will automatically be created within their allocated issue tracking projects. The other option is to manually choose a project, which is not recommended as it may complicate remediation efforts to have vulnerabilities from one application/environment spread across multiple projects.
- Enter a Campaign name to assign the ticket to(not required).
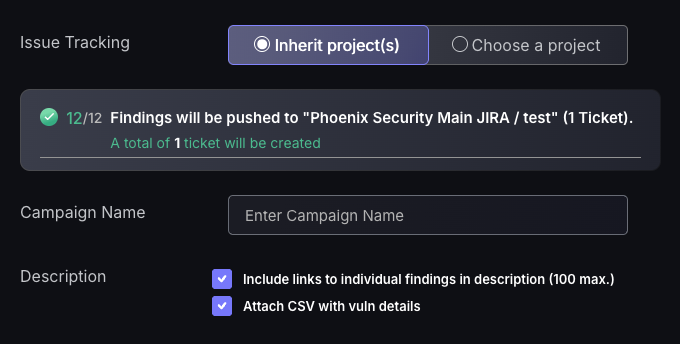
- Select a finding to set as the description for the ticket. The ticket name will automatically be set to the CVE of the finding selected as well as the remedy for the finding will be set within the ticket. Tickets should be made for very similar findings, meaning whichever finding you select for the ticket name, description, and remedy should be applicable to all findings created within that ticket.
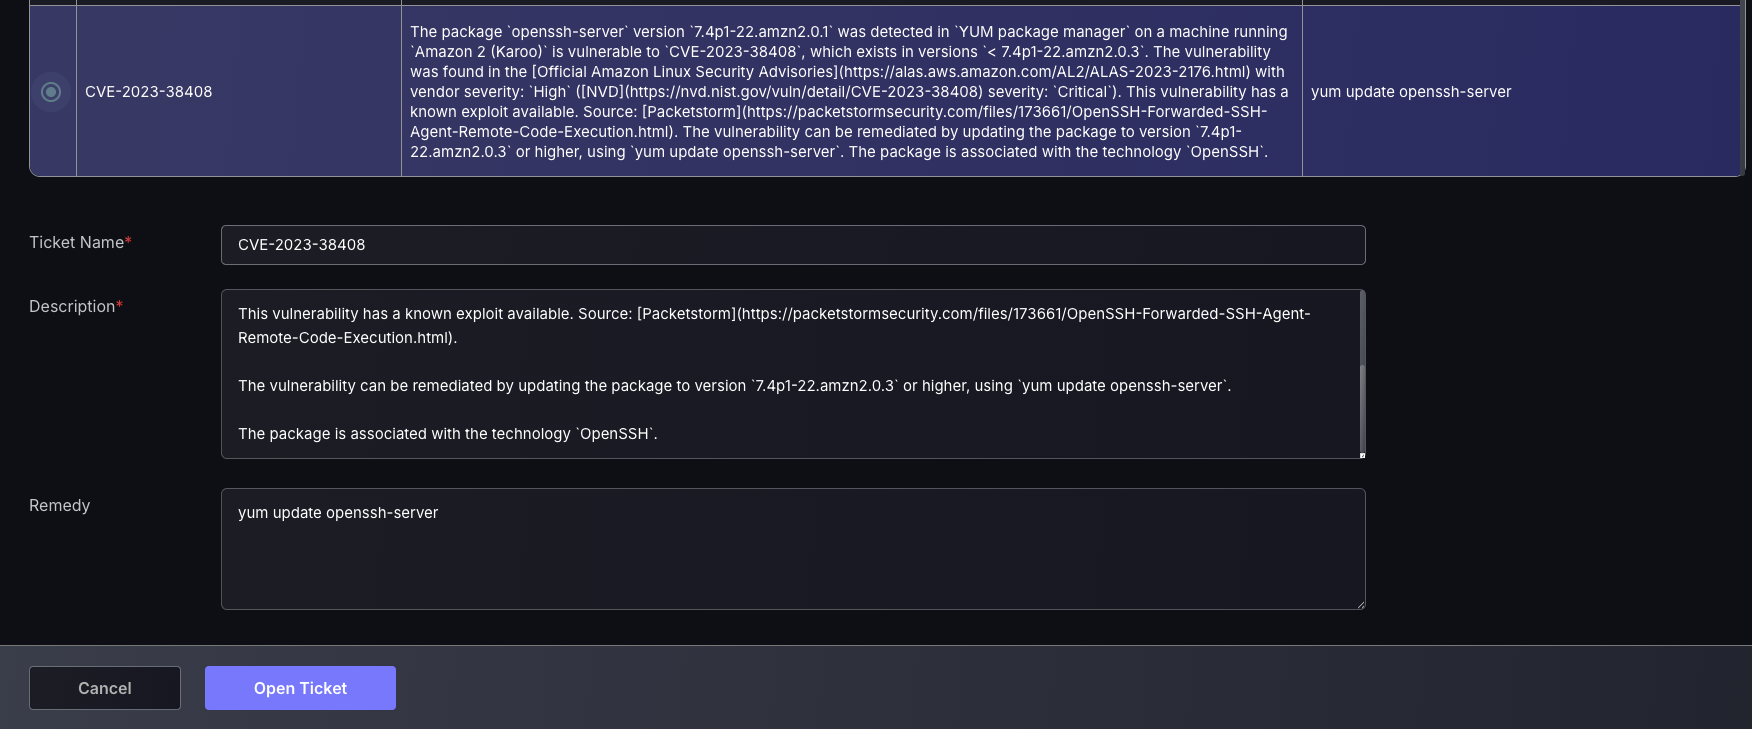
- Edit the Ticket name, Description and Remedy to have the appropriate information for teammates to have the relevant information on what needs to be fixed and how.
e. Link to existing ticket
This feature provides flexibility by allowing newly discovered vulnerabilities—when deemed similar to existing ones—to be linked to already created issue tickets. This helps consolidate remediation efforts and avoids duplication of work. Before linking a ticket, ensure that the issue tracking account or project has not been modified on the issue tracking provider’s side. Phoenix validates all details—including the issue tracking account, project name, and ticket ID—against the original information recorded when the ticket was first created. Any mismatch may prevent the ticket from being linked successfully.
- Enter the Issue tracking account of the existing ticket.
- Enter the issue tracking project of the existing ticket.
- Enter the Issue ticket ID found on the Issue tracking provider’s platform(not Phoenix).
- Press Confirm.

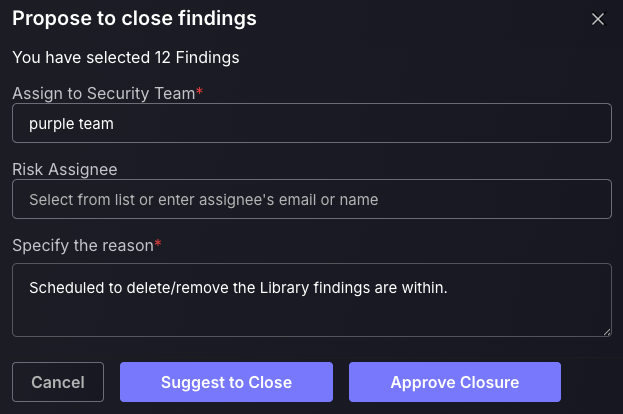
f. Propose Close
Proposing a closure of findings will mean they no longer appear on the platform. Users can either “Suggest to Close”, which will add the proposal to the Exception requests queue, or “Approve Closure”, which can only be done by administrators.
- Assign the findings closure to a Security team to be held responsible for the closure.
- Assign a risk Assignee, i.e. the user closing the findings.
- Specify the reason for the findings closure.
g. Propose Risk Exception
There are 4 different options for risk exception proposals. Please refer to 2.f. within this guide for more details on these different exception requests.
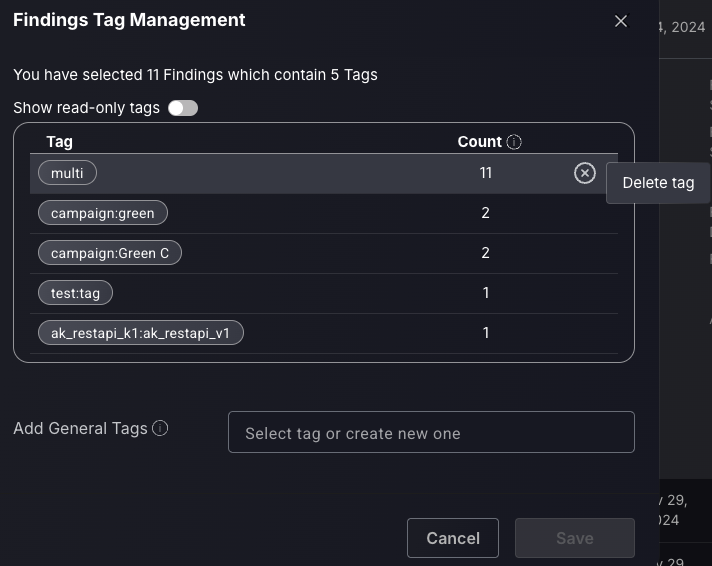
h. Tag management
Tag management is designed to be used in conjunction with filtering capabilities. For example, filter by team and assign a “pteam: teamname” tag to all findings with that filter.
The tag management feature gives a table of all the different tags assigned to the selected findings, as well as the count of findings with each specific tag. Click on the right side of a tag to delete the tag from those findings.
To add a tag to all the findings selected, either type the name of the new tag in the “Add General Tags” box and press Enter on your keyboard or select an already existing one from the drop-down. Remember to press save afterwards.
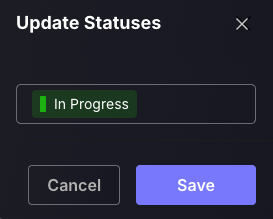
i. Update statuses
This feature is to be used to select multiple findings and use the custom status features, which are available to set up in Organisation settings -> Configuration. The statuses can already be changed within the findings page for each finding manually, but this tool can be used to update them all at once.
- Select a custom status from the drop down.
- Press save.