To help you get your Phoenix Security account up and running, here are the main steps you need to complete:
1. Connect Scanner.
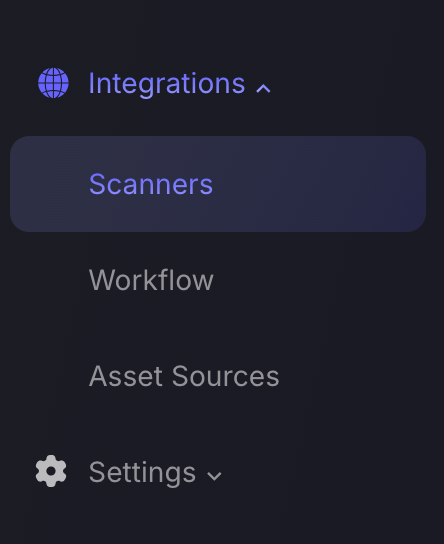
1. On the side bar menu, navigate to the Scanners tab in the Integrations section.
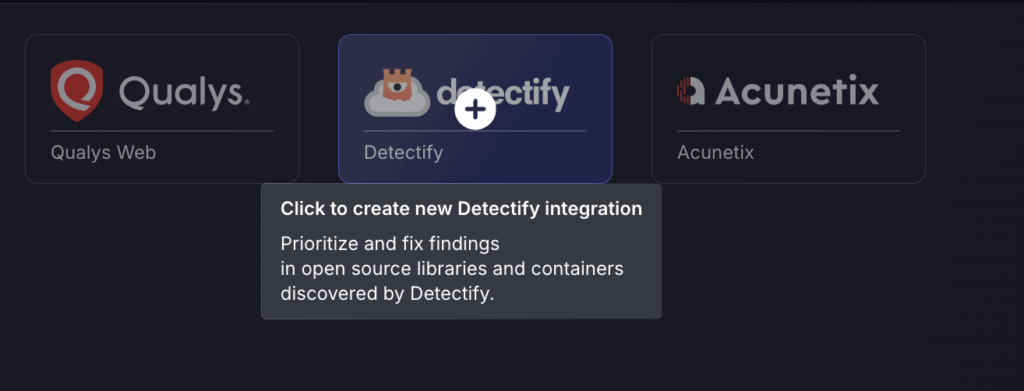
2. When creating a new scanner, locate the scanner type and click to create new scanner integration.
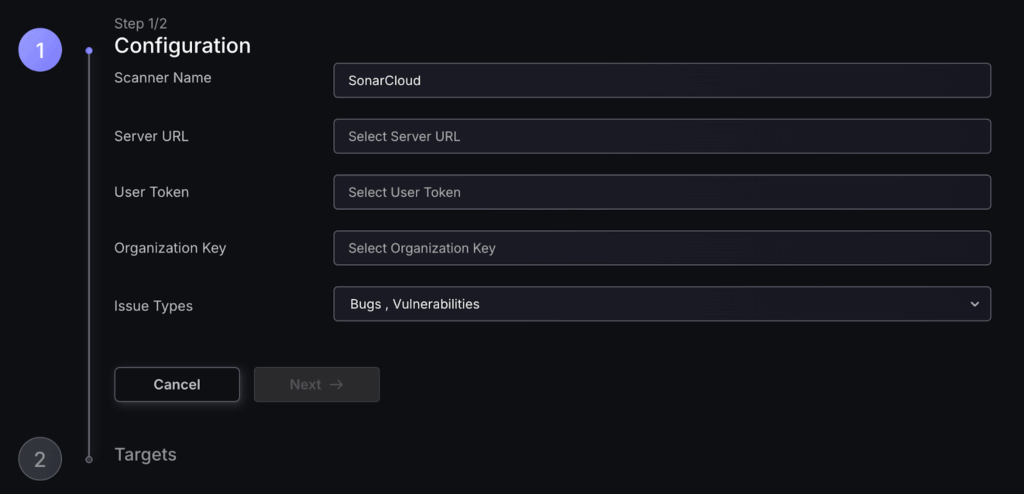
3. Enter the required details then select Next (required details will be different for each scanner type but here is an example with SonarCloud).
4. The next step is to select the targets you would like to fetch.
A target is a subdivision of the surface or scope covered by the scanner. Depending on the type of scanner, a target could be a cloud account, website, code repository, individual virtual machine, or an artificial construct defined by the scanner (like an “application” or “project”) etc. Within Phoenix, targets are defined so that the list of targets covers the entire scope of the scanner; two targets won’t cover the same entities (they don’t overlap).
a. Selecting fetch everything will fetch all data from all targets from the scanner, including any new targets that may be found in the future. You may now select Save Scanner and be done with this process. If you change your mind you can edit target selection at a later time.
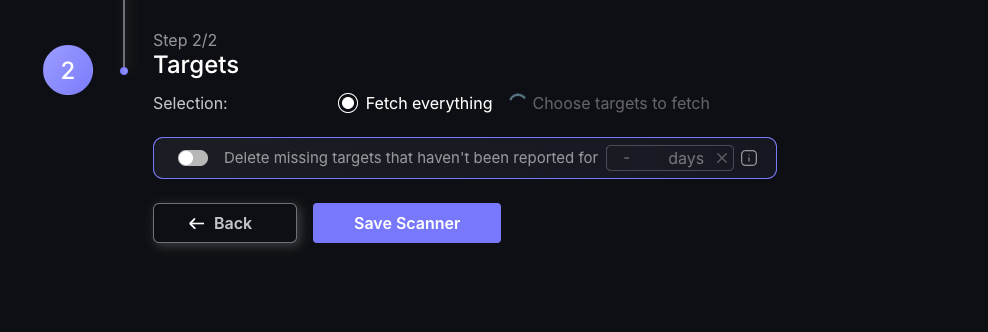
b. If you desire to choose which targets are being fetched you can wait for the spinner next to Choose targets to fetch to finish loading (as shown in the image above) or you can choose to close the creation modal window whilst the targets are loading.
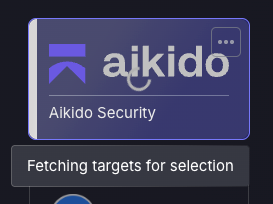
If you close the window you will see a spinner over the scanner, rolling the mouse over the scanner will reveal a tooltip that states it’s still Fetching targets for selection.
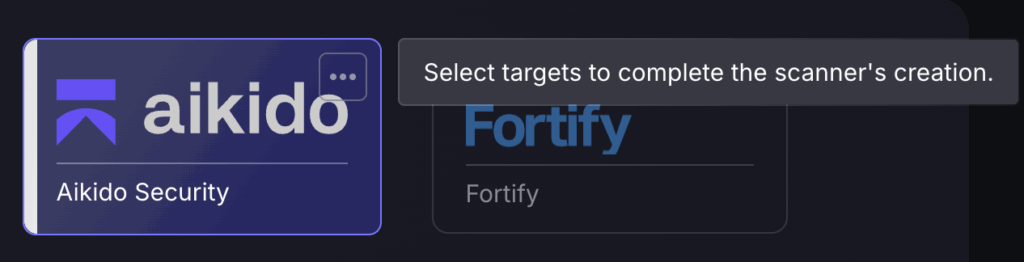
If the scanner is clicked on at this time you will be able to see the fetching targets process is still in progress.

If the creation window was closed; the scanner will begin to flash to indicate that the fetching process has been completed. Rolling the mouse over the scanner will reveal the tooltip stating that you must Select targets to complete the scanners creation.
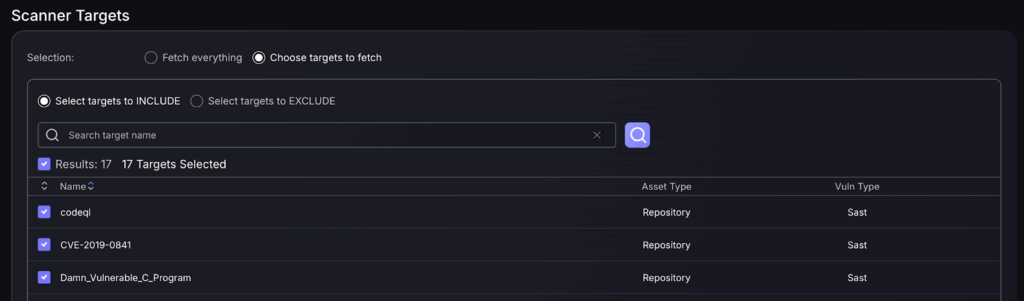
5. To complete scanner creation you must select which targets to include/exclude and then save the scanner.
- Select targets to INCLUDE : only data from selected targets will be fetched. Keep in mind that selecting all targets isn’t the same as selecting Fetch everything as it will only collect the ones that are selected and any new targets that may be found in the future will not be included in the fetch.
- Select targets to EXCLUDE : only data from selected targets will be excluded from the fetch. Any new targets that may be found in the future will be included.
For more detail head to our Scanner Integration Management page.
2. Create Applications.
To create an Application, follow these steps:
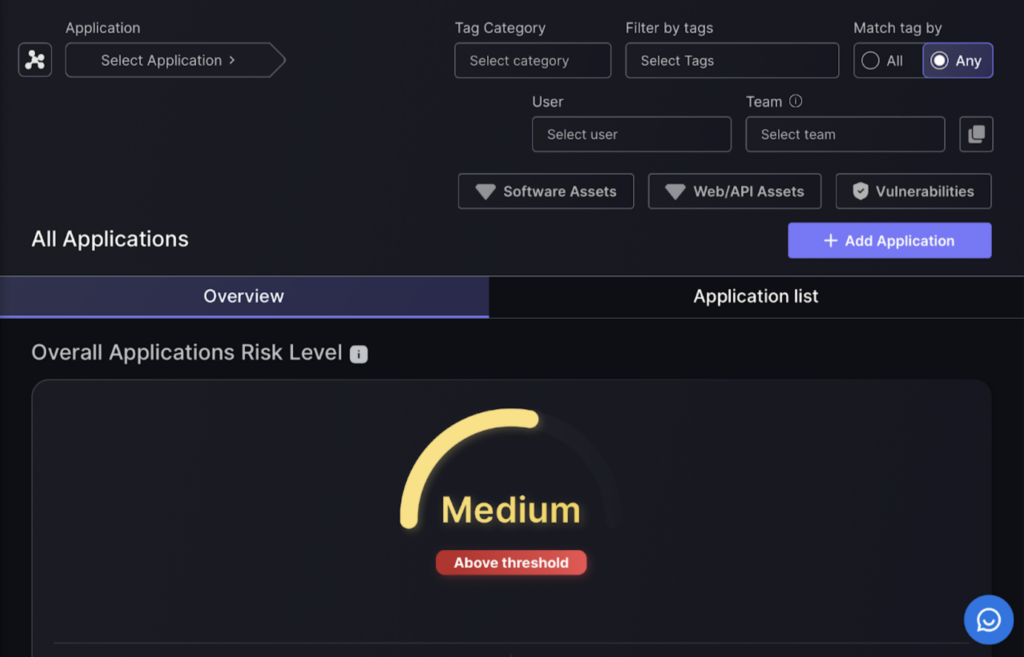
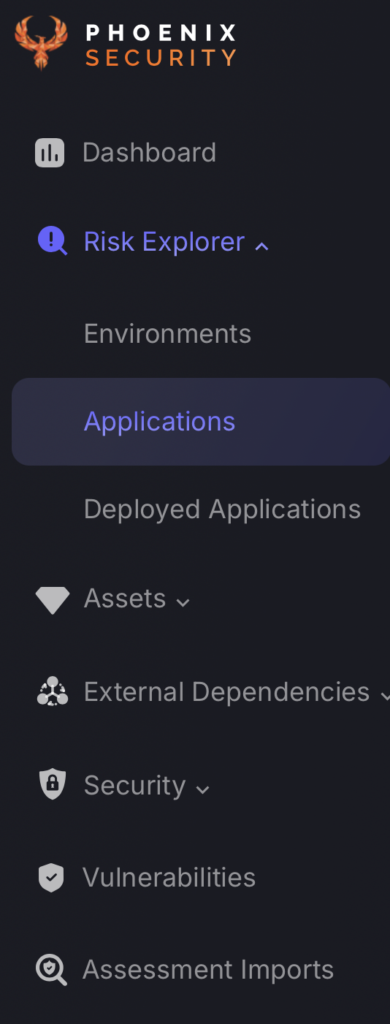
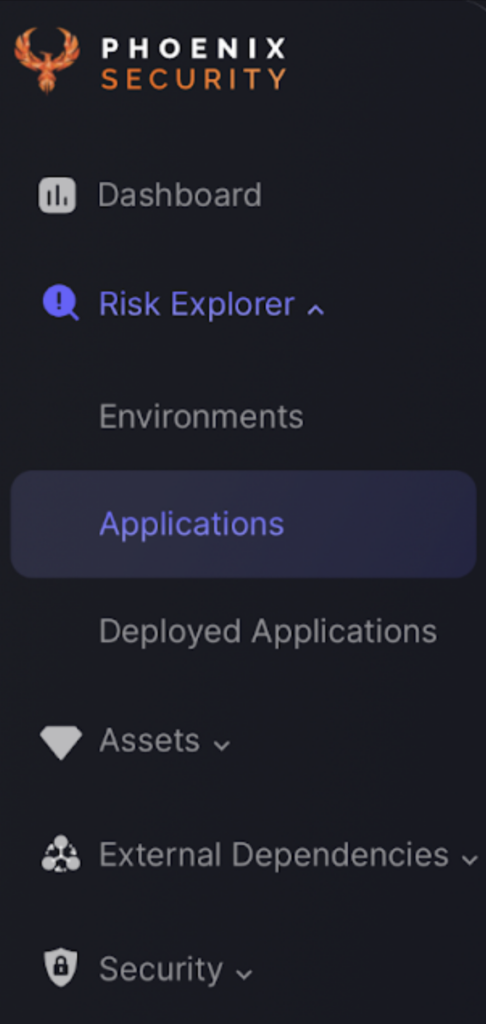
- On the Navigation Menu, select Risk Explorer > Applications.
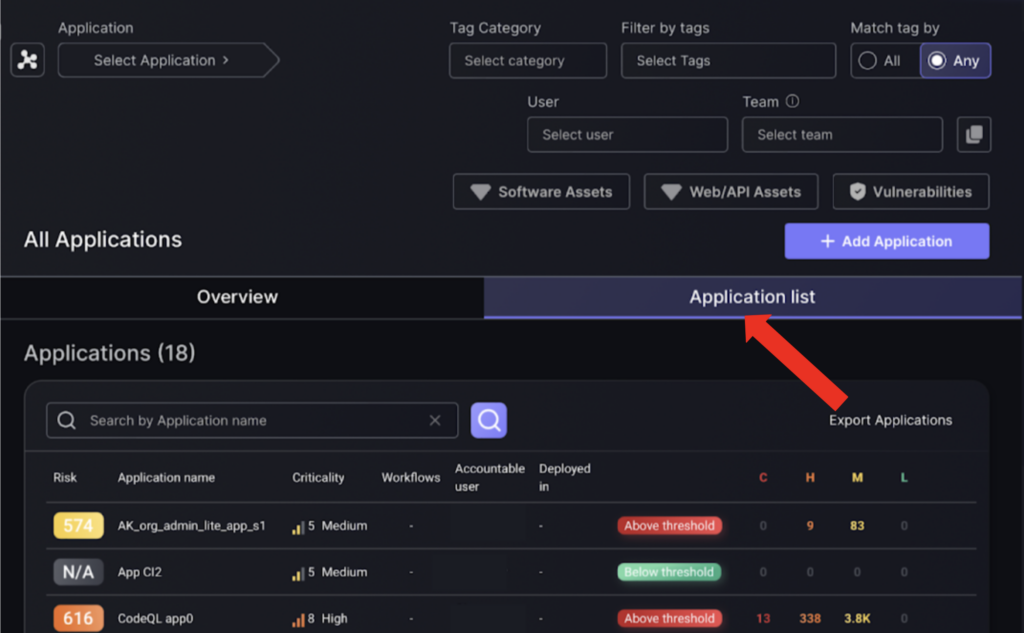
- Click the “Add Application” button on the right-hand side.
Step 1
- Complete the following fields:
- Application Name – name assigned to the Application.
- Risk tolerance – sets the risk tolerance level for the Application.
- Value – the monetary value to the organisation.
- Criticality – determines how critical the Application is to the organisation.
- Accountable User – assigns the person or user primarily accountable for the Application.
- Responsible users – assigns the users responsible for the application
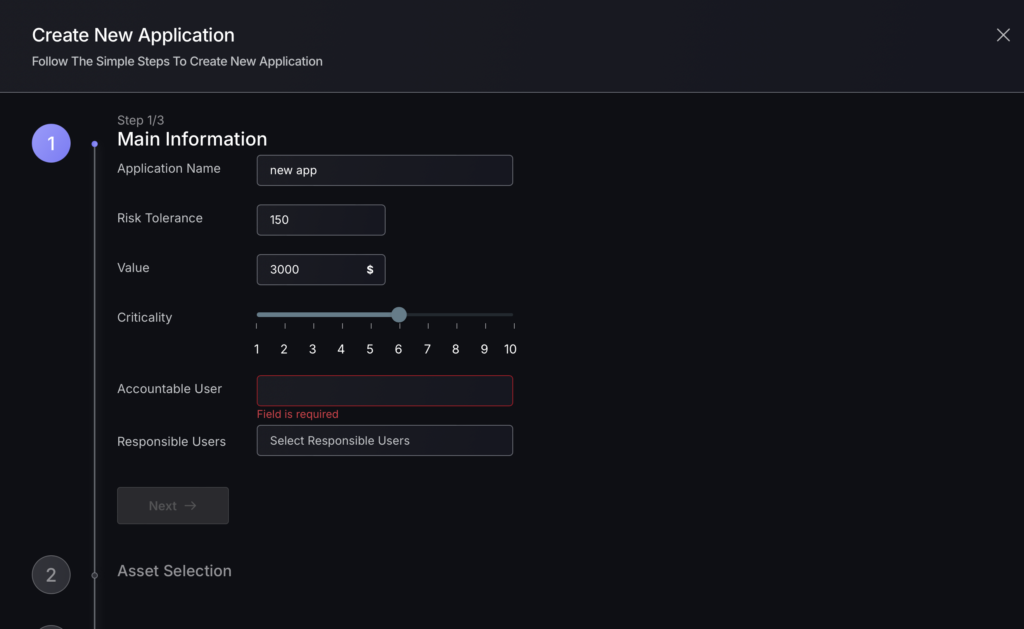
- Click “Next” once all fields are filled.
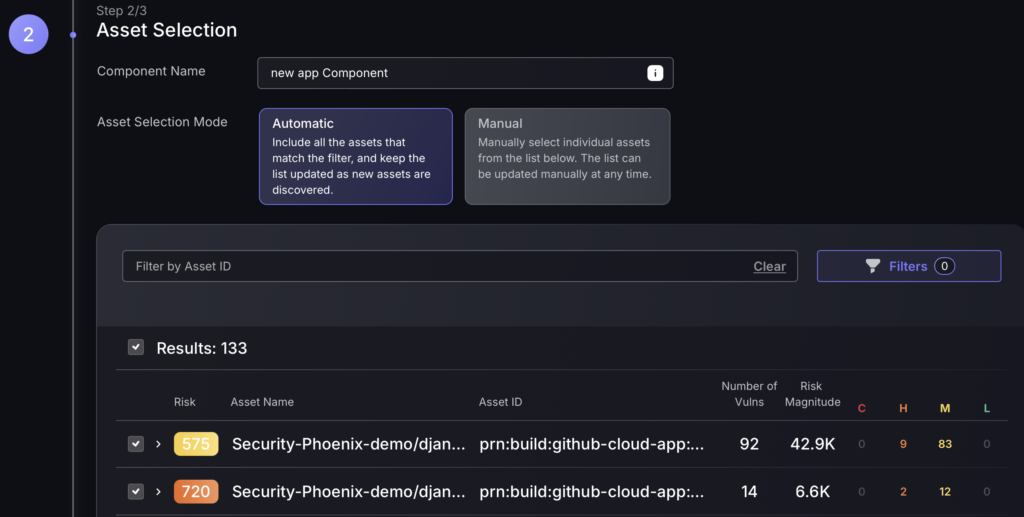
Step 2
- Enter Component Name – the name you want to label the component as.
- Select the Asset Selection Mode – automatic being the default selection.
Step 3
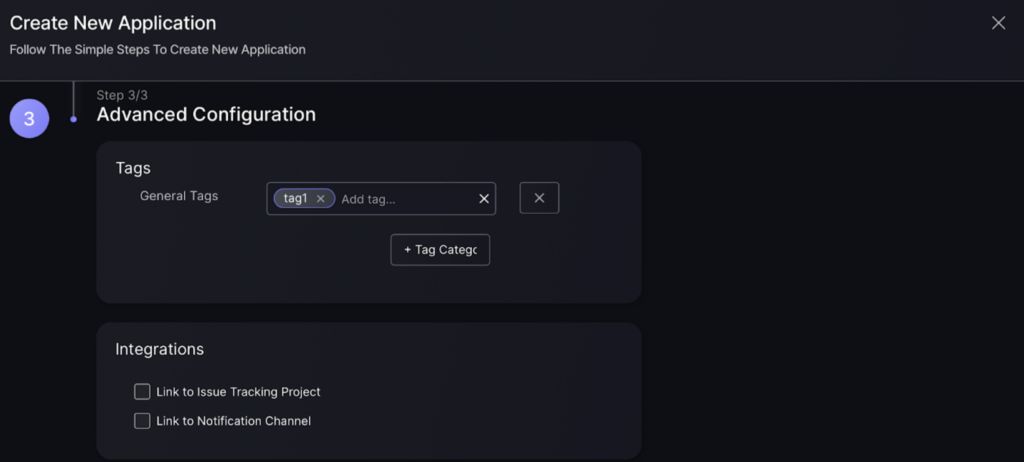
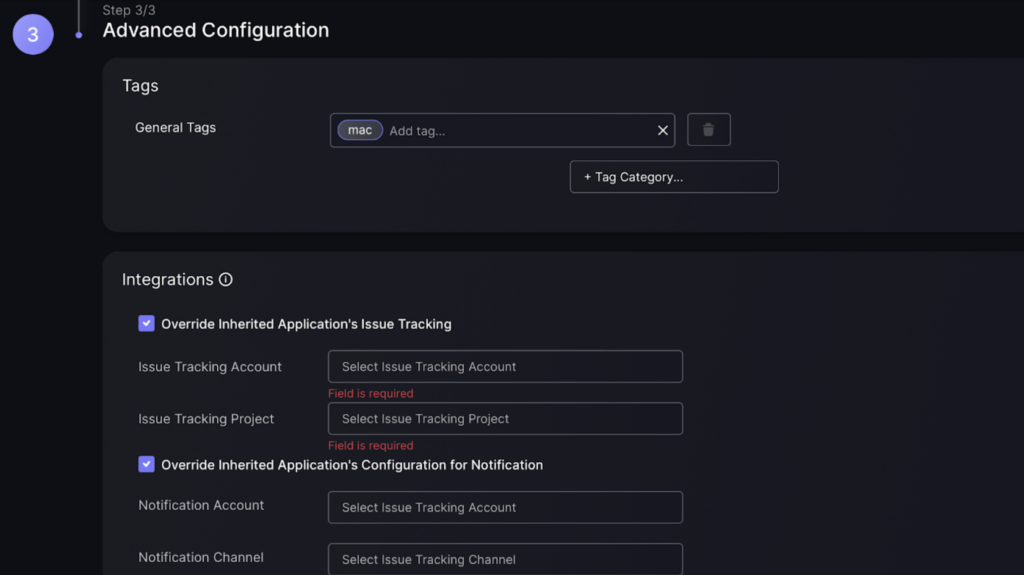
In this stage you will be given the option to add tags which you can use to identify the application and help search for it e.g. adding a tech stack tag of CSS can be used in the application filter to help find it.
You will also be able to link the application to an issue tracking project which will enable you to create tickets for vulnerabilities/findings linked to the application and start managing the vulnerabilities in an external workflow platform. The option to link to a notification channel will allow you to select a notification channel to receive security updates on.
- Add tags and select which integrations you would like – if any fill in details.
- Select which environment the application belongs to and the services attached.
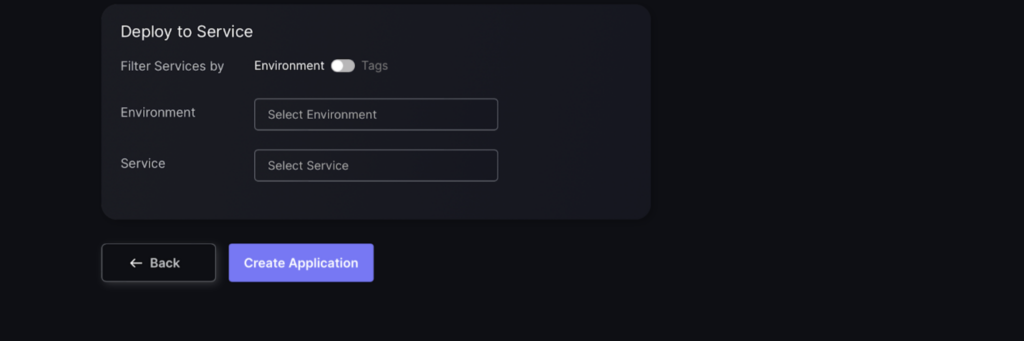
- Press the “Create Application” button, and the application can be viewed on the application list view.
3. Add Components (from Scanners).
If you didn’t already add a component when you initially made the application or need to add another component, this will direct you on how to do so.
- On the Navigation Menu, select Risk Explorer > Applications.
- Select the Application list to view which application you want to add a component to.
- Click on the three dots on the right side of the application record to reveal the selection box, then click edit.
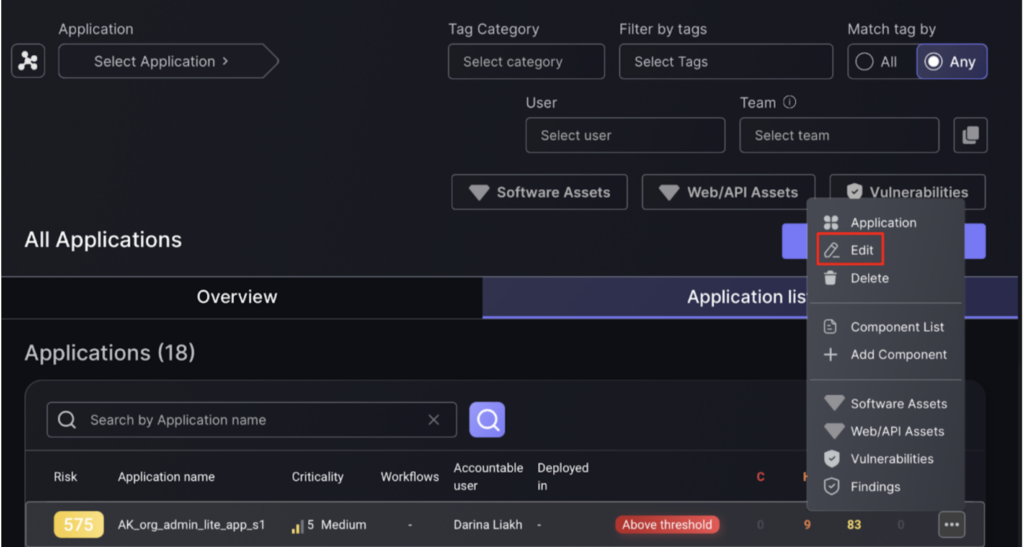
- Scroll down to the components section and click “Add Component” at the top right corner.
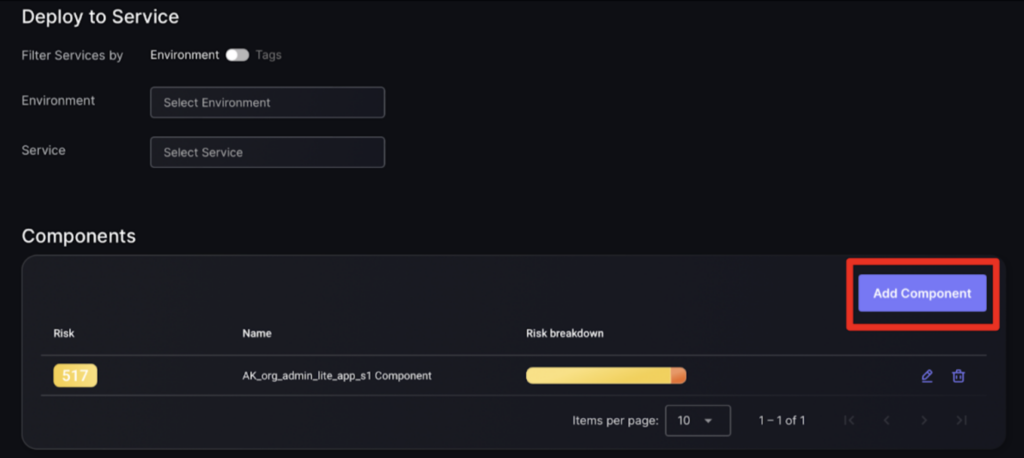
You will now be required to enter details about the component you are adding which is split into 3 stages.
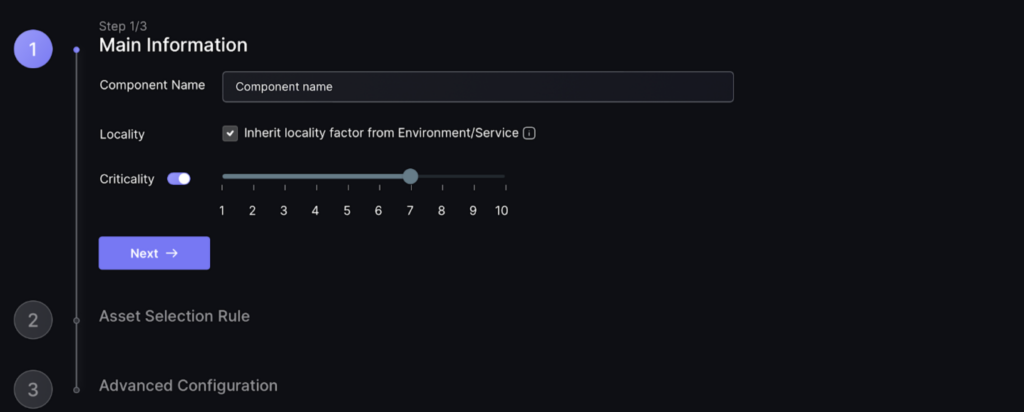
Step 1
a. Enter the name you wish to call your component.
b. Select if the component should inherit locality factor from environment/services – component will be linked to the environments/services the application is assigned to.
c. Select the criticality level which will impact the risk level of findings/vulnerabilities associated with this component.
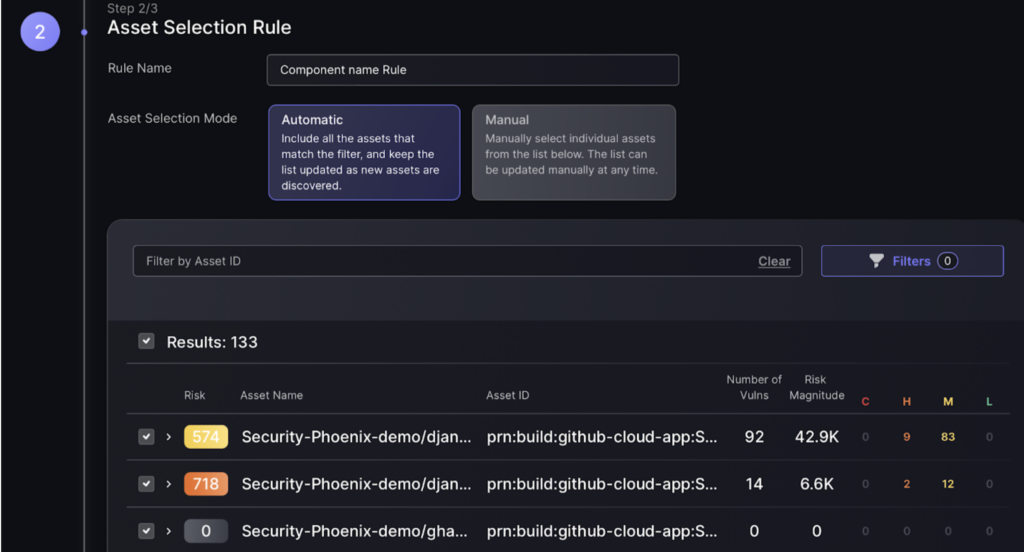
Step 2
d. Enter the name you wish to call the component.
e. Select the asset selection mode, which is automatic and is the default selection.
Step 3
f. Add tags which you can use to identify the component and help search for it e.g. adding a mac tag can be used in the application filter to help find it.
g. If you want to alter the issue tracking project for this component then select “Override Inherited Application’s Issue Tracking” button and fill in details.
If you want to alter the notification channel for this component then select the “Override Inherited Application’s Configuration for Notification” button and fill in details.
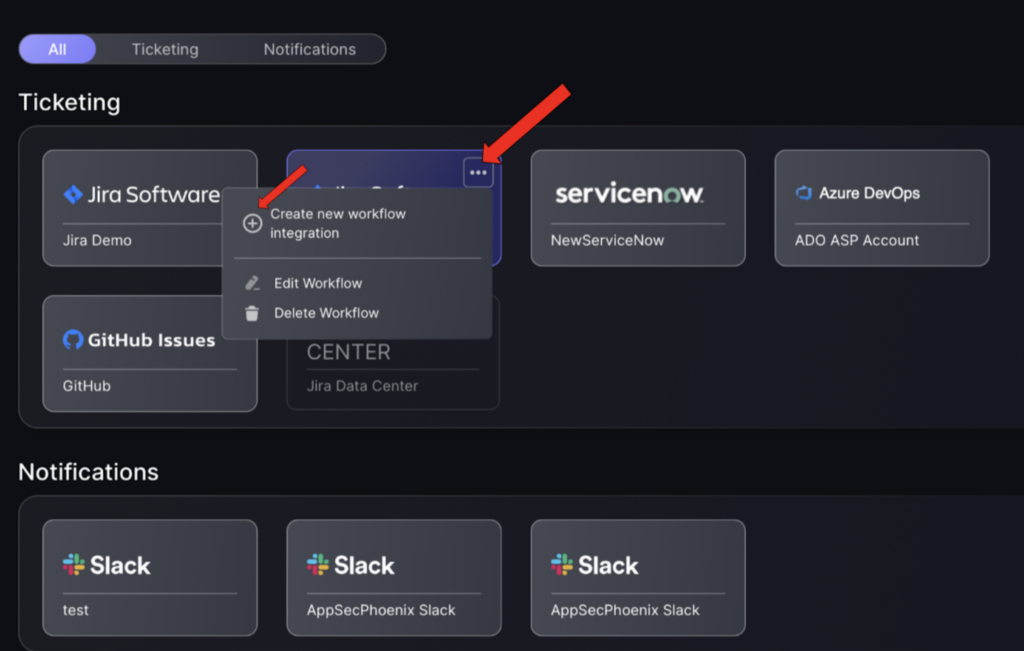
4. Link to Jira.
- On the Navigation Menu, go to Integrations > Workflow.

- Click on the 3 dots in the top right of an existing ticketing integration then select “Create new workflow integration”.
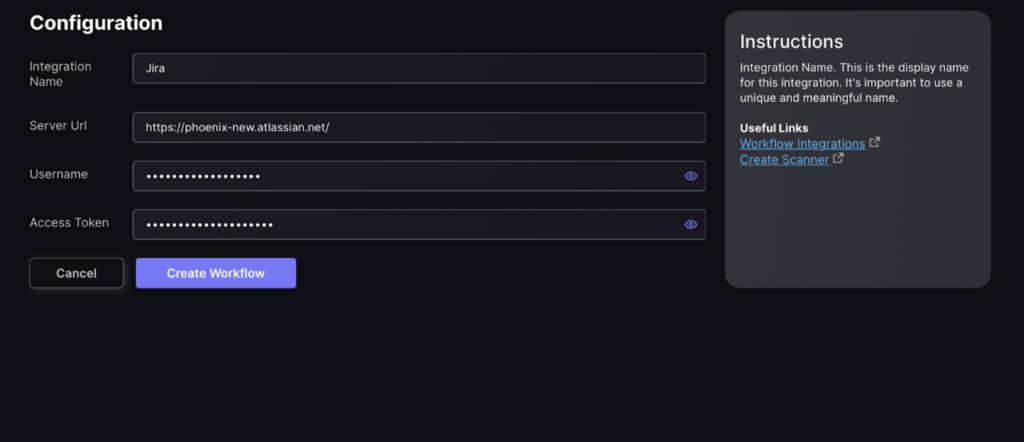
- Enter configuration details including:
- Integration name – this is the name that will be displayed on the workflow screen
- Server url – url of the workflow integration
- Username – username made when workflow account was created
- Access Token – Given when workflow account was created
- Press “Create Workflow” once all details have been entered.
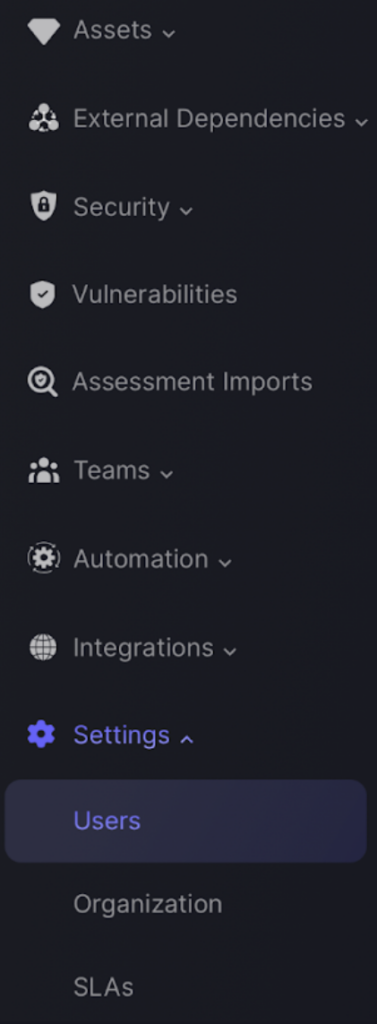
5. Create Users.
- On the Navigation Menu, click Settings > Users
- Click on the “Add User” button on the top right hand side of the screen to add a user.
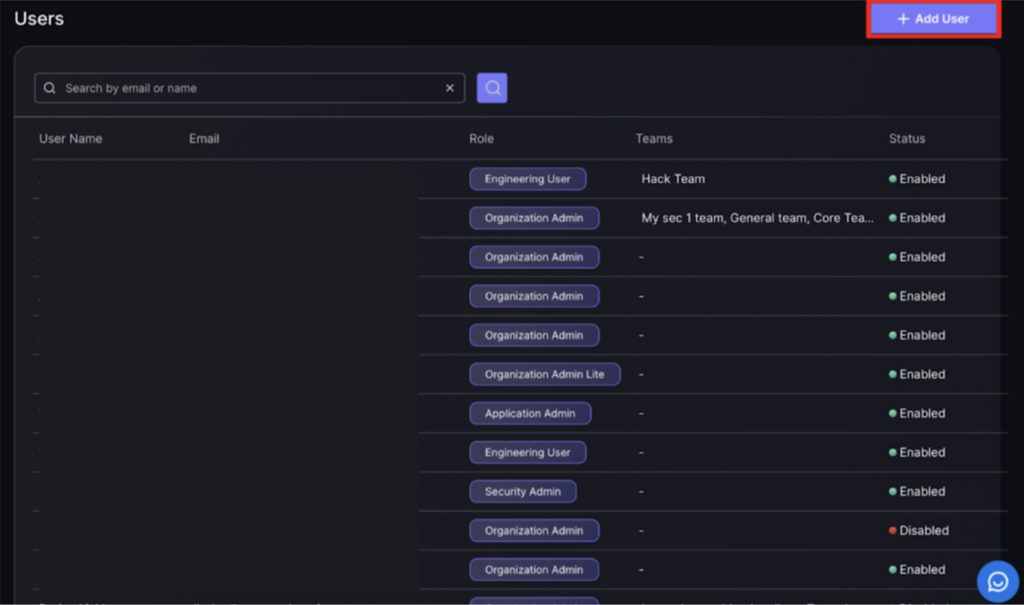
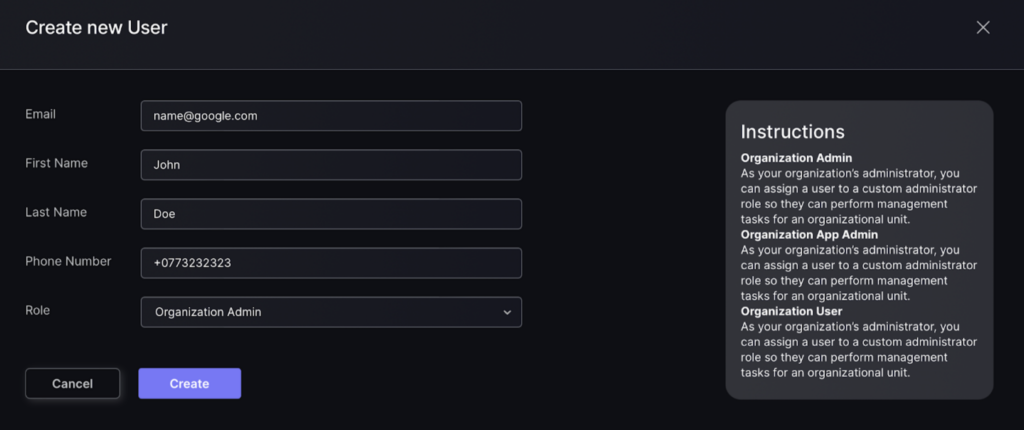
- Fill in new user details including:
- Email – user email
- First Name – user first name used to identify users in user table
- Last name – user last name used to identify users in user table
- Phone Number – users phone number
- Role – select role of user in organisation
For a detailed description on team roles and their privileges click here.
- Press “Create” once all details have been entered.
6. Assign Applications to Users.
These steps will show you how to both add accountable users and responsible users to an application to help aid management of applications by making it clear who is responsible but also accountable when things go bad.
- On the Navigation Menu, select Risk Explorer > Applications.
- Select “Application list” to view which application you want to add a component to, press on the 3 dots on the right of the application then press edit on the pop up.

- Complete following fields:
- Application Name – name assigned to the Application.
- Environment/Account – the cloud account where this Application is deployed.
- Threshold – sets the risk tolerance level for the Application.
- Value – the monetary value to the organisation.
- Criticality – determines how critical the Application is to the organisation.
- Accountable User – assigns the person or user primarily accountable for the Application.
- Responsible User – assigns users responsible for the application – to save the selected user press save on the drop down once users are selected.
- Tags – assigns tags to help identify and search for the Application.

- Click “Save” or “Save and Show Applications” to view the application dashboard.
7. Assign Applications to Jira.
- On the Navigation Menu, select Risk Explorer > Applications.
- Select “Application list” to view which application you want to add a component to, press on the 3 dots on the right of the application then press edit on the pop up.
Link to issue tracking project
- To link to an issue tracking project click on the grey box next to “Link to Issue Tracking Project” and fill in fields required:
- Issue Tracking Account – this is the name given to the workflow when it was created e.g. Jira Demo.
- Issue Tracking Project – this refers to projects made in the workflow eg in Jira infra backlog is an example of a project.
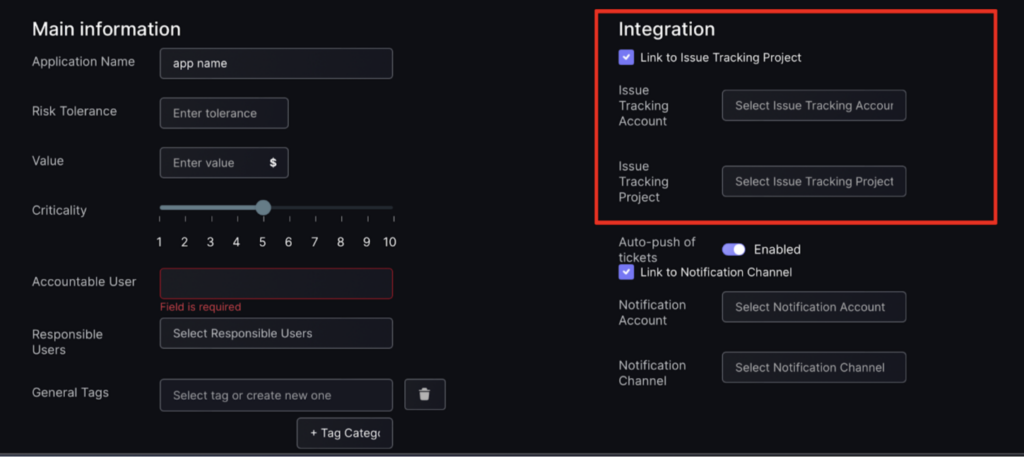
Link to notification channel
- To link to a notification channel click on the grey box next to “Link to Notification Channel” and fill in fields required:
- Notification account – this is the name given to the workflow integration when it was created e.g Slack.
- Notification Channel – this is the name given to the notification channel in the platform.
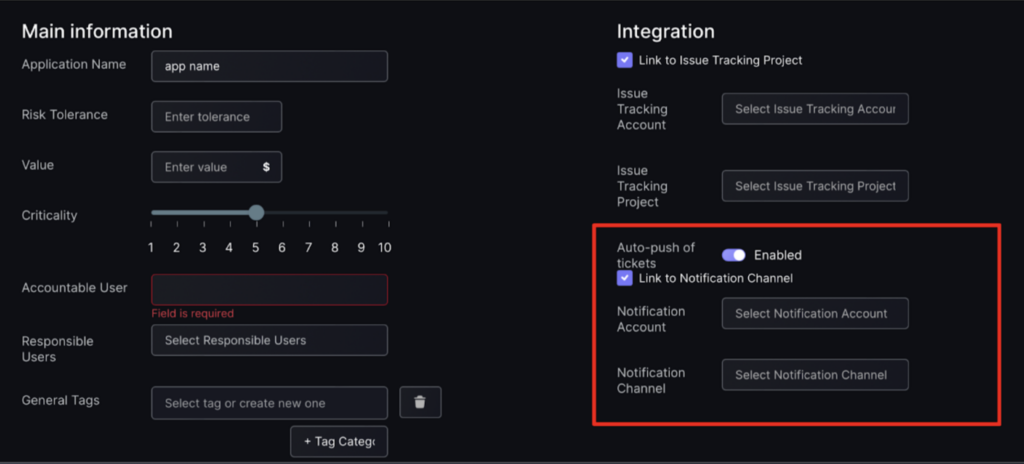
- Click “Save” or “Save and Show Applications” to view the application dashboard.
8. Creating tickets for findings
Once you have assigned an issue tracking project to an application, as outlined in stage 7 of the getting started guide, you can create a ticket – assign a finding to a project in Jira or another workflow tracking platform.
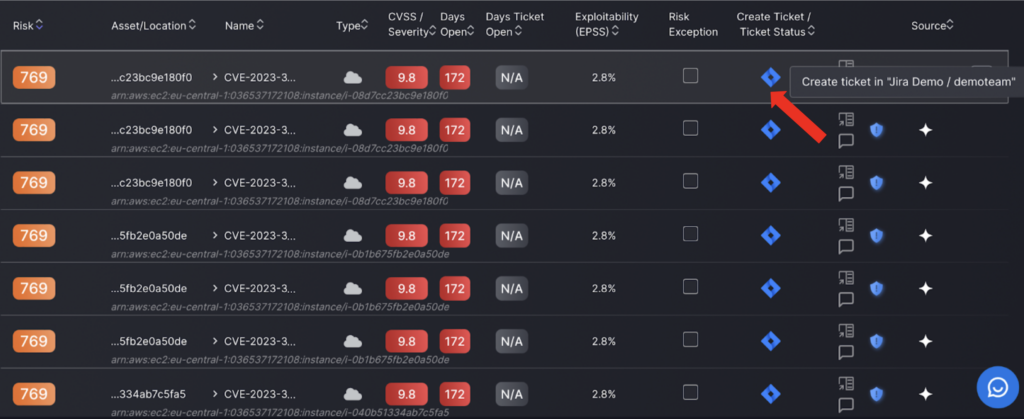
By clicking on the platform logo indicated by the red arrow, in this case Jira, you are assigning a finding to a workflow project. Once you have created a ticket you will receive a success notification in the top right hand corner to confirm the ticket creation was successful. You can only create tickets for findings linked to an application you have linked an issue tracking project to which is why there isn’t an option to create a ticket for some findings.
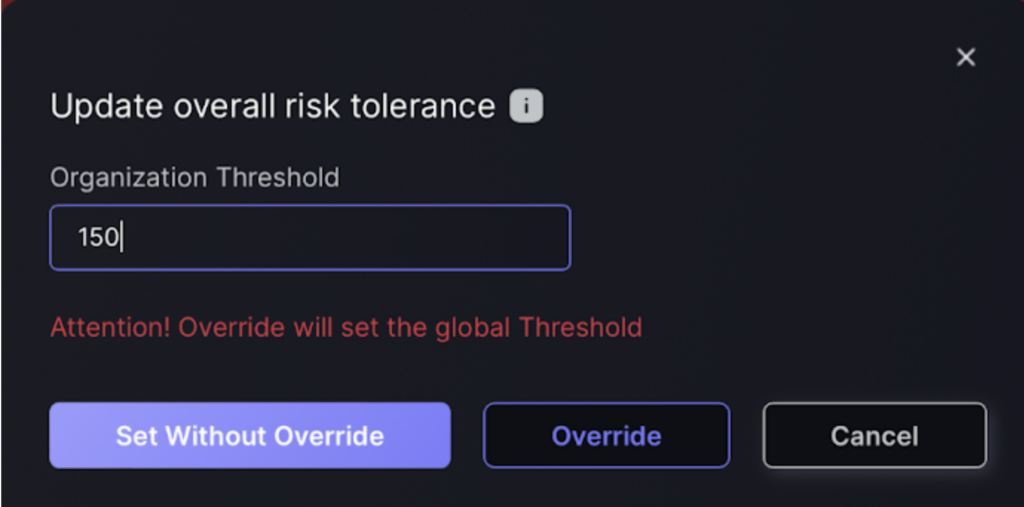
9. Set Risk tolerance
What is the Threshold or Risk Appetite or Risk Tolerance? – refers to the Organisational Threshold or the minimum value the global Risk Tolerance level needs to reach in order to raise the risk level to critical.
Set Risk Tolerance for separate applications
- On the Navigation Menu, select Risk Explorer > Applications.
- Select “Application list” to view which application you want to add a component to, press on the 3 dots on the right of the application then press edit on the pop up.
- Enter fields shown by the red arrows:
- Risk Tolerance – this is the risk level you are happy for the application to have before it becomes an issue and vulnerabilities need to be fixed.
- Value – your valuation of the application.
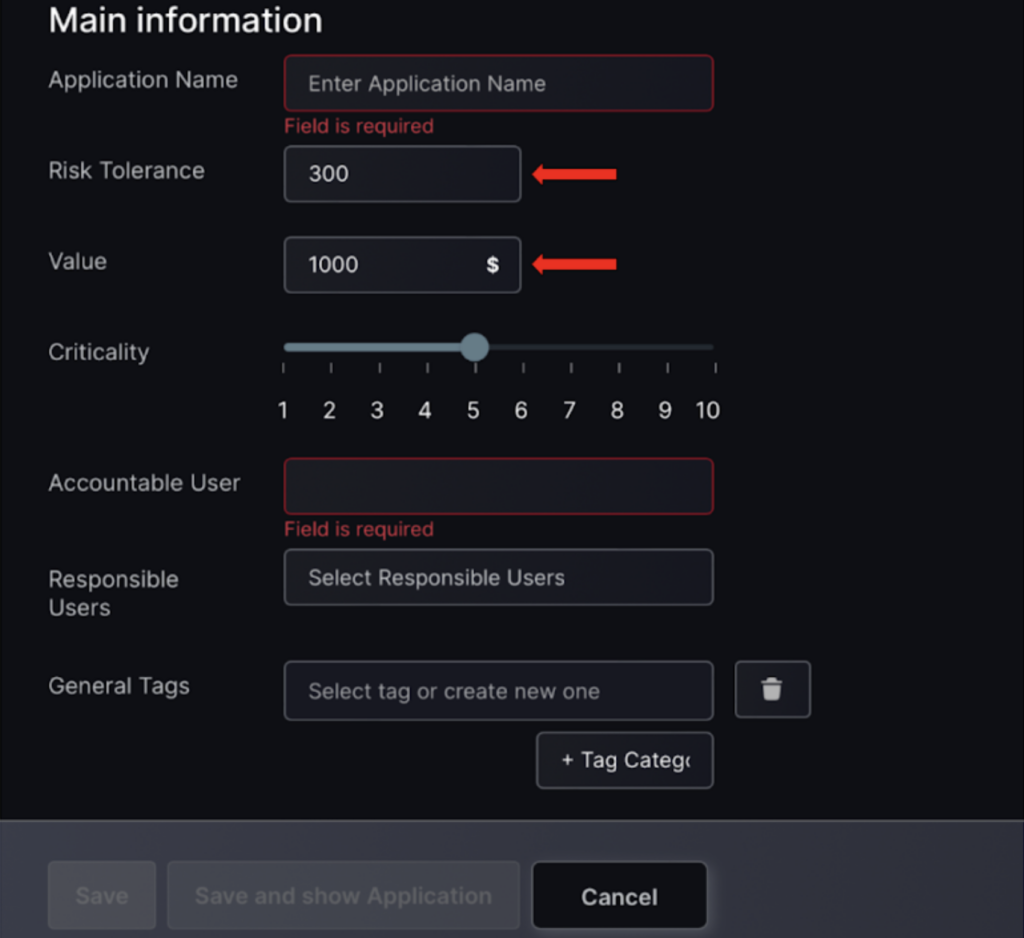
- Click “Save” or “Save and Show Applications” to view the application dashboard.
Setting global risk tolerance
You can also set a global Risk Tolerance level and override the individual Risk Tolerance or Threshold Level of individual Applications by following these steps:
- On the Dashboard, go to the Organisation Risk Evolution section and click the edit button shown by the red arrow.
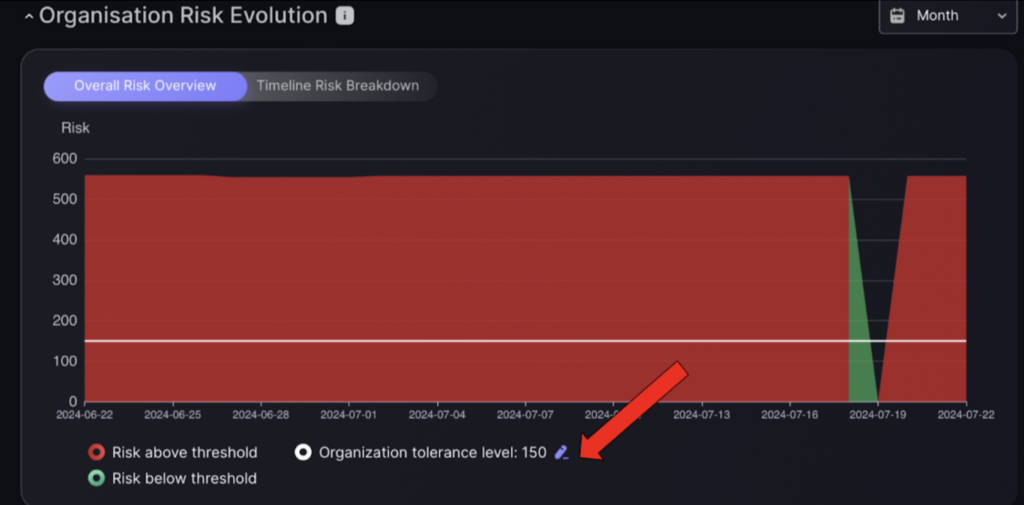
- Enter the new organisation risk threshold and select one of two options:
- Set without Override – will set the global risk tolerance for apps not assigned a tolerance to the value entered.
- Override – will set tolerance level for all applications the same even if they already have a value set for them.