Introduction
The Teams section allows you to track team progress within the dashboard but also manage and assign applications/environments/components to teams and team users. It displays data on risk magnitude changes and the number of fixes implemented by each team over the specified time frame. The dashboard lists various teams, along with key metrics such as changes in risk magnitude, vulnerabilities resolved, vulnerabilities introduced, and relative risk magnitude. This section enables administrators to compare teams, highlighting areas that have seen the most significant improvements or require attention due to increased risk levels. This comparative analysis helps in directing resources and strategies to areas where they are most needed to manage risks effectively.
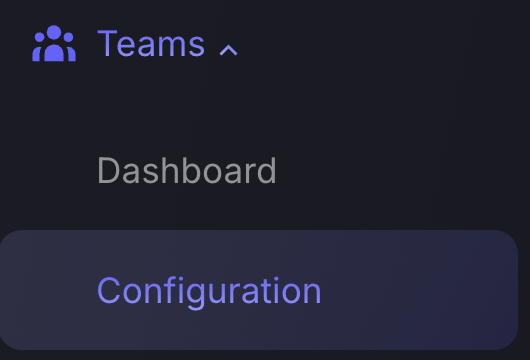
Dashboard and team management
Press Teams on the navigation bar then Dashboard.
Best Performers
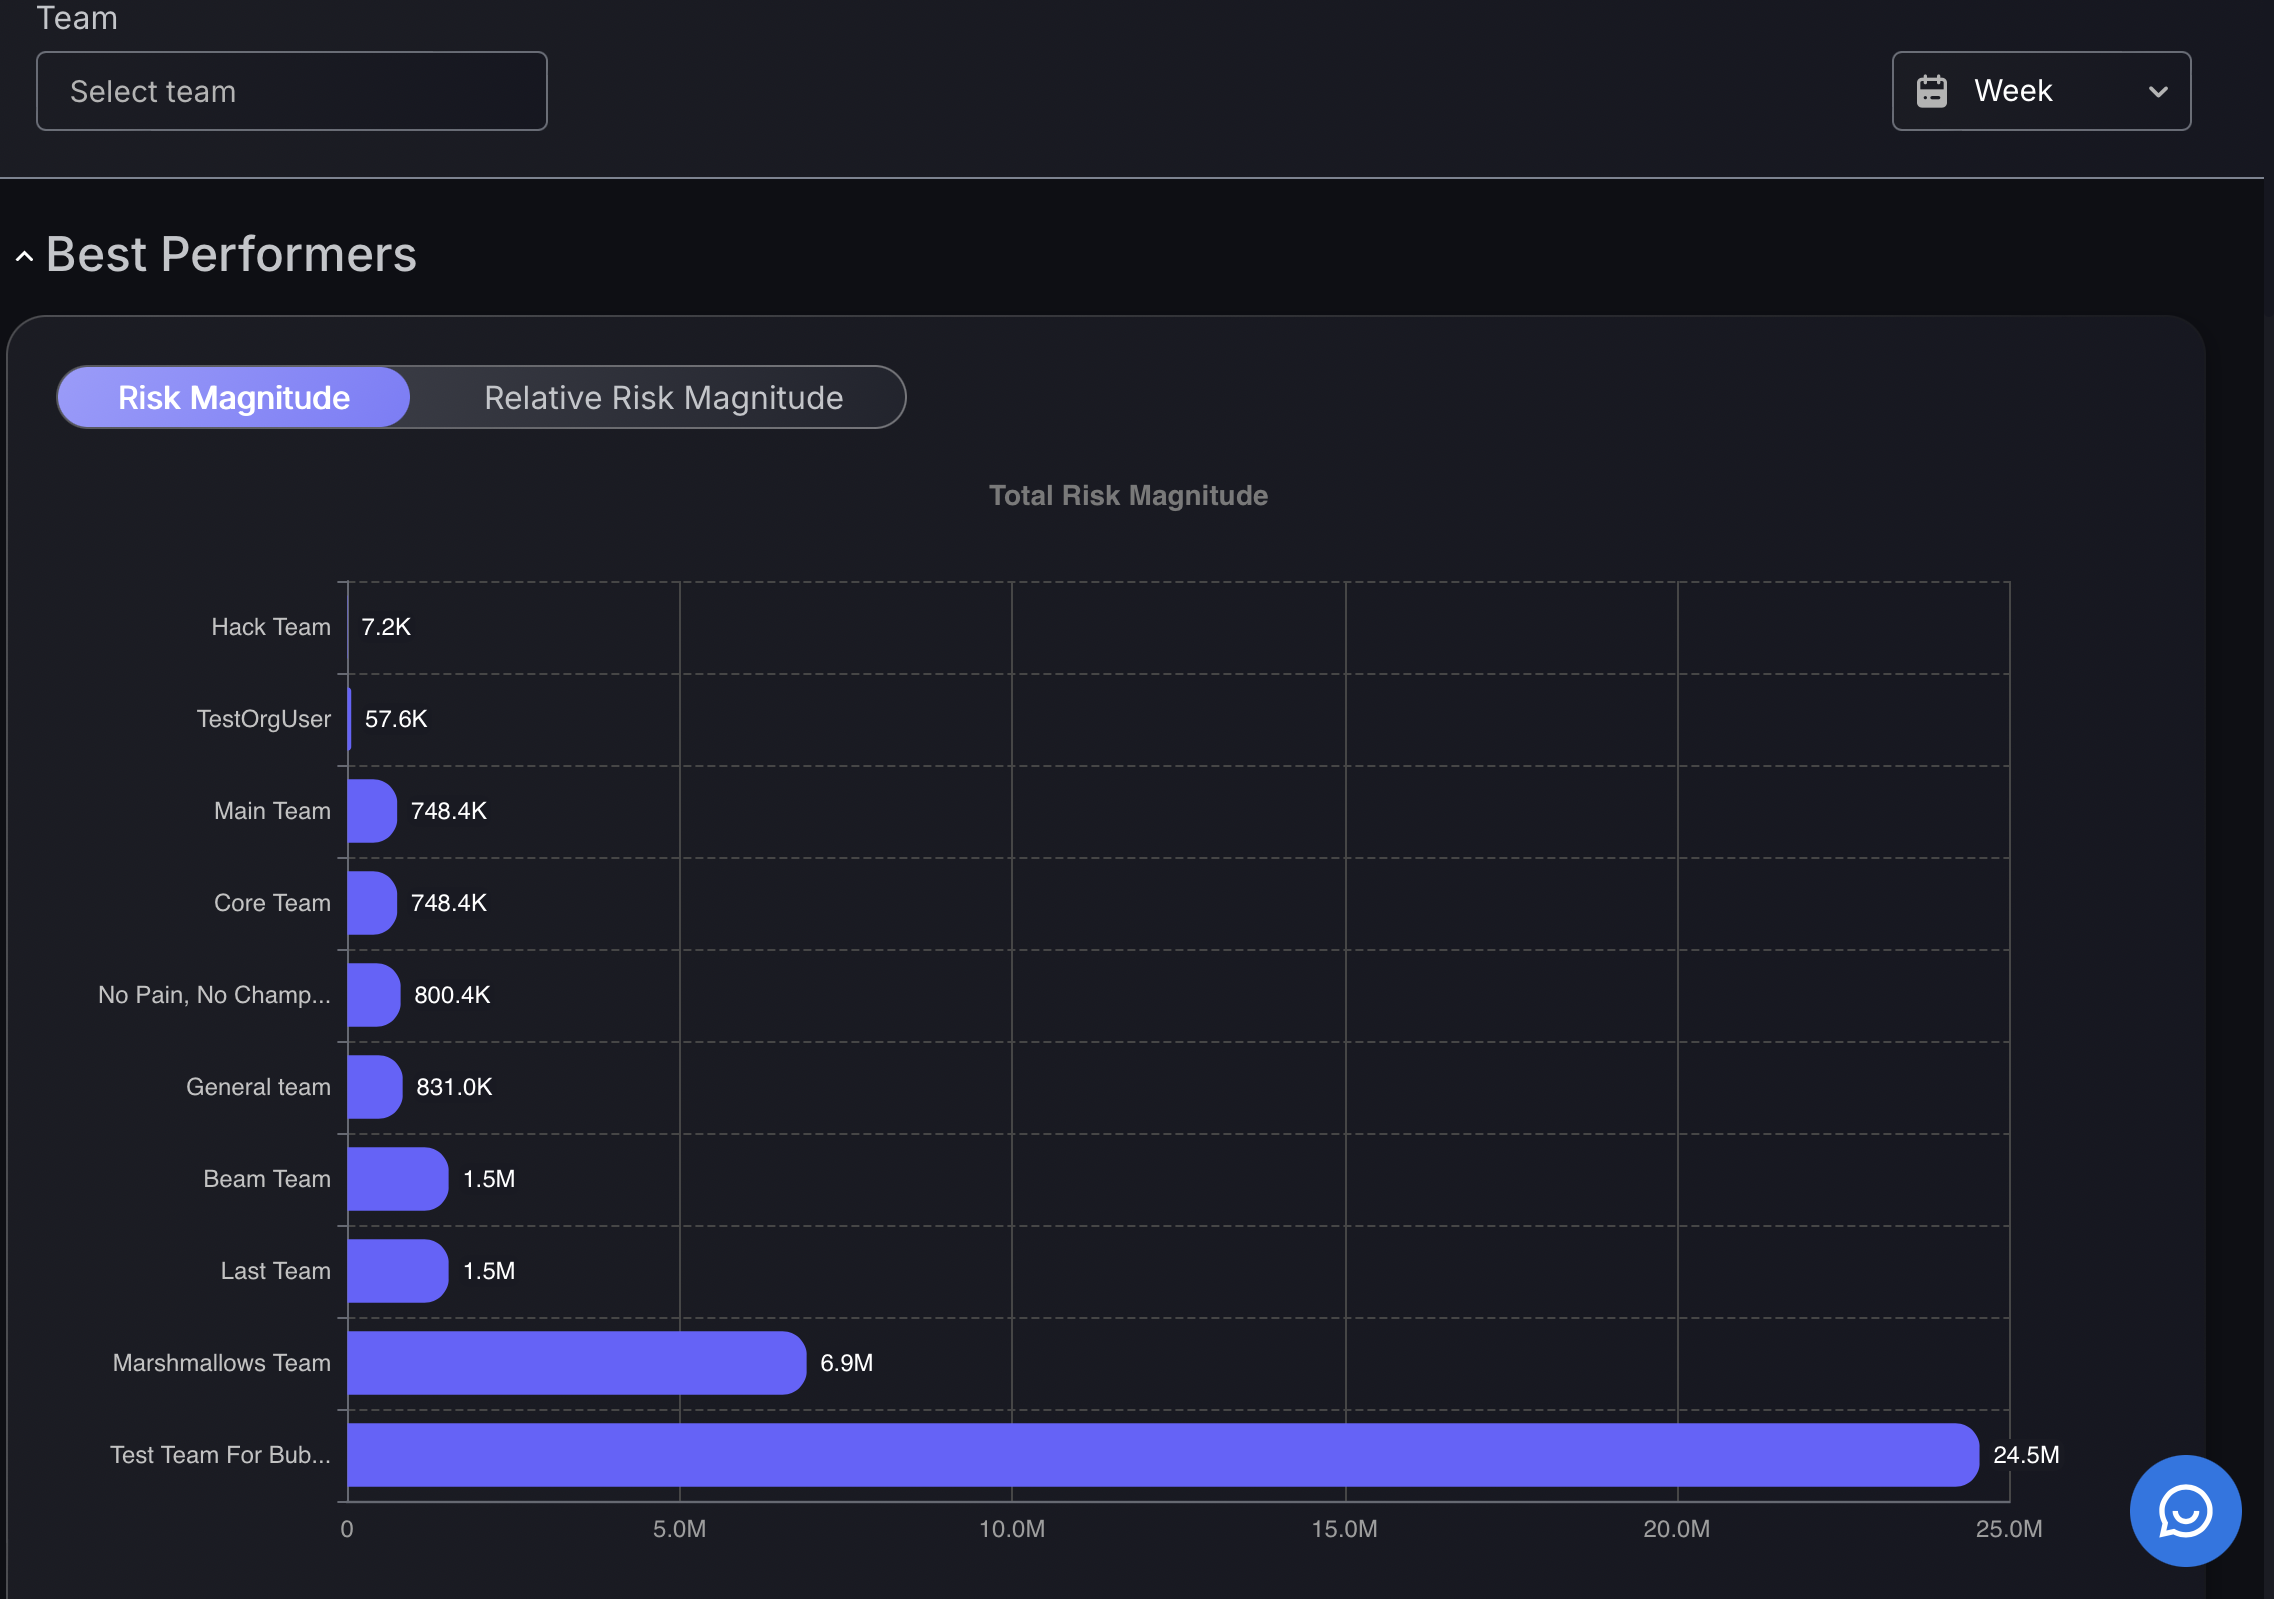
The “Best Performers” chart is the first visual in the Teams dashboard. It displays a bar chart ranking teams based on their risk magnitude, helping you quickly identify which teams are performing best in minimizing application security risk.
Each team is listed with its corresponding risk value, enabling side-by-side comparison. This highlights areas where specific teams may need additional focus and aids in the recognition of teams that excel in security management.
You can switch between two views:
- Risk Magnitude:
Shows the total (absolute) risk associated with each team. This includes the risk magnitude of all the findings. Larger teams or those managing more assets may naturally have higher totals. - Relative Risk Magnitude:
Provides a normalized comparison, adjusting for context such as:- Number of assets per team
- Risk concentration per asset
- Team size or scope
This visualization is essential for both identifying areas of improvement and recognizing high-performing teams.
You can also adjust the time range of data displayed using the timeframe selector in the top of the dashboard.
Opportunity to Improve
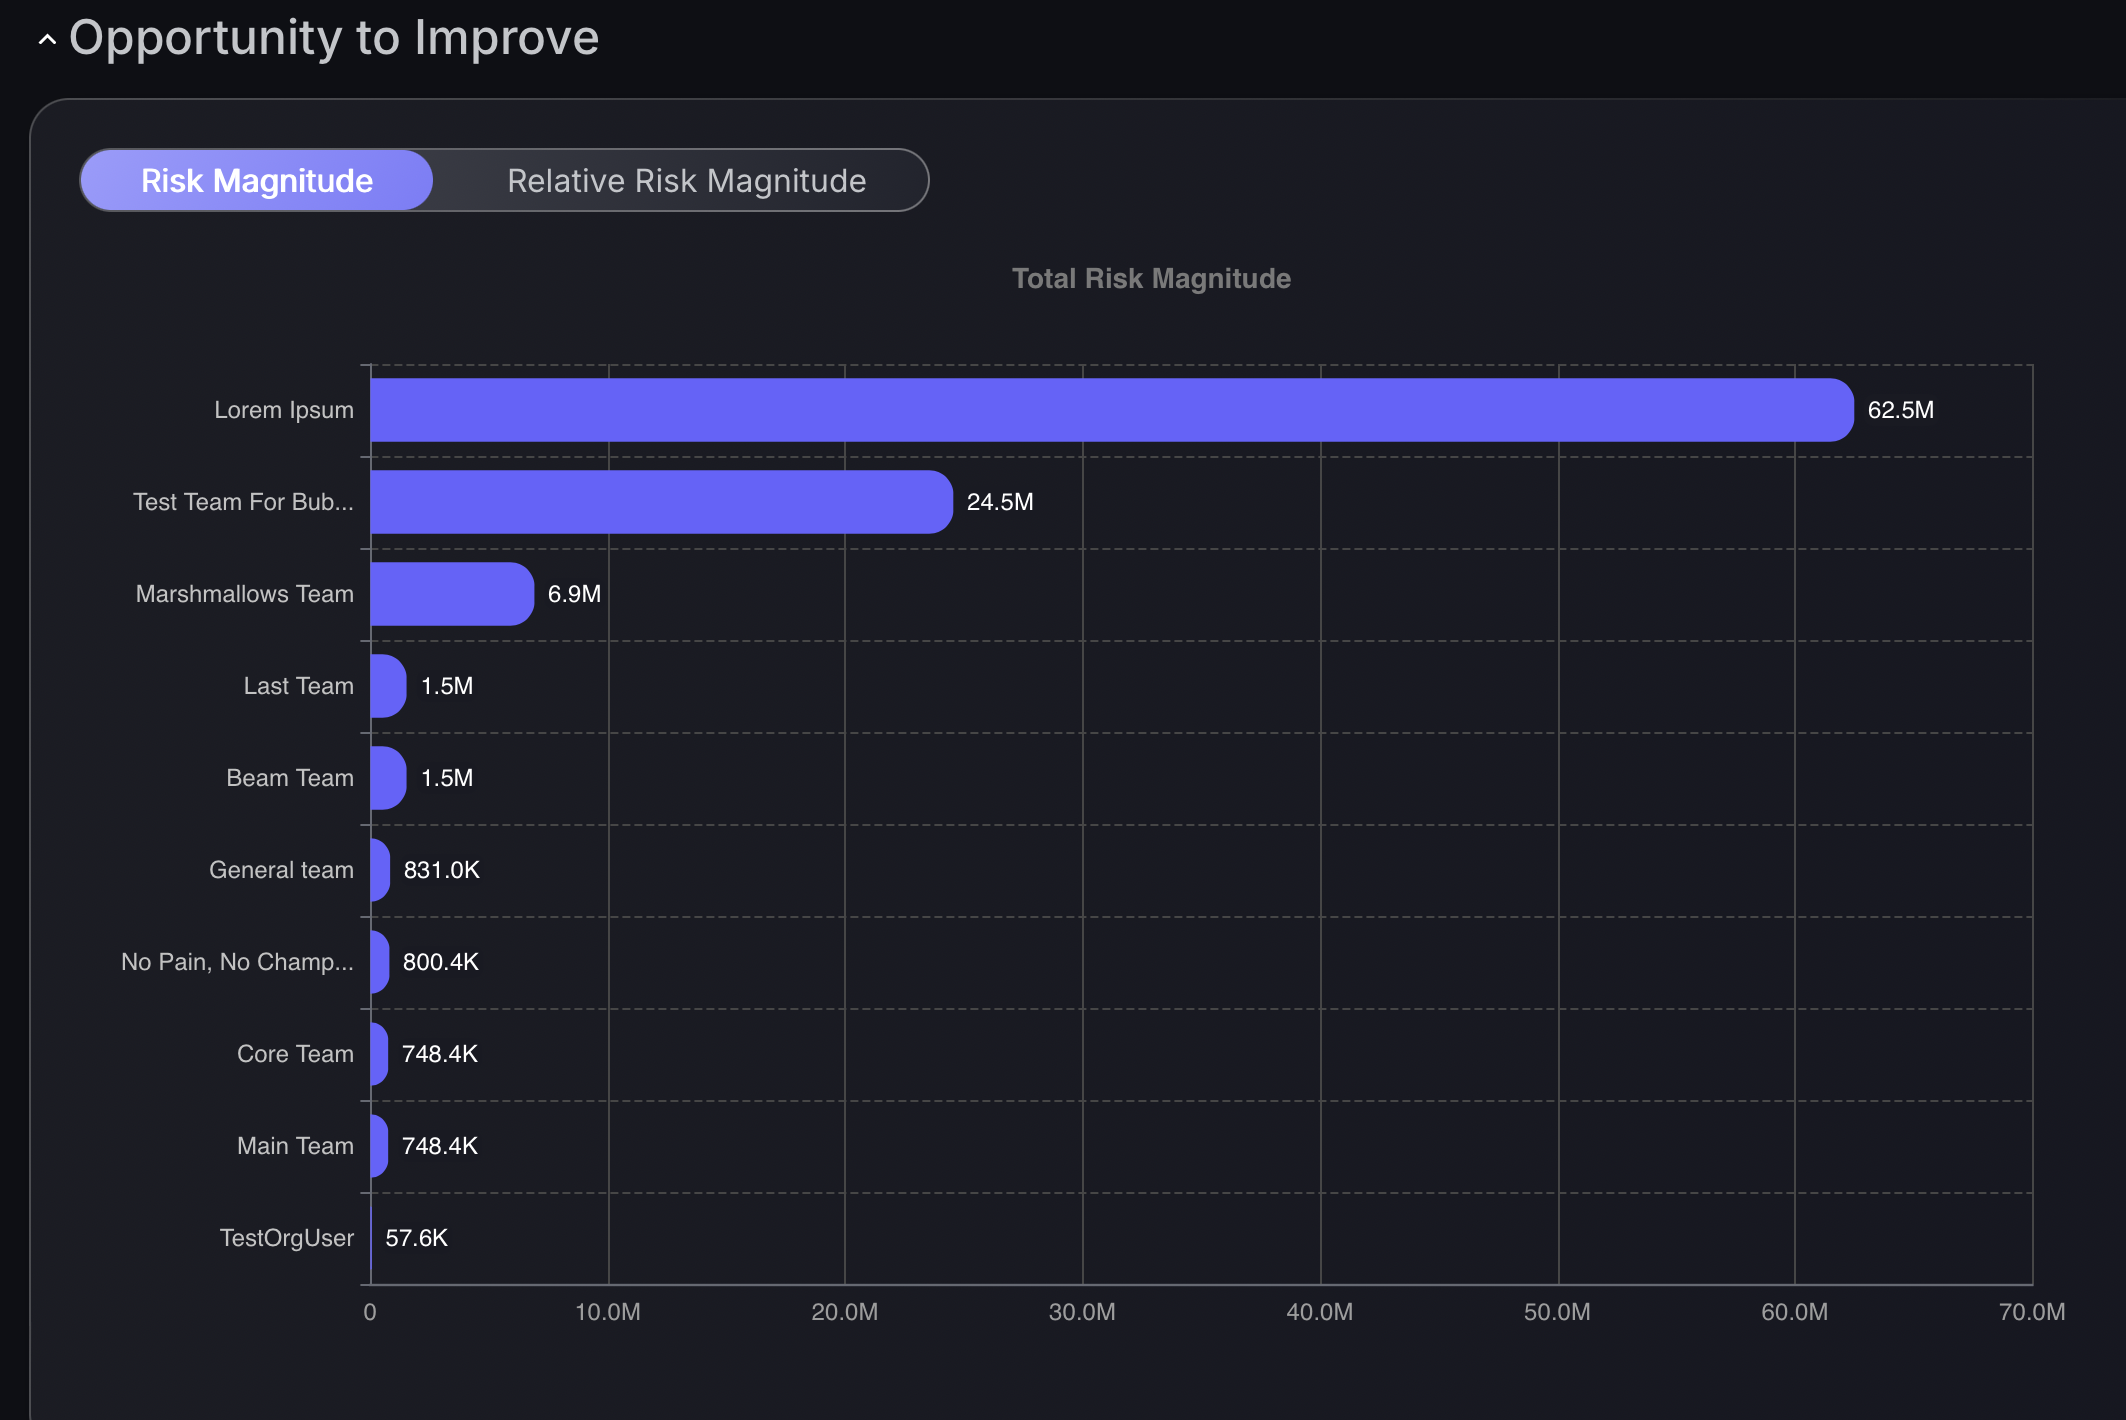
The “Opportunity to Improve” chart highlights teams with the highest risk magnitude. It identifies which teams are currently facing the most significant security challenges and need focused attention. The chart ranks the teams in decreasing severity, allowing you to prioritise efforts to reduce risk and improve security posture across the organisation.
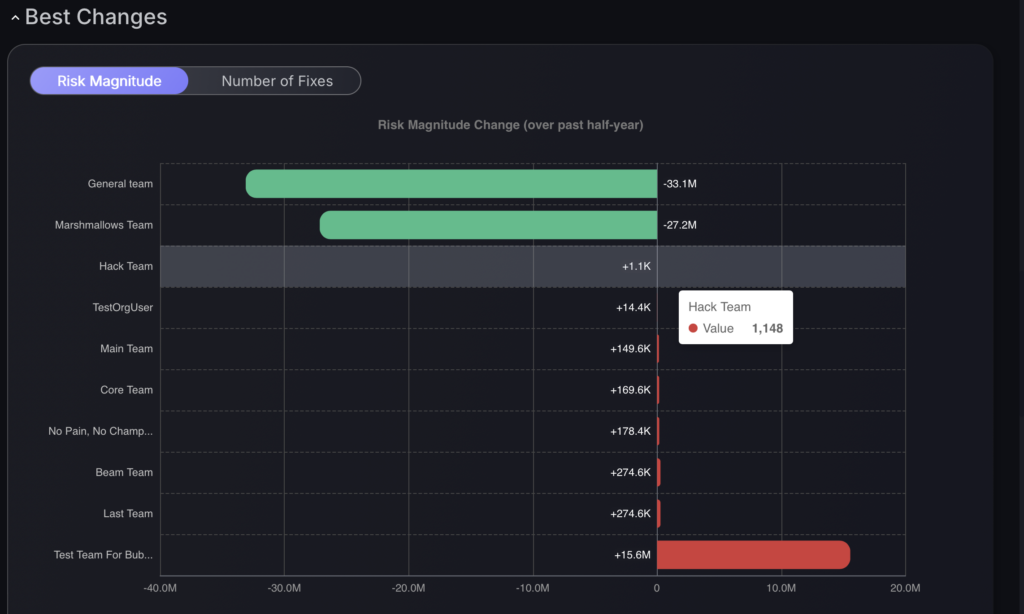
Best Changes
The “Best Changes” section highlights teams that have made significant improvements in their risk magnitude over the selected time frame. The chart displays the change in risk magnitude since the beginning of the time frame selected, teams showing substantial reduction are indicated by positive green values. This section allows you to recognise teams that have effectively mitigated risks, helping to improve the overall security posture.
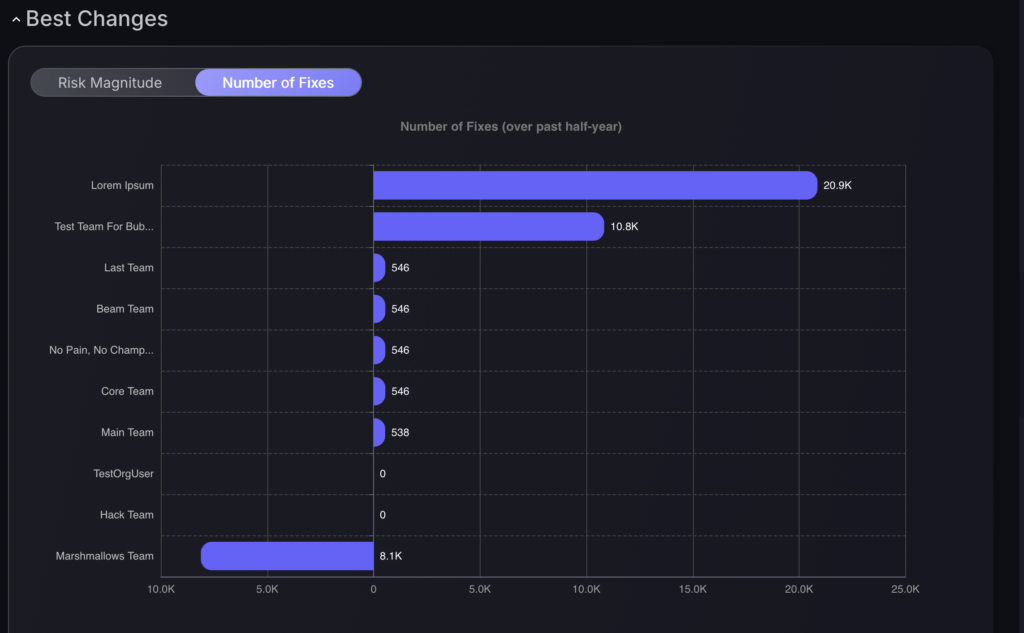
By pressing on the “Number of Fixes” button it shows a chart indicating the teams that have implemented the most fixes over the selected time frame. The chart lists teams in descending order of fixes applied, with the highest number of fixes at the top. This feature highlights teams that are actively improving their security posture by resolving vulnerabilities, making it easier to recognise and encourage continued efforts in maintaining application security.
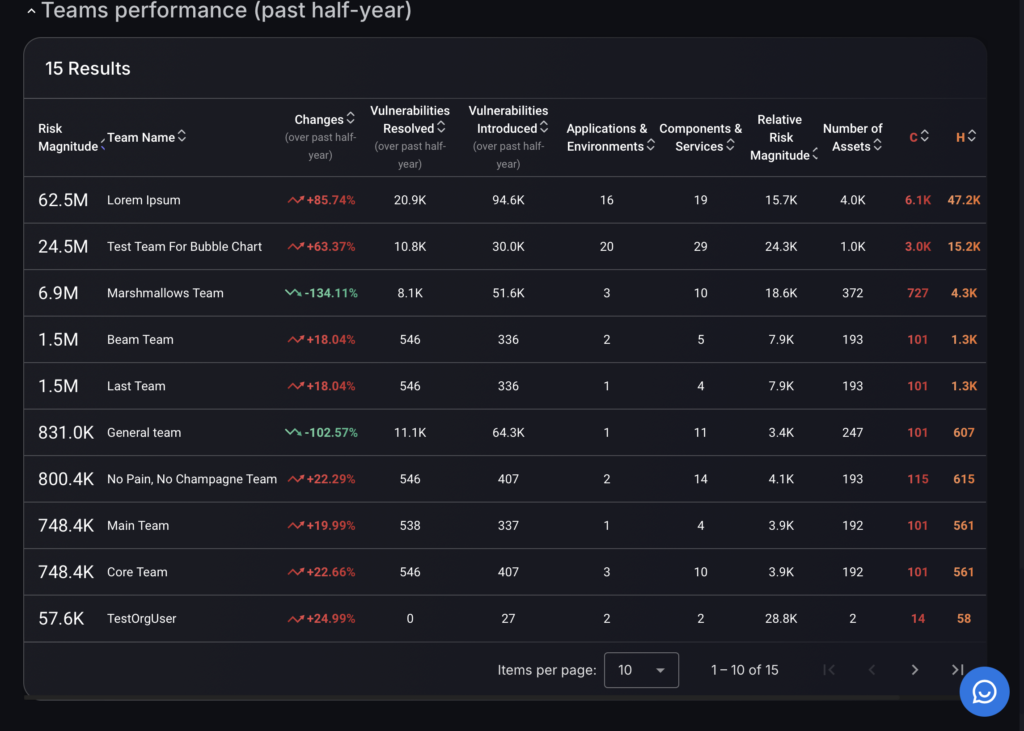
Teams performance
The “Teams Performance” chart lists key metrics like the number of vulnerabilities resolved, new vulnerabilities introduced, and changes in risk magnitude over the past week. This table allows for a comprehensive assessment of each team’s security efforts, with all the previous charts data recorded as fields in the table allowing for a comparative view of team data as a whole. By clicking on any team it will take you to that teams dashboard where it gives a more in depth overview of that teams performance.
Creating a Team
The “Configuration” section provides an overview of all teams within the platform, including their associated applications, environments, components, assets, and members. You can search for specific teams using the search bar and pressing the blue magnifying glass button.
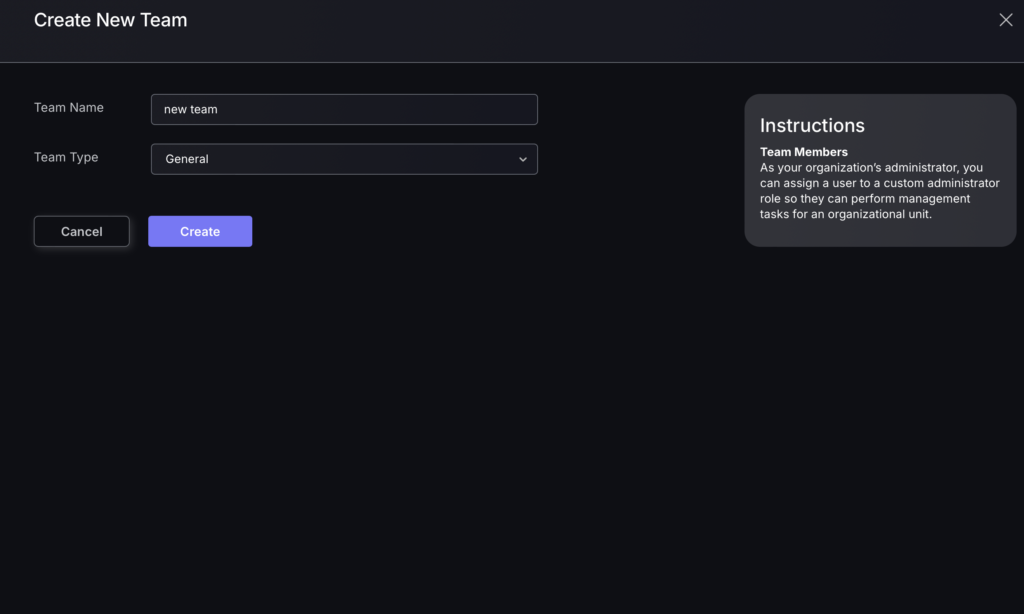
To add a new team follow these steps:
- Click “Create New Team” button in the top right hand corner of the screen.
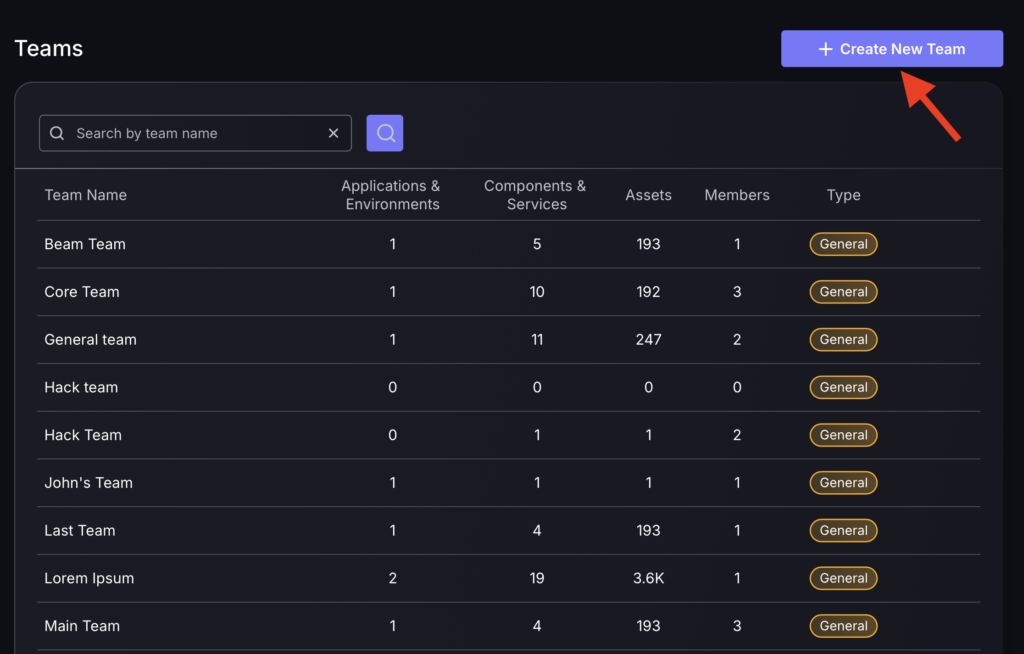
- Enter the team name and select the type of team.
- Click “Create”.
Types of team

A General team is to be assigned to engineering teams with standard team roles.
A Security team is to be assigned to teams with security users who have accessibility to special features such as marking Vulnerabilities as risk exceptions.
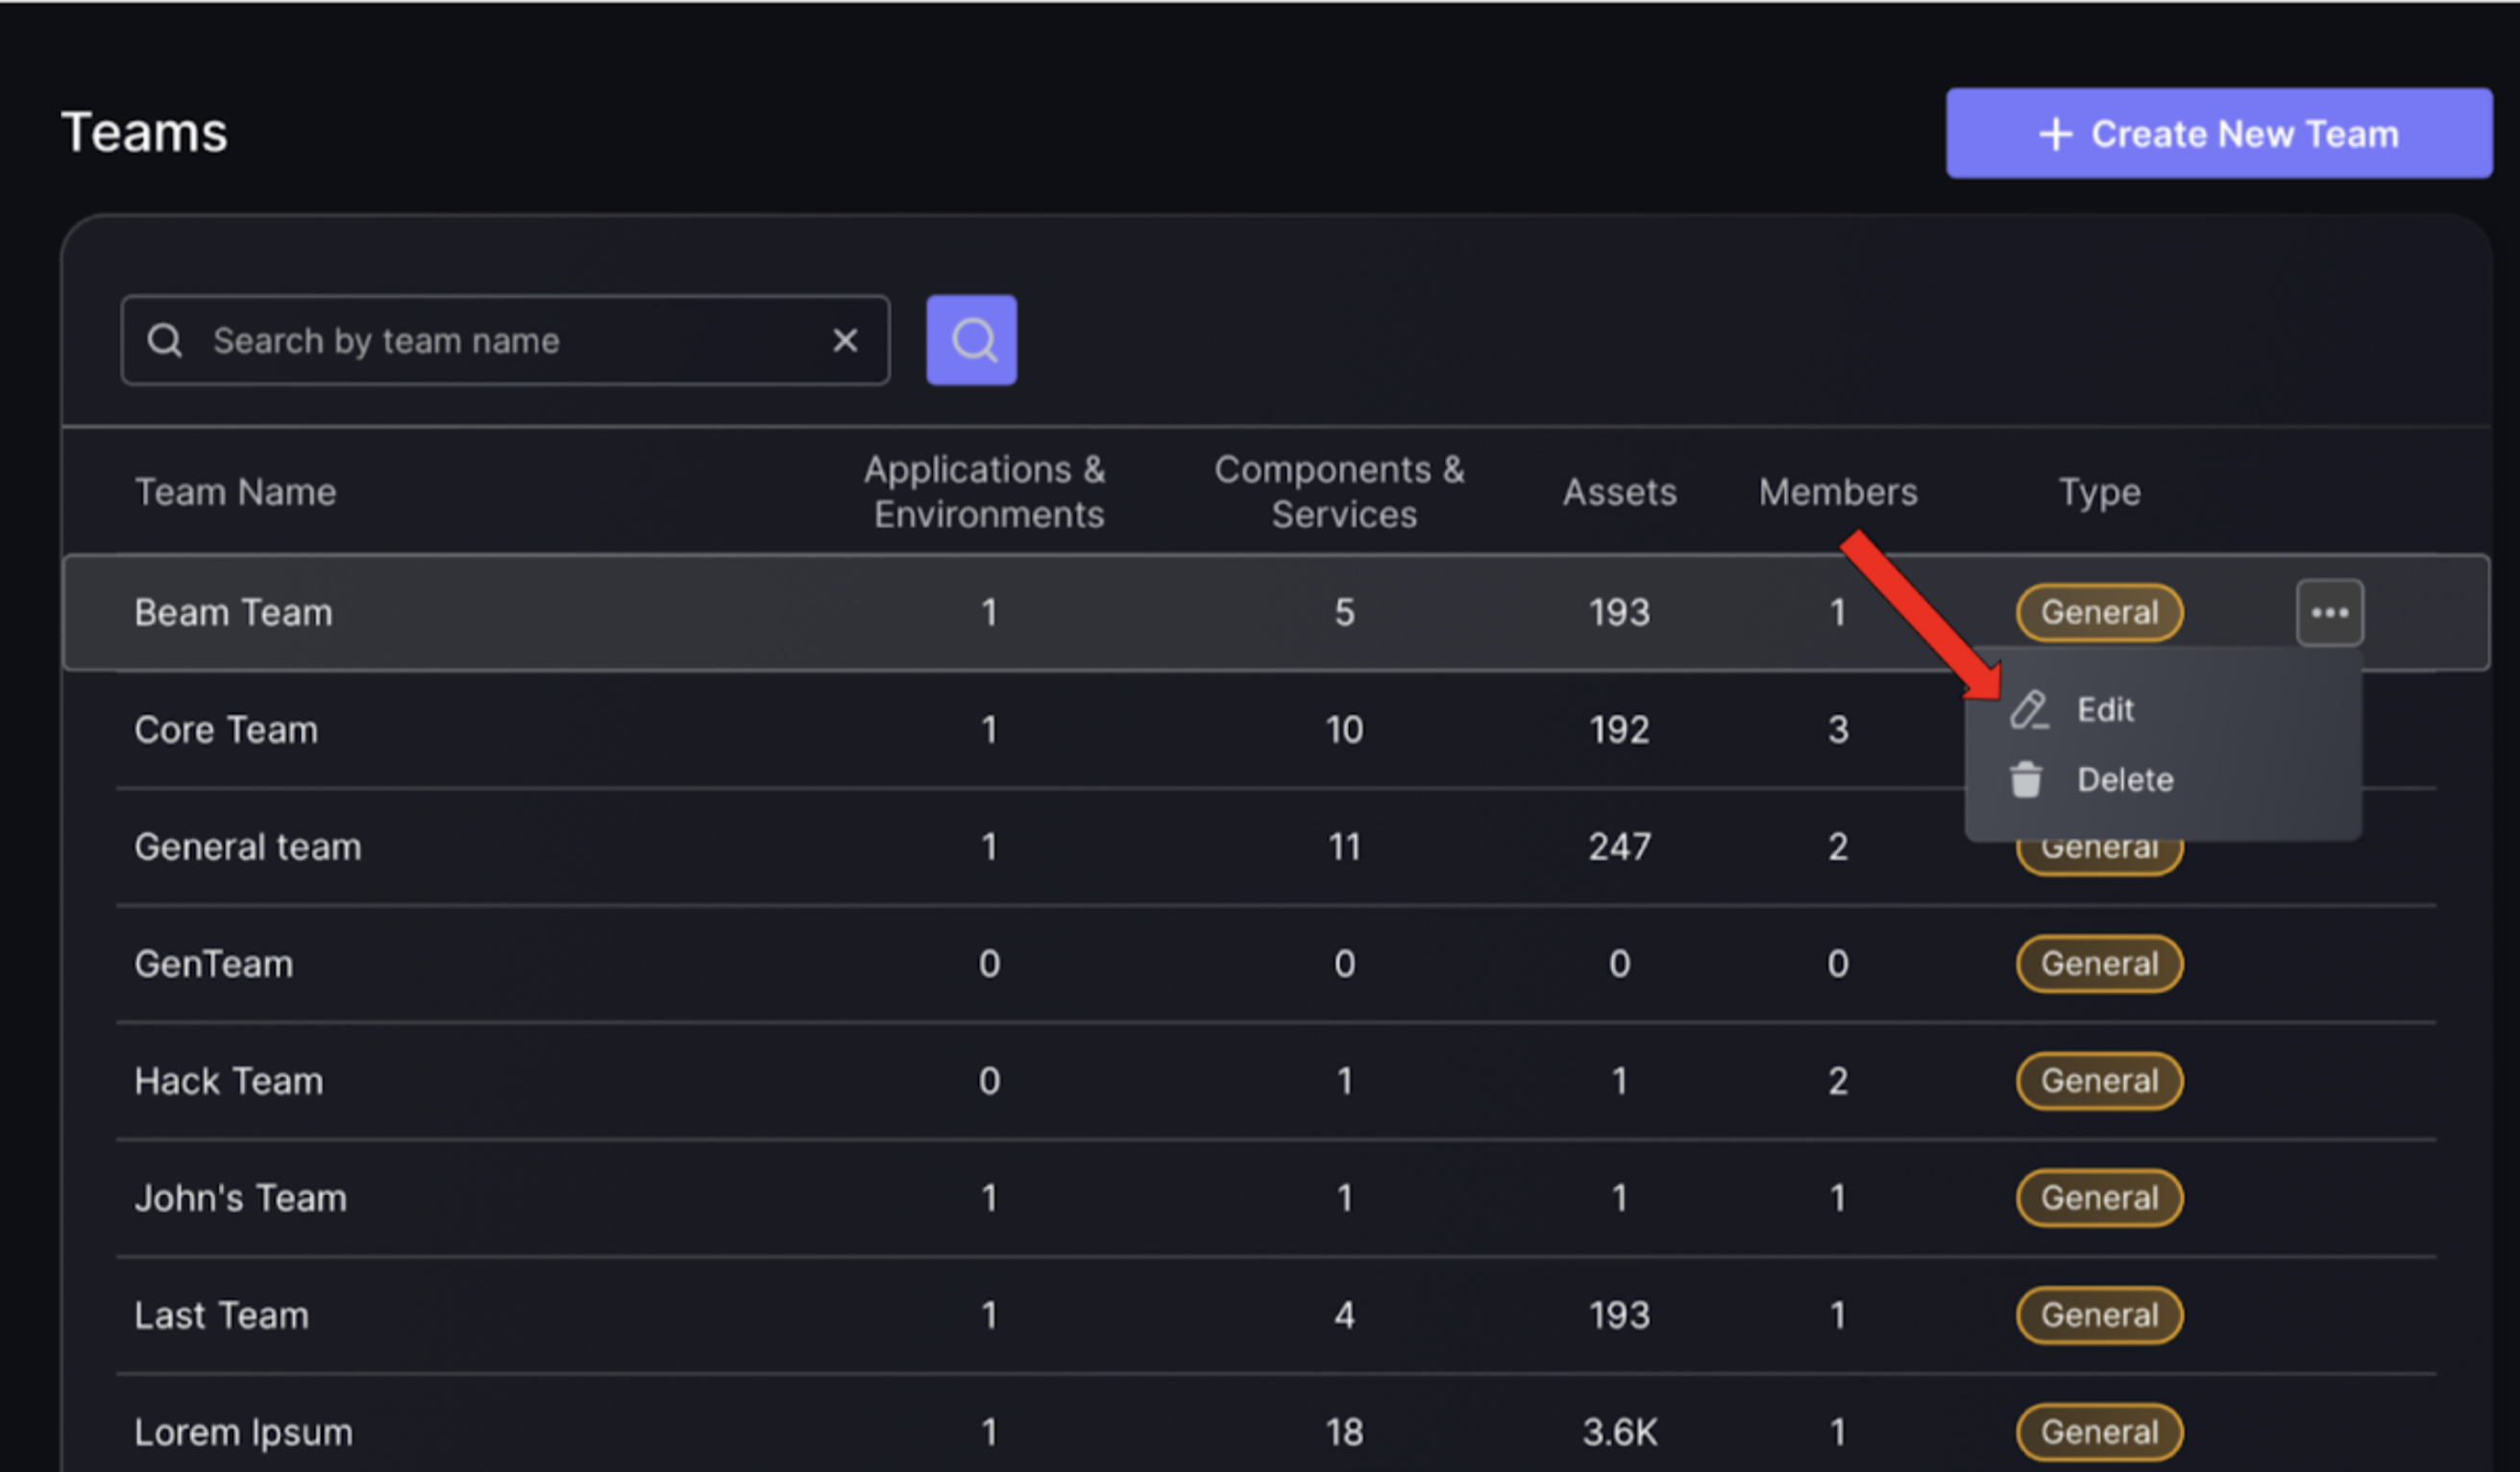
Editing/deleting a team
In the “Teams” section, you can manage existing teams by using the options menu (three dots) next to each team name. This menu provides options to Edit or Delete a team, allowing you to easily update team details or remove a team from the platform.
Assigning users to teams
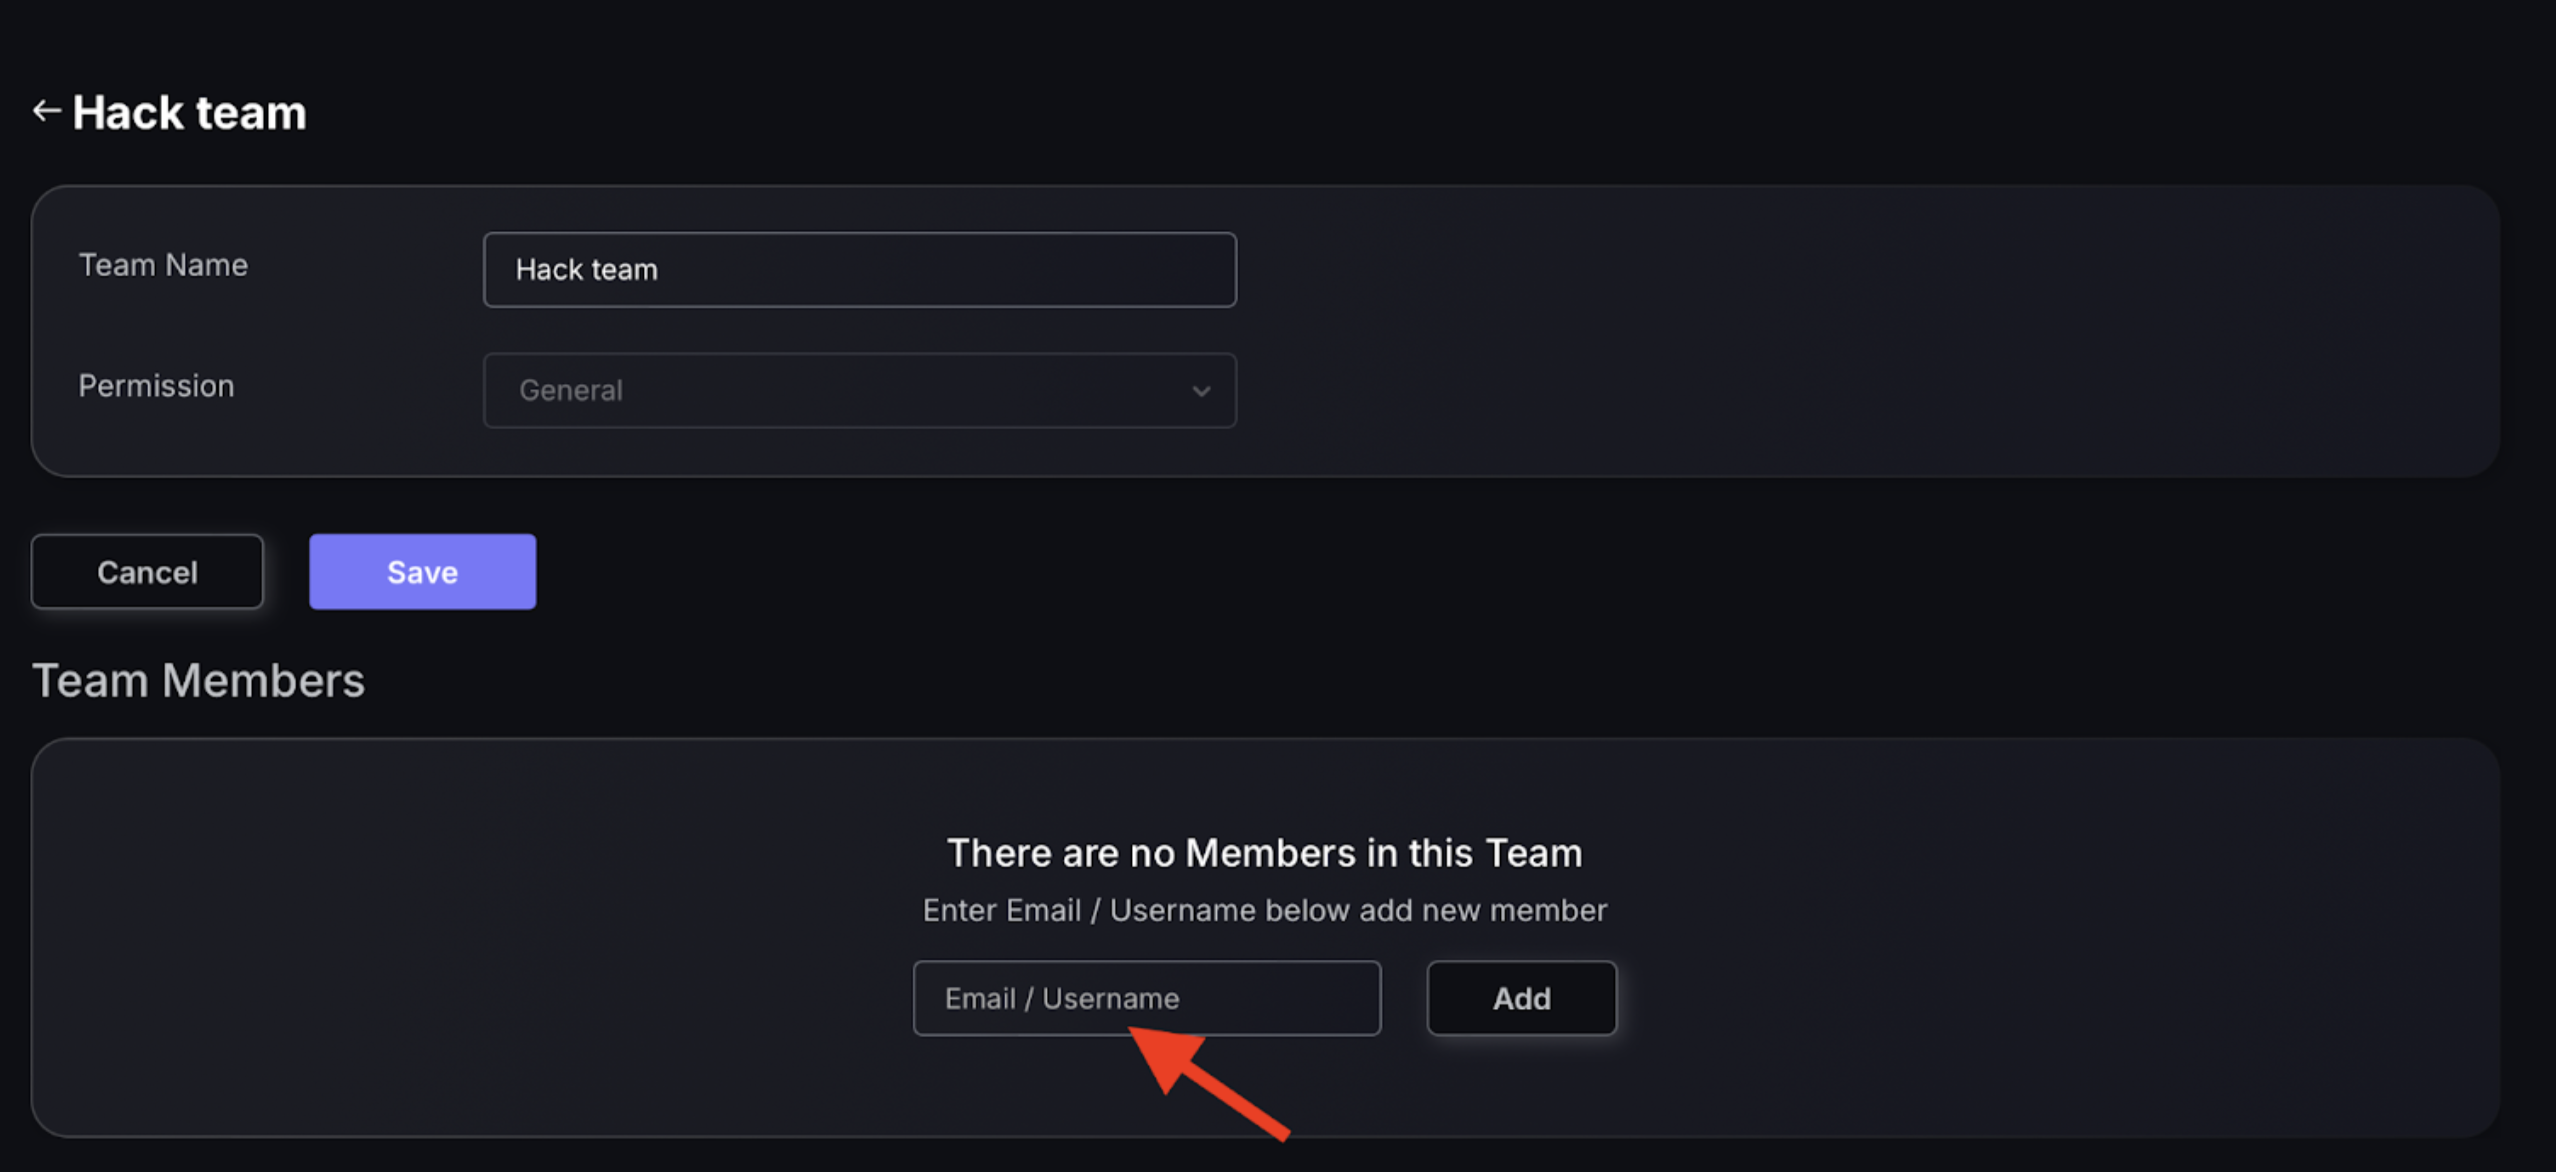
Once a team has been made follow these steps to add team members:
- Press the edit button on the team in the configuration section.
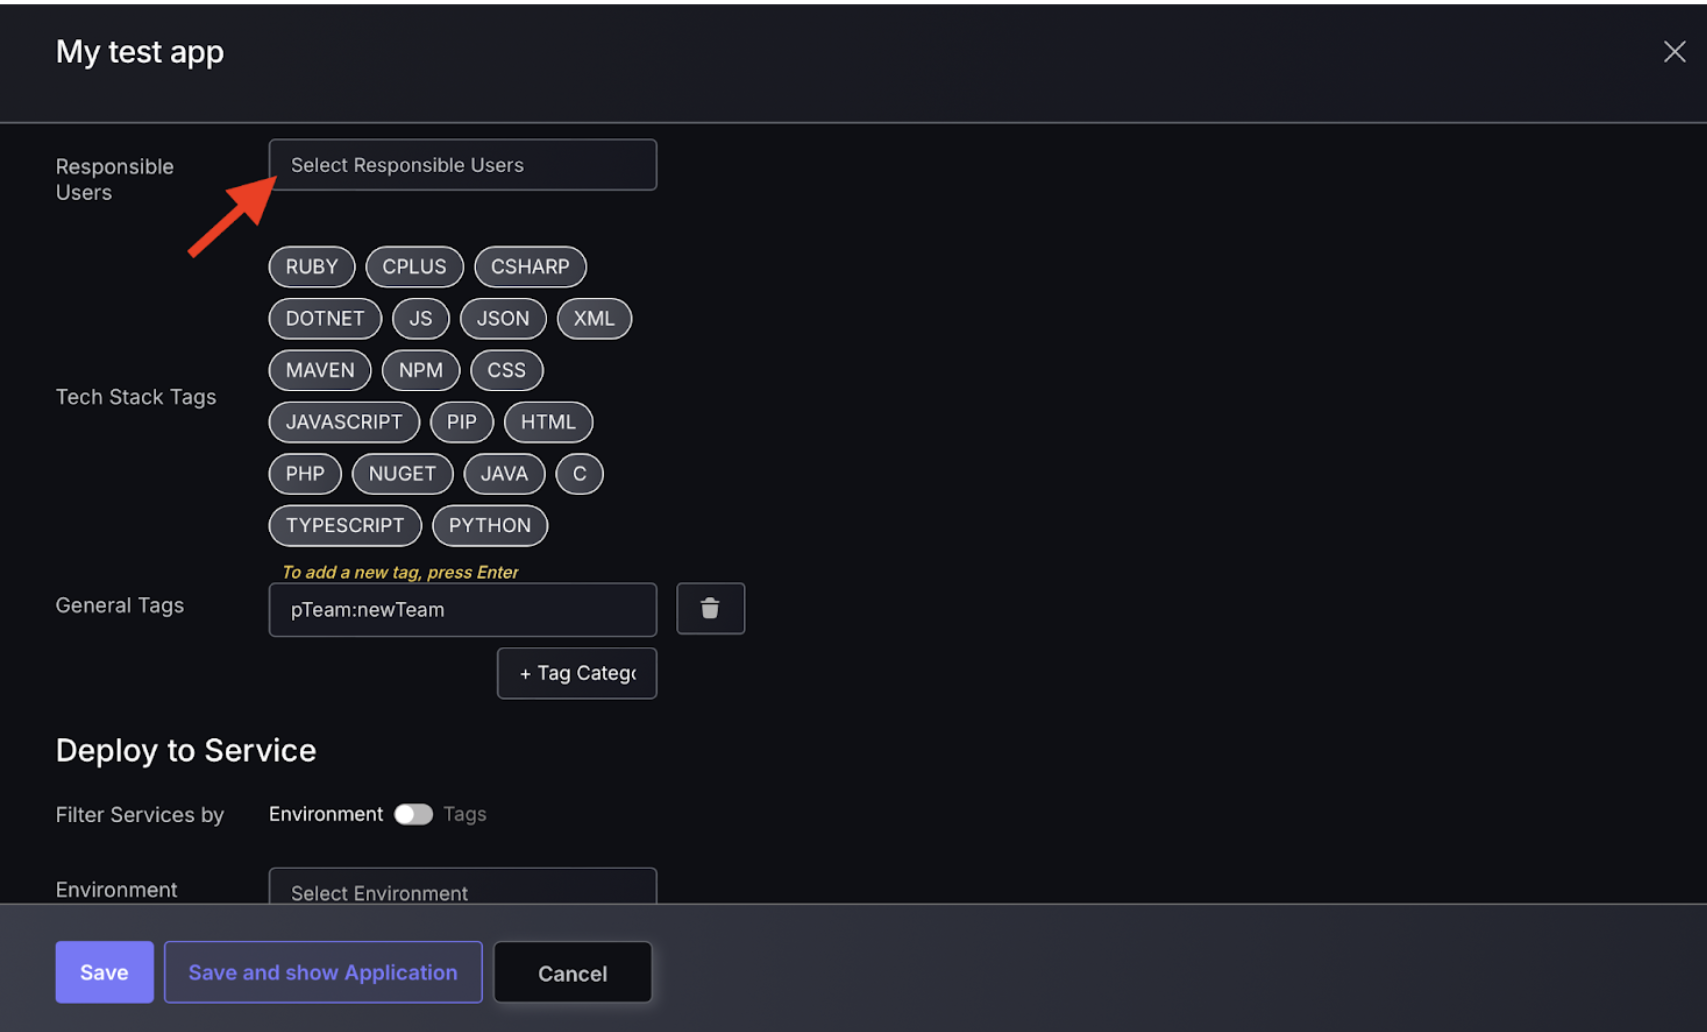
- Scroll down to the team members section and select users from the drop down indicated by the red arrow, then press add.
3. Assigning applications/environments to teams
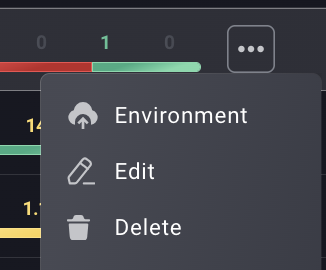
To assign applications/environments/components to teams click the 3 dots next to team on the configuration menu then press edit.

Auto-link based on Team Members
The “Auto-link based on Team Members” option enables applications/environments to be assigned to teams by assigning responsible users to applications/environments. When you turn this auto link on, it means that if a team member is assigned to an application/environment as a responsible user, the whole team is assigned to that application/environment. There are two ways to add applications/environments/components to a specific Team, and this way is the recommended way. Follow these steps to add a responsible user to an application:
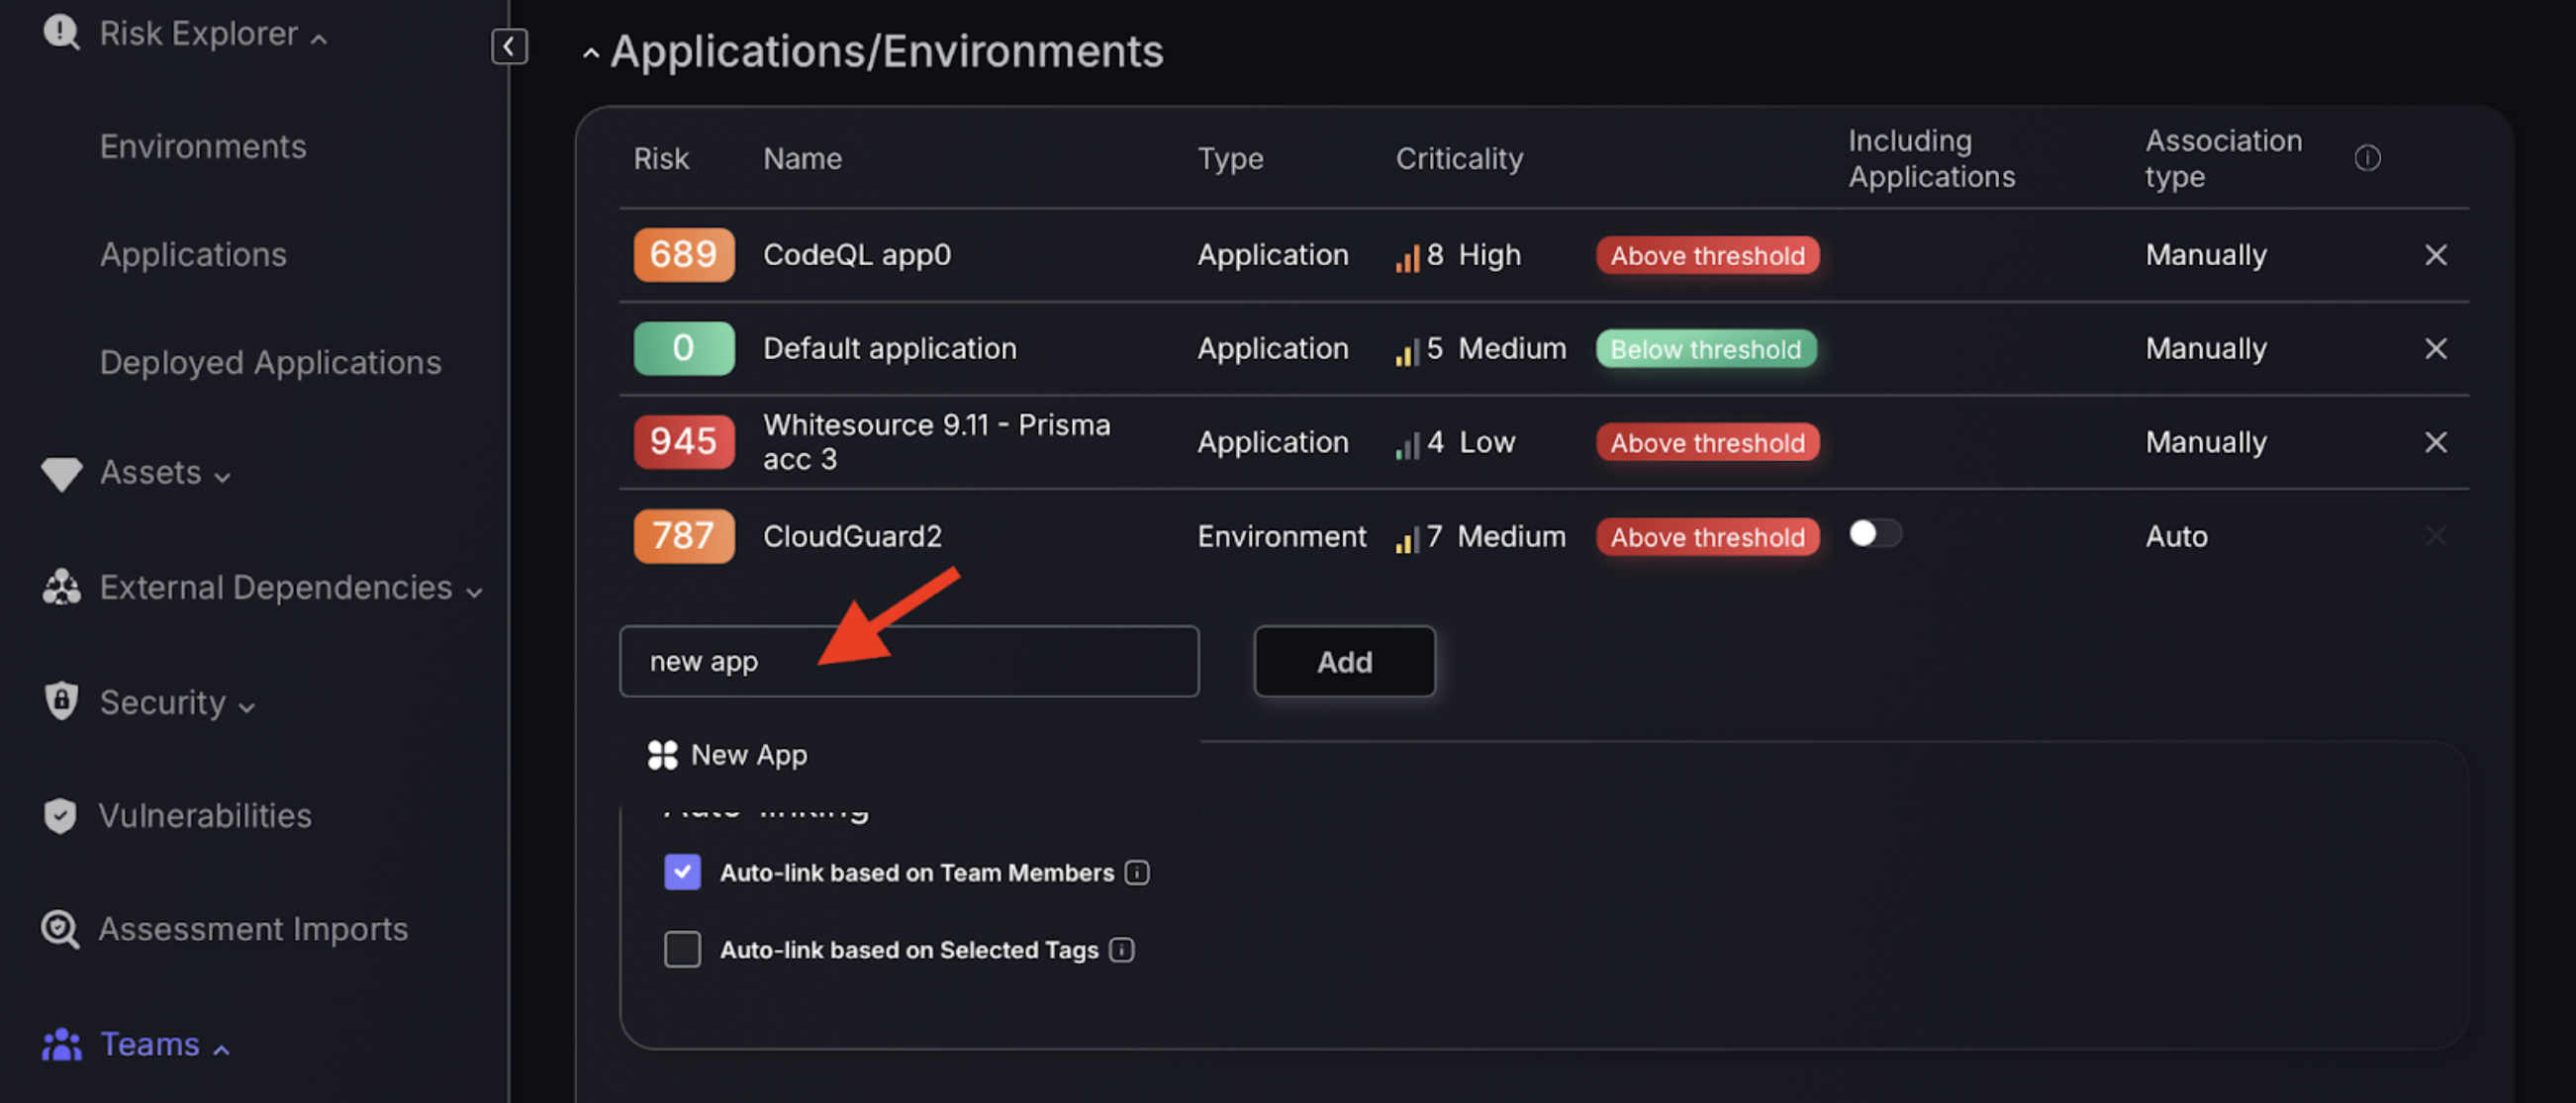
- To link an application or environment to the team head over to the risk explorer on the navigation bar and select the environment or application depending on what you are adding the team to.

- Select list view and click on the 3 dots on the right hand side of the application/environment you are adding users to and select edit on the pop up.


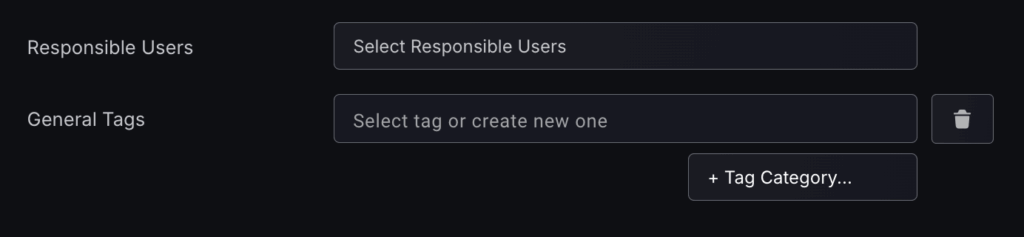
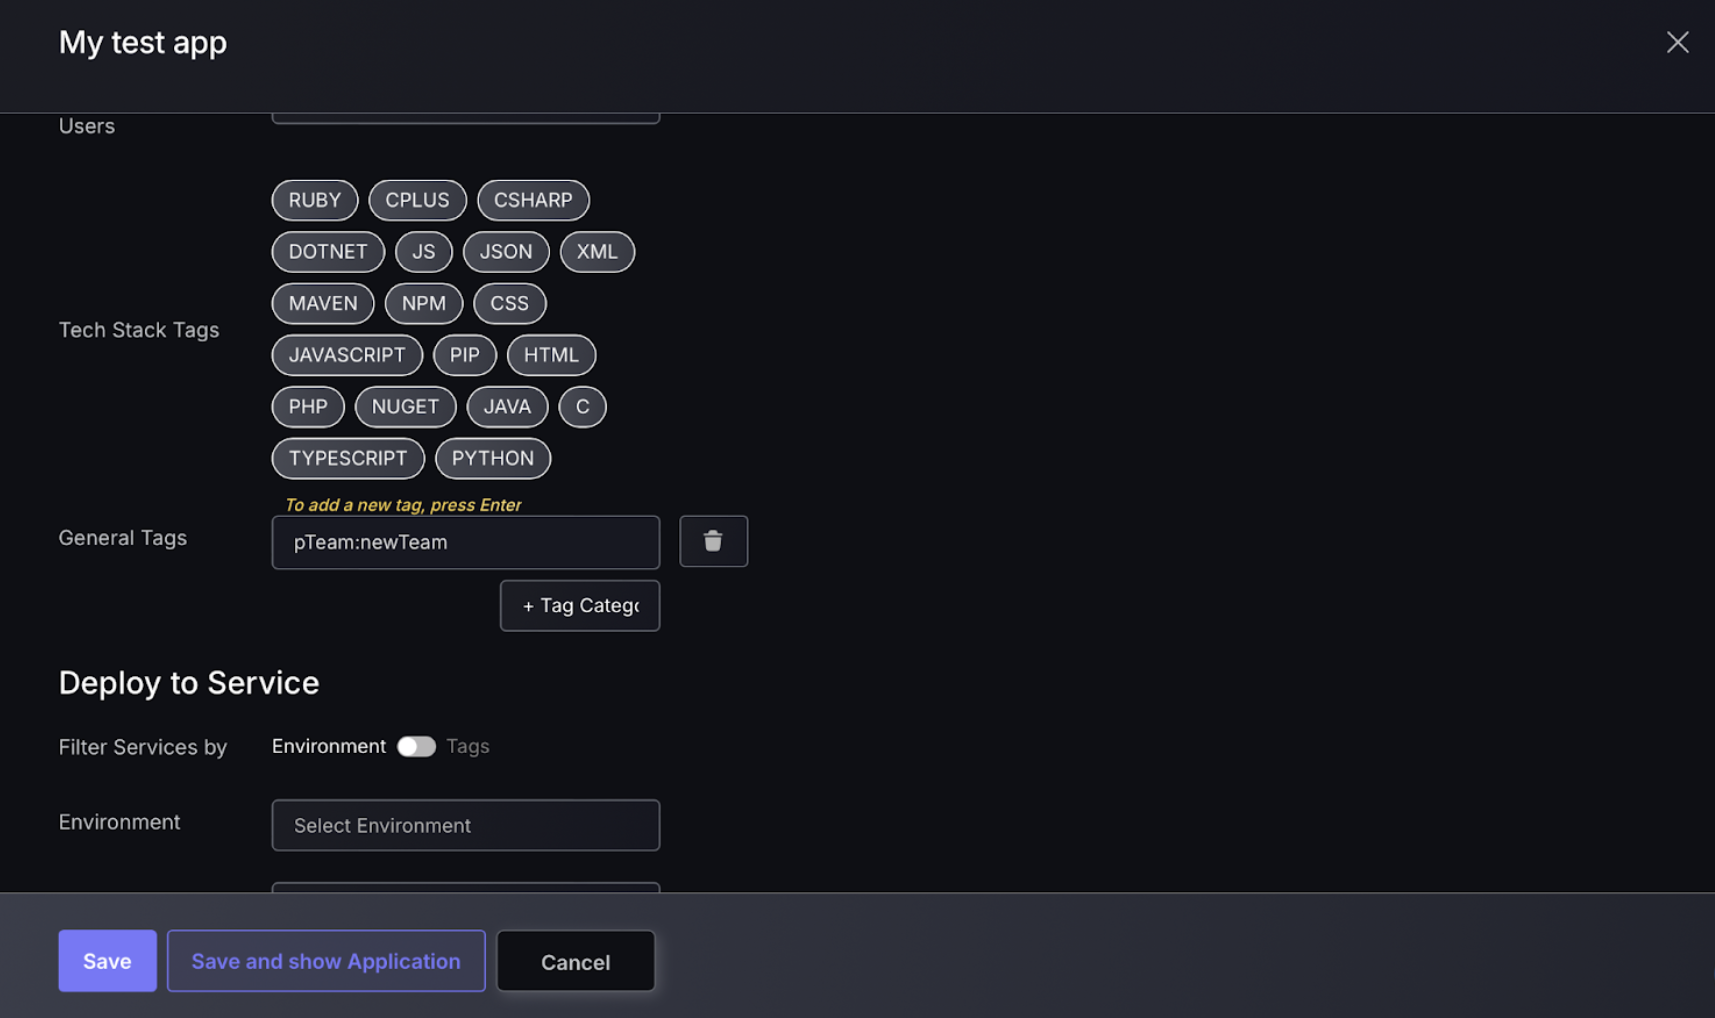
- Scroll down to the responsible users section and select a user from the team to add as a responsible user. If you have the auto-link enabled for the team, then the team will automatically be assigned this application/environment.
Auto-link based on selected Tags
The “Auto-link based on selected Tags” option within the Auto-linking section enables applications to be assigned to teams using tags. When a tag is added to the team auto-linking section, it creates an automated link between any application/environment with that tag. Whenever an application or environment uses this tag, the application/environment is assigned to the team. To avoid confusion, we recommend you structure your tag as “pTeam: Team_name” (PlatformTeam) instead of using “Team: Team_name” as you are likely to use tags using Team for other various things. Follow these steps to add a tag to an application:
- To link an application or environment to the team head over to the risk explorer on the navigation bar and select the environment or application depending on what you are adding the team to.
- Select list view and click on the 3 dots on the right hand side of the application/environment you are adding users to and select edit on the pop up.
- Scroll down to the tags section and create a team tag, remembering to press add afterwards. You will now need to head back to the teams section and add the tag to the team in the auto-link section.
The tagging system allows for more efficient allocation of application/environments to teams as it means responsible users can be added to environments/applications and not be assigned to the whole team assuming the auto-link based on Team members is turned off. This allows for customization of which applications/environments are assigned to teams directly, compared to allocation through responsible users which can get complicated if users are part of multiple teams.
Manually adding Applications/Environments
The third way of assigning applications/environments to teams is to manually add apps/environments using the field in the Application/Environments section of the team. This is not recommended as it complicates the process rather than using the automated features, if new responsible users are added to the application/environment then the user will manually have to be added to the team.