Introduction:
The REST API functionality allows seamless import of scanner reports on vulnerabilities, enabling automated data integration and real-time updates. By using the API, users can efficiently upload and manage vulnerability data, streamlining the identification and remediation process to maintain robust application security.
- The API domain for Production is https://api.securityphoenix.cloud (not included in the paths below). If you are using a different environment to Production please contact your Phoenix team for the current API domain.
1. Response HTTP Code
Requests to the REST API will receive a response with one of the following status codes.
| Status Code | Verbs | Meaning | Suggested Action |
| 200 OK | GET | The request succeeded and the response body contains the result of the request in JSON format. | You can use the results of the request. |
| 201 Created | POST, PUT | The new item was created successfully. | |
| 204 No Content | DELETE | The item was successfully deleted; the response doesn’t contain any further information. | |
| 401 Unauthorized | All | The access token sent with the request is wrong or has expired. | Obtain a new access token and retry the request. |
| 404 Not Found | GET | The items accessed by the request doesn’t exist – or the API credentials don’t have access to it. | If the item ID was returned by another API endpoint, contact support with details. |
| 500 Internal Error | All | There was a problem executing your request. This is a rare response and should not happen normally; however, clients should be ready to handle it. | The problem might be transient or permanent. Clients are advised not to retry indefinitely. |
| 503 Service Unavailable | All | This error means that the API service is not reachable at this point in time, but it’s likely to become available shortly. | Clients are advised to retry, for a limited number of times, if that suits their flow. |
2. Authentication:
In order to access the REST API, users have to generate a set of API ID/Secret to authenticate against the API and obtain a temporary access token. The id/secret pair is only used to obtain access tokens; all other access to the API endpoints is authenticated using the temporary access tokens.
API Client ID and Secret requests to the API endpoints are not individually authenticated by those credentials. Instead, clients must use their ID and Secret to obtain time-limited access tokens – then they can use the access token to authenticate each API request
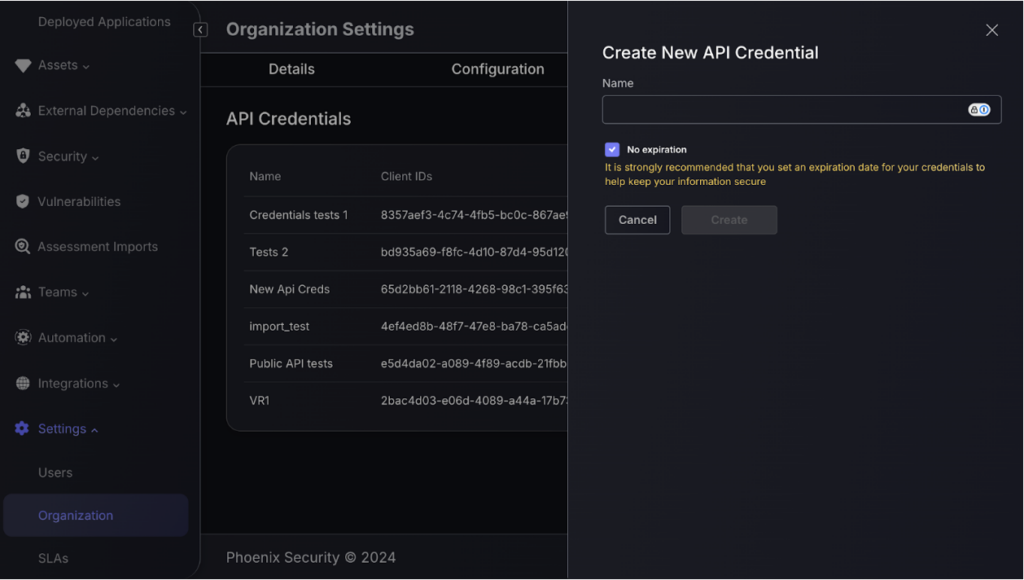
Create API Credentials
You can generate one or more sets of API credentials in the Phoenix Security platform (Settings > Organisation > API Access). Each of those sets can be managed independently so that potentially compromised credentials can be deactivated or removed from the platform.

When users create API credentials in the UI they will only be able to see and copy the API Secret at the time of creation. This secret is stored in an encrypted form and can’t be decrypted again. It’s important that users copy and safely store the secret at the time of creation.
The Client ID is a “username” that allows for identification of the secret that needs to be checked – it can be stored in clear text for easy lookup. The Client Secret should be stored in an encrypted (hashed) format so that it’s not possible to decrypt it but it’s possible to check if a clear text string matches the encrypted secret – like it works with password storage and check.
Obtain Access Token
Before clients can make requests to the API they need to obtain an Access Token. In order to do so, clients need to send a request to the tokens endpoint and include an HTTP Basic Auth header with the Client ID (username) and Secret (password). The required prompt is:
GET /v1/auth/access_token
Authorisation:
Basic <username = client ID; password = secret>
Responses:
- Incorrect credentials: 401 Unauthorised
- Correct credentials: 200 OK
{
“token”: string,
“expiry”: number // Time of token expiration as Unix timestamp
}
- token: An opaque (Bearer) token to be included in subsequent requests to the API.
- expiry: The time of expiration of the token in Unix timestamp format. Due to server time shift, clients should not rely on this timestamp alone, and should handle “token invalid or expired” responses as appropriate.
Using Access Tokens:
All requests to the Phoenix Security API – except for the /v1/access_token endpoint above – should include an access token as part of the request. This is done through an Authorisation/Bearer HTTP header.
Authorisation: Bearer <access token>
If the token is missing, it’s incorrect or it has expired, the request would return an “401 Unauthorised code”. The response body might, or might not, contain additional details.
3. Importing With Phoenix API
The API supports a whole range of scanner-native report formats. Users can import scanner vulnerability reports files from a wide variety of tools (see list below). The report import API described below can be used to import those reports through a process of translation into Phoenix internal format.
Import Scan Report
The API URL for report file import is:
POST /v1/import/assets/file/translate
This is an asynchronous request: this request uploads and enqueues that report for processing; the actual import takes place asynchronously in the background. This request uses a multi-part form request to send the parameters and the report file to the API, hence the following header is required:
Content-Type: multipart/form-data
Peramaters
- file: Required. The actual contents of the report file (multi-part form format)
- scanType: Required. The name of the scan type of the report – see the list of supported formats below.
- assessmentName: Required. The name of the assessment that this report is associated with. It provides context to successive imports of reports covering the same scope (assets).
- importType: Required. The type of import in the context of the assessment (“new” or “merge”)
- scanTarget: Optional. A string with the name/path of the target that was scanner in the report
- autoImport: Optional. Defaults to true. Indicates that the import should take place automatically after report pre-processing, if there are no errors. Only change if you want to separate the processing and import steps.
Response:
{ “id”: “uuid”,
“organizationId”: “uuid”,
“requestDetails”: {
“importType”: “new” | “merge”,
“scanType”: “string”,
“assessmentName”: “string”,
“scanTarget”: “string”,
“autoImport”: true
},
“status”: “string”,
“createdAt”: “date-time”,
“importedAt”: “date-time”,
“error”: “string”
}
- id: The UUID identifying the import request. It can be used to check status of the import.
- organizationId: The organisation ID where the import is taking place.
- requestDetails: The same details that were passed as parameters in the request.
- status: The status of the request (TRANSLATING, READY_FOR_IMPORT, IMPORTED, ERROR), see below.
- createdAt: Date-time of the creation of the import request.
- importedAt: Timestamp of the actual import of the report, after pro-processing.
- error: Description of any errors that might have taken place during processing and import.
Import Request Status
The response of the import request can contain one of the following status values:
- TRANSLATING: This means that the request has been saved in the platform and is waiting for or in the process of being parsed and translated into Phoenix’s internal format.
- READY_FOR_IMPORT: The pre-processing has completed successfully and the report can be imported. This is only relevant if autoImport is set to false in the request; otherwise the report is imported automatically after pre-processing (the default).
- IMPORTED: The pre-processing and import steps have completed successfully.
- ERROR: There was an error during the processing or import of the report. The error field would include additional details.
Check Import Status
Depending on the size of the report, the upload, pre-processing and import of the report can take some time. That’s why import requests through this API are asynchronous. Once a request is made, you can check the status of the import using the following API endpoint.
GET /v1/import/assets/file/translate/<request-id>
where the <request-id> is the “id” field received in thre response to the import request (see above).
Response
{
“id”: “uuid”,
“organizationId”: “uuid”,
“requestDetails”: {
“importType”: “new” | “merge”,
“scanType”: “string”,
“assessmentName”: “string”,
“scanTarget”: “string”,
“autoImport”: true
},
“status”: “string”,
“createdAt”: “date-time”,
“importedAt”: “date-time”,
“error”: “string”
}
These values have the same meaning as for the response to the import request above. Once the whole process is completed (in the background) the status field’s value would be “IMPORTED” and the importedAt field would contain the import timestamp.
Valid Report Types:
The list below covers all the report types that can be imported the Phoenix API. The name of the report as shown below (literally, the whole string, including parenthesys) is the value to be passed in the scanType parameter described above.
- Acunetix Scan
- Acunetix360 Scan
- Anchore Engine Scan
- Anchore Enterprise Policy Check
- Anchore Grype
- AnchoreCTL Policies Report
- AnchoreCTL Vuln Report
- AppSpider Scan
- Aqua Scan
- Arachni Scan
- AuditJS Scan
- AWS Prowler Scan
- AWS Prowler V3
- AWS Scout2 Scan
- AWS Security Finding Format (ASFF) Scan
- AWS Security Hub Scan
- Azure Security Center Recommendations Scan
- Bandit Scan
- Blackduck Component Risk
- Blackduck Hub Scan
- Brakeman Scan
- BugCrowd Scan
- Bundler-Audit Scan
- Burp Enterprise Scan
- Burp GraphQL API
- Burp REST API
- Burp Scan
- CargoAudit Scan
- Checkmarx OSA
- Checkmarx Scan
- Checkmarx Scan detailed
- Checkov Scan
- Clair Klar Scan
- Clair Scan
- Cloudsploit Scan
- Cobalt.io Scan
- Codechecker Report native
- Contrast Scan
- Coverity API
- Crashtest Security JSON File
- Crashtest Security XML File
- CredScan Scan
- CycloneDX Scan
- DawnScanner Scan
- Dependency Check Scan
- Dependency Track Finding Packaging Format (FPF) Export
- Detect-secrets Scan
- docker-bench-security Scan
- Dockle Scan
- DrHeader JSON Importer
- DSOP Scan
- Edgescan Scan
- ESLint Scan
- Fortify Scan
- Generic Findings Import
- Ggshield Scan
- Github Vulnerability Scan
- GitLab API Fuzzing Report Scan
- GitLab Container Scan
- GitLab DAST Report
- GitLab Dependency Scanning Report
- GitLab SAST Report
- GitLab Secret Detection Report
- Gitleaks Scan
- Gosec Scanner
- Govulncheck Scanner
- HackerOne Cases
- Hadolint Dockerfile check
- Harbor Vulnerability Scan
- Horusec Scan
- HuskyCI Report
- Hydra Scan
- IBM AppScan DAST
- Immuniweb Scan
- IntSights Report
- JFrog Xray API Summary Artifact Scan
- JFrog Xray Scan
- JFrog Xray Unified Scan
- KICS Scan
- Kiuwan Scan
- kube-bench Scan
- Meterian Scan
- Microfocus Webinspect Scan
- MobSF Scan
- Mobsfscan Scan
- Mozilla Observatory Scan
- Netsparker Scan
- NeuVector (compliance)
- NeuVector (REST)
- Nexpose Scan
- Nikto Scan
- Nmap Scan
- Node Security Platform Scan
- NPM Audit Scan
- Nuclei Scan
- Openscap Vulnerability Scan
- OpenVAS CSV
- ORT evaluated model Importer
- OssIndex Devaudit SCA Scan Importer
- Outpost24 Scan
- PHP Security Audit v2
- PHP Symfony Security Check
- pip-audit Scan
- PMD Scan
- Popeye Scan
- PWN SAST
- Qualys Infrastructure Scan (WebGUI XML)
- Qualys Scan
- Qualys Webapp Scan
- Retire.js Scan
- Risk Recon API Importer
- Rubocop Scan
- Rusty Hog Scan
- SARIF
- Scantist Scan
- Scout Suite Scan
- Semgrep JSON Report
- SKF Scan
- Snyk Scan
- Solar Appscreener Scan
- SonarQube API Import
- SonarQube Scan
- SonarQube Scan detailed
- Sonatype Application Scan
- SpotBugs Scan
- SSL Labs Scan
- Sslscan
- Sslyze Scan
- SSLyze Scan (JSON)
- StackHawk HawkScan
- Talisman Scan
- Tenable Scan
- Terrascan Scan
- Testssl Scan
- TFSec Scan
- Trivy Operator Scan
- Trivy Scan
- Trufflehog Scan
- Trufflehog3 Scan
- Trustwave Fusion API Scan
- Trustwave Scan (CSV)
- Twistlock Image Scan
- VCG Scan
- Veracode Scan
- Veracode SourceClear Scan
- Vulners
- Wapiti Scan
- Wazuh
- WFuzz JSON report
- Whispers Scan
- WhiteHat Sentinel
- Whitesource Scan
- Wpscan
- Xanitizer Scan
- Yarn Audit Scan
- ZAP Scan